background image


4


Using Your Drive 


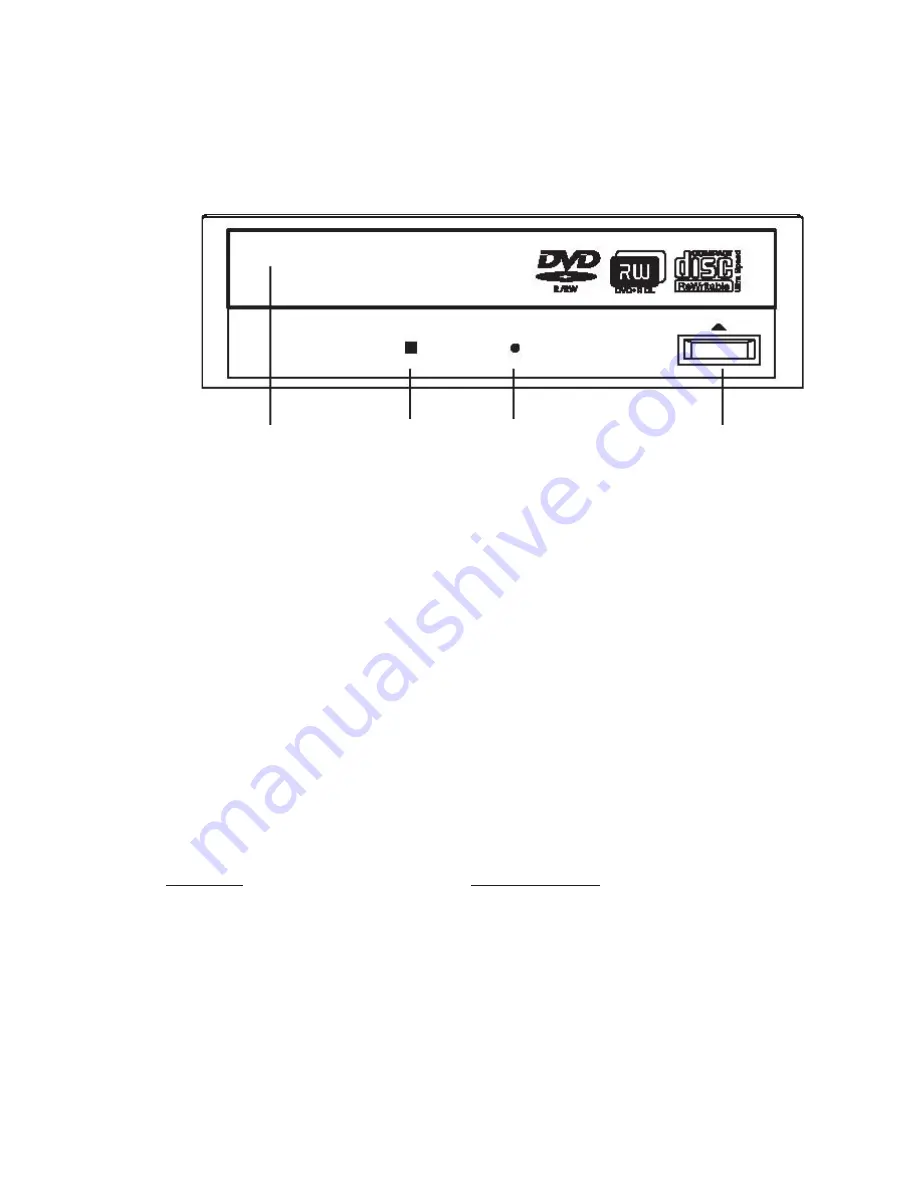
Busy Indicator LED: 

Lights up when reading or writing data. 

Eject Button: 

Press to load or unload a disc. 

Disc Tray: 

Open or close by pressing the eject button. Load discs into the tray with 

the label side facing up.   

Forced Eject Hole: 

If the eject button will not open the tray, insert a stiff rod such as 

a large paper clip into the hole and push in to eject the tray after the drive has been 

turned off and the disc has stopped spinning.


About DVD Media Types 

Media compatibility 

Disc Types 


      EPR200 

Supports


DVD+RW UDF format   


Read (by connecting to a PC) 

Write (from a DVR, EDR series) 


Eject Button 

Forced Eject 

Hole 

Busy Indicator 

LED 

Disc Tray 

Содержание EPR200

Страница 1: ...EPR200 Quick Installation Guide About this manual Before installing and using this unit please read this Manual carefully Date Feb 2006 ...

Страница 2: ...ntents Hardware System Requirements 3 Using Your Drive 4 About DVD Media Types 4 Product Specifications 5 Copying Video from DVR to EPR200 6 Viewing a Copied File 8 Disc Care 13 Troubleshooting Technical Support 14 ...

Страница 3: ...are System Requirements Minimum Intel Pentium III 800 MHz 256 MB memory Used for such things as data backup Recommended Intel Pentium 4 1 0 GHz 512 MB memory Highly recommended for DVD RW UDF format recording ...

Страница 4: ... up Forced Eject Hole If the eject button will not open the tray insert a stiff rod such as a large paper clip into the hole and push in to eject the tray after the drive has been turned off and the disc has stopped spinning About DVD Media Types Media compatibility Disc Types EPR200 Supports DVD RW UDF format Read by connecting to a PC Write from a DVR EDR series Eject Button Forced Eject Hole Bu...

Страница 5: ...tal out and line out at the back MPC compatible Interface IDE ATAPI Burst Transfer Rate PIO mode 4 Ultra DMA 33 Cache 2 MB Compatibility MPC level 3 Multi Read PC2001 Media Modes Supported DVD ROM DVD R DVD RW DVD R DVD R DL DVD RW DVD Video CD ROM CD ROM XA CD Audio CD Extra CD Text CD I Ready CD Bridge Photo CD VideoCD Hybrid CD Writing Methods DAO disc at once SAO session at once TAO track at o...

Страница 6: ...you to copy an image or video from the DVR Only EDR series DVR is supported Connect the USB connector into the USB slot on the front panel or back panel of the DVR to copy Back panel of EPR200 Front panel of DVR EDR series with USB slot USB connector ...

Страница 7: ...NO Disk number It is fixed as 01 in this series CAMERA NO Camera channel number You can select the video of camera you would like to copy START DATE TIME The start time of video you want to copy END DATE TIME The end time of video you want to copy DEVICE The media USB CF you wish to store the file Press SELECT to copy after setting up everything Press COPY key from the front panel of DVR and then ...

Страница 8: ...8 Viewing a Copied File First Step is to open the viewer that you copied from DVR Insert the DVD RW to your PC and choose the appropriate drive double click on EDRViewer exe to open the viewer ...

Страница 9: ...9 Once the viewer is opened click on Load file to load the archived EDR MPEG Files arv that you just copied from DVR Then click on Open and it will start to play the video automatically ...

Страница 10: ...lay the video again Press PAUSE button whenever you would like to pause the playing video During playback mode press PAUSE button to freeze the playing back picture Press STEP for reverse playback or press STEP for slow forward Or you can simply drag the slide bar to the position where you would like to view the image ...

Страница 11: ...11 The option CAPTURE allows you to capture a specific still image that you copied Press CAPTURE button and the instant image will be captured save the image as jpg file to your desired file location ...

Страница 12: ...enient way for most PC users Press Save to AVI button and the copied arv file will be converted and saved to your desired file location Note Viewer is only supported by Windows XP If you have other PC system than Windows XP you would need to setup a burning software first in order to download the viewer ...

Страница 13: ... proper storage cases when not in use Check for dirt dust or fingerprints on a disc s recording side before inserting into the unit Avoid touching or scratching the recording side of the disc Hold the disc only by the edges or by the center hole and one edge Do not affix stickers labels or tape to the disc Discard warped or cracked discs as they may cause damage to the drive Avoid unusually shaped...

Страница 14: ... the drive Verify the computer is powered up and running Drive is very loud when reading writing Make sure the drive is securely mounted to the computer s chassis Excessive vibration can be caused by loose or uneven mounting Still having problems Visit Everfocus website at http www everfocus com or call 886 2 26982334for assistance ...

Страница 15: ...stry Base Haidian District Beijing China TEL 86 10 62971096 FAX 86 10 62971432 www everfocus com cn Japan Office 1809 WBG MARIBU East 18F 2 6 Nakase Mihama ku Chiba city 261 7118 Japan TEL 81 43 212 8188 EverFocus P N MPR2G00100 Your EverFocus product is designed and manufactured with high quality materials and components which can be recycled and reused This symbol means that electrical and elect...

Отзывы: