EverFocus EHD300/N-2 Скачать руководство пользователя страница 6


5


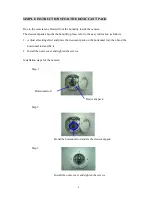
Connect the power supply cable (12VDC/24VAC), video output and alarm 

output to the proper connectors shown as Figure 5.     

The V. Phase adjustment screw is located on the termination board. The 

vertical phase may require adjustment to synchronize the vertical phase of the 

camera with other camera in the system when it is to be used in the line-lock 

sync mode.    Make the adjustment when the vertical phase of the camera does 

not match with other cameras.


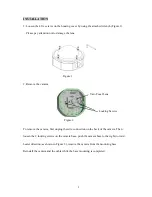
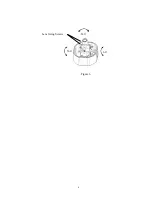
5. View Angle Adjustment 

The camera can be rotated 360

° 

horizontally, 140

°

 vertically and 60

° 

3’rd axis 

view angles (as shown in Figure 6).    Adjust the proper camera view angle as 

needed.    If a vari-focal lens is used, you may adjust the focus and zoom of 

the lens to bring the object in focus. Be sure to loosen the locking screws on 

the lens before you make adjustment.   

Video 

Alarm COM 

Micro Switch for Alarm trigger 

GND 

Alarm NO 

Alarm NC 

Power In 

(+)


V. Phase Adjustment VR 

Figure 5 

Power In

 (-)


Содержание EHD300/N-2

Страница 1: ...c fields Install the camera away from TV radio transmitter magnet electric motor transformer audio speakers since the magnetic fields generate from above devices will distort the video images 2 Never...

Страница 2: ...res It is perfect for all high profile crime prone applications such as building entrances retail stores and shopping malls EHD series are unquestionably one of the world s toughest cameras and is you...

Страница 3: ...emove the camera first unplug the wire connection on the back of the camera Then loosen the 2 locking screws on the camera base push the camera base to the right toward heater direction as shown in Fi...

Страница 4: ...Please make sure if the mounting is strengthened enough to support it if not please reinforce the mounting according to the environment Note The diameter of the screw hole is 4 7mm Conduit plug setsc...

Страница 5: ...tion The camera comes with a conduit plug pre installed in the PF 1 2 conduit entry on the side The screw can be removed and installed in the back conduit entry Loosen the conduit plug setscrew as sho...

Страница 6: ...e adjustment when the vertical phase of the camera does not match with other cameras 5 View Angle Adjustment The camera can be rotated 360 horizontally 140 vertically and 60 3 rd axis view angles as s...

Страница 7: ...6 Figure 6 Lens fixing Screws 140 360 60...

Страница 8: ...ng is ON FL Flickerless When picture flicker fiercely turn FL on then the camera will stabilize the speed of electronic shutter at 1 100 S NTSC or 1 120 S PAL automatically and reduce the flicker imme...

Страница 9: ...y instruction as follows 1 Adjust all settings first and place the desiccant pack on the horizontal rod then bend the horizontal rod and fix it 2 Install the outer cover and tighten the screws Install...

Страница 10: ...m F 1 6 Lens models and availability vary in different regions Auto Gain Control ON OFF Switch Flickerless ON OFF Switch Back Light Comp ON OFF Switch Auto White Balance Yes Gamma Correction 0 45 Vide...

Страница 11: ...10 CONTENT LIST Standard Accessories 1 Camera Unit 2 Operation Instruction this document 3 Accessory Pack 4 Waterproof Connector 5 Power Video Cable Optional Accessory 1 Wall Mount Bracket BA EHD...

Страница 12: ...r used electrical and electronic product Please help us to conserve the environment we live in Ihr EverFocus Produkt wurde entwickelt und hergestellt mit qualitativ hochwertigen Materialien und Kompon...

Отзывы: