EverFocus ED350 Скачать руководство пользователя страница 9


8


3.


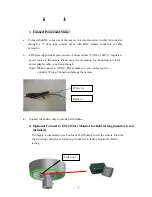
Connect Power and Video   
 

a.


Connect the BNC connector of the camera to a color monitor, or other video device 
through a 75 ohm type coaxial cable with BNC female connector at cable 
extension. 

b.


ED Series support dual power source. Connect either 12VDC or 24V

AC

 regulated   

        power source to the camera. Please use power extension for connecting to it if the   
    power adapter cable is not long enough.   
        Note!! When connect to 12VDC. Please make sure you connect power +,-       
          correctly. Wrong Connection damage the camera.  


c.


Connect the audio ( only for model with Audio)


4.


Optional Connect to EN220 Test Monitor for field testing (monitor is not 
included) 

      It is highly recommend to use Everfocus Test Monitor to test the camera. Find the   
      Video testing connector as following. Connect it to testing monitor for field       
      testing.  


.  


White (+)   

Black (-)   

Video out   

Содержание ED350

Страница 1: ...peakers since the magnetic fields generate from above devices will distort the video images 2 Never disassemble the camera nor put impurities in it Disassembly or impurities may result in trouble or f...

Страница 2: ...e vari focal auto iris lens for discreet surveillance or close up viewing and it features with iris LEVEL volume control for the best viewing quality ED300 is 520TVL dome camera equipped with simple D...

Страница 3: ...2 OPTIONALACCESSORIES BA ED Mounting L Bracket for ED Series Mini Dome Cameras EN220 5 6 inch LCD Test Monitor...

Страница 4: ...c Shutter 1 50 1 60 1 100 000 Lens Type Vari focal lens Auto Iris f 2 9 10mm f 3 8 9 5mm f 9 22mm Back Light Comp ON OFF Switch Auto Gain Control ON OFF Switch Flickerless ON OFF Switch Auto White Bal...

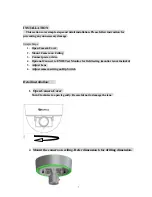
Страница 5: ...4 DIMENSIONS a b...

Страница 6: ...nd damage 2 Lens ED350 and ED300 come with vari focal lens ED200 ED230 330 comes with fixed lens This Vari Focal Lens allows users to adjust the Zoom and Focus manually 3 Base The camera unit is set i...

Страница 7: ...er input Use the connector to connect with 12VDC 24VAC power adaptor 7 Video Output BNC Connector Use the connector to connect with the video in connector of a monitor 8 DIP Switch and ALC Iris adjust...

Страница 8: ...ver 2 Mount Camera on Ceiling 3 Connect power video 4 Optional Connect to EN220 Test Monitor for field testing monitor is not included 5 Adjust Lens 6 Adjust camera setting on Dip Switch Detail instal...

Страница 9: ...power extension for connecting to it if the power adapter cable is not long enough Note When connect to 12VDC Please make sure you connect power correctly Wrong Connection damage the camera c Connect...

Страница 10: ...ired view range W side Zoom out The viewing range will be wider and the subject is smaller T side Zoom in The viewing range will be smaller and the subject is larger 2 Loosen the focus ring knob then...

Страница 11: ...Turn the IRIS ALC Adjustment VR counterclockwise for Average Metering Turn the IRIS ALC Adjustment VR clockwise for Peak Metering 2 IRIS Level Adjustment Brightness Level can be adjusted from the IRIS...

Страница 12: ...N The sensitivity increases automatically when the light is low AGC OFF A low noise picture is obtained under a low light condition The default setting is ON 5 Back Light Compensation Adjustment When...

Страница 13: ...com Your EverFocus product is designed and manufactured with high quality materials and components which can be recycled and reused This symbol means that electrical and electronic equipment at their...

Отзывы: