Страница 1: ...eXplora User s Manual...
Страница 2: ...portant safety feature To reduce the risk of electrical shock damage to your equipment or loss of data do not disable this feature Power Cord Set Requirements The power cord set appliance coupler flex...
Страница 3: ...does not operate normally when the operating instructions are followed Adjust only those controls that are covered by the operating instructions since improper adjustment of other controls may result...
Страница 4: ...tallation If this equipment does cause harmful interference to radio or television reception which can be determined by turning the equipment off and on the user is encouraged to try to correct the in...
Страница 5: ...Xplora PC 1 Placement Tips 2 Chapter 2 3 Unpacking the Box 3 Selecting a Site 3 Check List 3 Chapter 3 4 System Overview 4 Front Panel 4 Chapter 4 8 Computer Setup 8 System Recovery 12 Appendix 16 Sys...
Страница 6: ......
Страница 7: ...or that provides you with a personal computer which is both fast and powerful The Perfect System Whether gaming at home or making presentations at the office the eXplora is the perfect system for all...
Страница 8: ...rain To further reduce eye strain close your eyes and or refocus on something other than your computer screen at least twice an hour Most monitors come standard with a detachable tilt and swivel base...
Страница 9: ...n If the computer does not have enough ventilation internal components can become overheated and may become damaged When opening the box make sure not to damage it or the packing material as you may n...
Страница 10: ...ollows Figure 3 1 Note Depending on the model your computer s components may vary and look slightly different than those pictured 1 Optical Disc Drive Eject Button Press this button to eject a 5 25 in...
Страница 11: ...wer will switch off When lit the Power indicator shows blue to indicate that system power is on 5 USB Port 2 Up to two USB devices can be connected via these ports there are four additional ports at t...
Страница 12: ...system voltage 115 230 V appropriate to your area Connect the system unit s power cord to this socket ensure that it is connected to a stable AC power source CAUTION Before you plug in the AC power c...
Страница 13: ...is jack 9 PS 2 Mouse Connector Plug your PS 2 mouse into this connector 10 Parallel Port purple Parallel devices such as a printer or scanner can be connected to this port 11 RJ45 LAN Connector 1 For...
Страница 14: ...ox please follow the steps below to finish its setup Setting up the AC Input voltage selection There are two settings for the system to operate You may set the AC input voltage to 115V or 230V The AC...
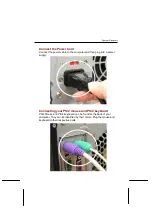
Страница 15: ...e to the computer and then plug into a power supply Connecting your PS 2 mouse and PS 2 keyboard PS 2 Mouse and P S2 keyboard can be found at the back of your computer They can be identified by their...
Страница 16: ...l 10 Connecting your monitor Monitor port can be found at the back of your computer It can be identified easily by color of navy blue Connecting the modem Connect your phone line in and your JR11 cabl...
Страница 17: ...hernet Connect the RJ45 cable to the LAN port to get access to internet Connecting Your Printer Connect the printer cable to the printer port at the back of your computer Please make sure that both pr...
Страница 18: ...system in case system crashes later R P is hidden User Partition shortened as U P in later paragraphs the U P stores the user data added later after end user gets the system When system boots user wil...
Страница 19: ...tays intact if the user clicks Next the non destructive recovery will take place see the following picture And after all recovery process have finished a CRC check request is prompted and user can mak...
Страница 20: ...if the user chooses Advance in the dialog in Selecting Recovery Options that means destructive mode both the U P will be destroyed So user should choose this option with caution Afterwards a CRC veri...
Страница 21: ...running After CRC check is done system reboots Technical Support Thanks for choosing EVEREX eXplora system To provide the best and fastest service to our customer you may visit our website to get fur...
Страница 22: ...tive Window Front I O USB 2 0 port x 2 Line Out jack x 1 Microphone In jack x 1 LED Indicators Power On Off Suspend activity indicator HDD activity indicator Back panel follow M B SPEC USB 2 0 port x...