background image

For installation of Memory Controller, refer to step 7a and skip this step.

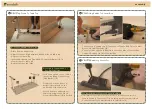
• Turn Health Coach Controller (7) upside down and place it onto 

  the underside of the table top
• Align Health Coach Controller to desired position and secure 

  with screws provided
• Plug in cable to Health Coach Controller, and connect 

  the other end of the cable to the Control Box (6).

Attaching Health Coach Controller

7

b

S T E P   S E V E N ( b ) :

For installation of Health Coach Controller Only

 • Attach Cable Clips (13) to underside of table top and secure loose 

   cables neatly via clips.

Loose Cable Management

S T E P   E I G H T :

8

• Make sure all cables are plugged in securely to Control Box (6)
• Organise loose cables and tuck them into Center Rail (4)
• Place Cable Tray (15) on top of Center Rail
• Adjust Cable Tray and align it to holes in Center Rail, then insert 

  and tighten four Pan Head Screws (M6x10mm) (10) to fasten and 

  secure Cable Tray. Repeat for the other end.

Attaching Cable Tray To Center Rail

9

S T E P   N I N E :

assembly

Flipping E Over

10

S T E P   T E N :

  Make sure to turn the table on the side with the Notch - do not 

  turn the table on the side with the controller installed

• Grab desk base and flip assembled table right side up
• Plug Power Cord (8) into 230v outlet to power the table

13

4

6

7

10

15

Содержание Max Frame

Страница 1: ...assembly manual Max Frame Max Frame Assembly Information ...

Страница 2: ...er Rail 4 2 Side Bracket 5 2 Control Box 6 1 Handset 7 1 Power Cord 8 1 Cable Extender 1 3m 1 9 M6x10mm Pan Head Screw 10 16 M6x14mm Pan Head Screw 11 12 M5x20mm Wood Screw 12 7 M6x12mm Pan Head Screw 14 4 13 Cable Clip 10 Cable Tray 1 15 M5x16mm Wood Screw 2 16 M4x12mm Phillips Head Machine Screw 2 17 Parts Qty Parts Qty Parts Qty Tools These parts can be found in the Health Coach Controller Kit ...

Страница 3: ...nd Use allen wrench provided to insert and tighten four Pan Head Screws M6X10mm 10 Repeat for other side Frame End 3b Attaching The Legs 2 S T E P T W O Center Rail Frame S T E P O N E Slide Frame Ends 3 apart to reveal Center Rail 4 Slide the Side Bracket 5 into Frame End 3a Insert and tighten two Pan Head Screws M6X14mm 11 on both sides of the Side Bracket Repeat for other side Frame End 3b Moun...

Страница 4: ...ller 7a S T E P S E V E N a For installation of Memory Controller Only Place frame on table top Adjust frame to align with pre drilled holes on table top Repeat for other side Insert and tighten two Pan Head Screws M6x12mm 14 to attach frame to table top Repeat for the other side Attaching Frame To Table Top 5 S T E P F I V E A For Pre Drilled Table Tops B For Table Tops without Pre Drilled Holes ...

Страница 5: ...eatly via clips Loose Cable Management S T E P E I G H T 8 Make sure all cables are plugged in securely to Control Box 6 Organise loose cables and tuck them into Center Rail 4 Place Cable Tray 15 on top of Center Rail Adjust Cable Tray and align it to holes in Center Rail then insert and tighten four Pan Head Screws M6x10mm 10 to fasten and secure Cable Tray Repeat for the other end Attaching Cabl...

Страница 6: ...ight is adjustable so that it can be positioned at the most ergonomically suitable height Any other use is at the user s risk Under no circumstances does EverDesk accept warranty claims or liability claims for damages caused from improper use or handling of the desk frame Keep Children away from electric height adjustable desks control units and handsets There is a risk of injury and electric shoc...

Страница 7: ...ontroller anti clockwise or clockwise to decrease or increase the height value respectively Finish the reset process by turning the controller anti clockwise and holding it until the desk lowers further slightly rises and stops The new height value is saved and the desk is ready to use Manually Change Height Value Troubleshooting Health Coach Settings Ensure that the desk it at its lowest height b...

Отзывы: