Terraced Double Bed Extension - 68" L x 21" W x 14" & 21" H
Assembly 1
8
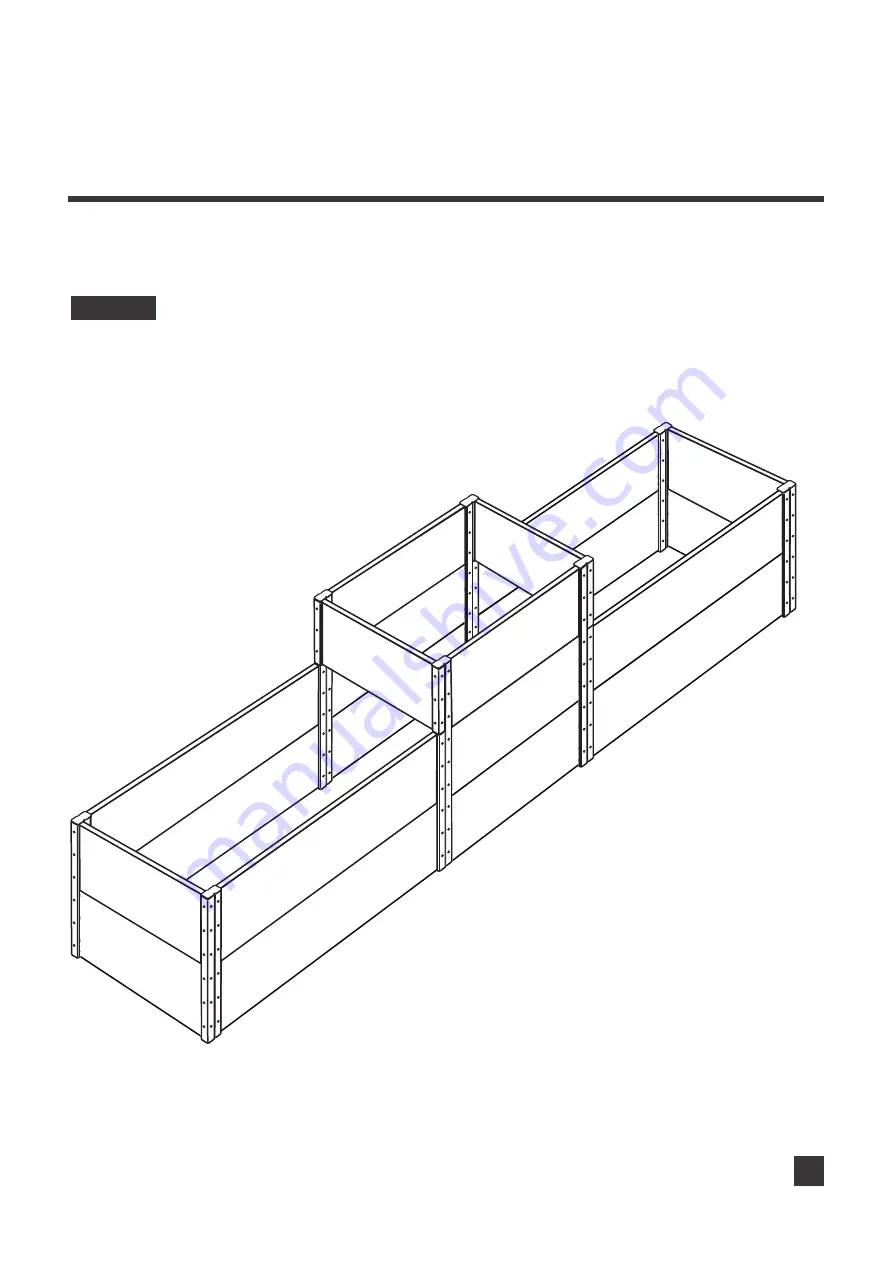
IMAGE 6
Now you get a Low-Hi-Low triple garden bed, as shown in Image 6.
Note: Store the additional caps for future use.
Страница 1: ...sion Installation Guide Thank You You re only a few steps away from your perfect vegetable garden or elevated planter We hope you enjoy Before You Start Please read the instructions carefully to famil...
Страница 2: ...raced Double Bed Extension 68 L x 21 W x 14 21 H Parts List 2 Post Cap X 4 2pc replacement Long Board X 4 1140mm Short Board X 8 540mm Top Bottom Top Bottom Left Joiner Corner X 2 Right Joiner Corner...
Страница 3: ...eds in this Hi Lo version Every extension can add a pair of Hi Lo beds additionally to an unlimited length as long as your land can take For Low Hi Low Triple bed please follow steps of Assembly 1 fro...
Страница 4: ...eft joiner corner and left corner post 360mm on one long board from above as shown in Image 2 Note The boards need to be placed in the inward U shape of the brackets Image 2 Long Board Left Joiner Cor...
Страница 5: ...and corner posts 360mm on long boards from above as shown in Image 3 Long Board x 2 Long Board x 2 Long Board x 2 Long Board x 2 Left Joiner Corner Right Joiner Corner Right Joiner Corner Left Corner...
Страница 6: ...ble Bed Extension 68 L x 21 W x 14 21 H Assembly 1 6 IMAGE 4 Slide all the short boards to form the bed as shown in Image 4 Short Board x 2 Short Board x 2 Short Board Short Board x 3 Short Board x 3...
Страница 7: ...IMAGE 5 If necessary use your rubber mallet to ensure the boards are tightly in place Cover the brackets with the 8 end caps as shown in Image 5 Rubber Mallet Post Cap X 1 Post Cap X 1 Post Cap X 1 P...
Страница 8: ...Terraced Double Bed Extension 68 L x 21 W x 14 21 H Assembly 1 8 IMAGE 6 Now you get a Low Hi Low triple garden bed as shown in Image 6 Note Store the additional caps for future use...
Страница 9: ...g sure each corner post is oriented correctly Reference image 7 Left Corner Post 540mm From R212421 Left Corner Post 540mm From R212421 Right Corner Post 540mm From R212421 Right Corner Post 540mm Fro...
Страница 10: ...8 Fix the right joiner corner and left joiner corner on one long board from above as shown in Image 8 Note The boards need to be placed in the inward U shape of the brackets Image 8 Right Joiner Corn...
Страница 11: ...her two joiner corners on long boards from above as shown in Image 9 Long Board x 2 Long Board x 2 Right Joiner Corner Left Joiner Corner Left Joiner Corner Left Corner Post 540mm From R212421 Left Co...
Страница 12: ...68 L x 21 W x 14 21 H Assembly 2 12 IMAGE 10 Slide all the short boards to form the bed as shown in Image 10 Short Board x 3 Short Board x 3 Short Board x 3 Short Board x 3 Short Board x 3 Short Boar...
Страница 13: ...ly 2 13 IMAGE 11 If necessary use your rubber mallet to ensure the boards are tightly in place Cover the brackets with the 8 end caps as shown in Image 11 Post Cap X 1 Post Cap X 1 Post Cap X 1 Post C...
Страница 14: ...Terraced Double Bed Extension 68 L x 21 W x 14 21 H Assembly 2 14 IMAGE 12 Now you get a Hi Low Hi triple garden bed as shown in Image 12 Note Store the additional caps for future use...
Страница 15: ...misalignment of the Corner Posts as shown in Image 13 and Image 14 which may result in difficulty of sliding boards into the brackets Please adjust them to the right position so that they are paralle...
Страница 16: ...Distributed by Dynaforge Trading LLC St Paul MN55101 Email service everbloom garden com Everbloom Garden com US Patent Pending Subscribe at www everbloom garden com for extra savings and upgrading inf...