A
A
A
B
B
A
1.
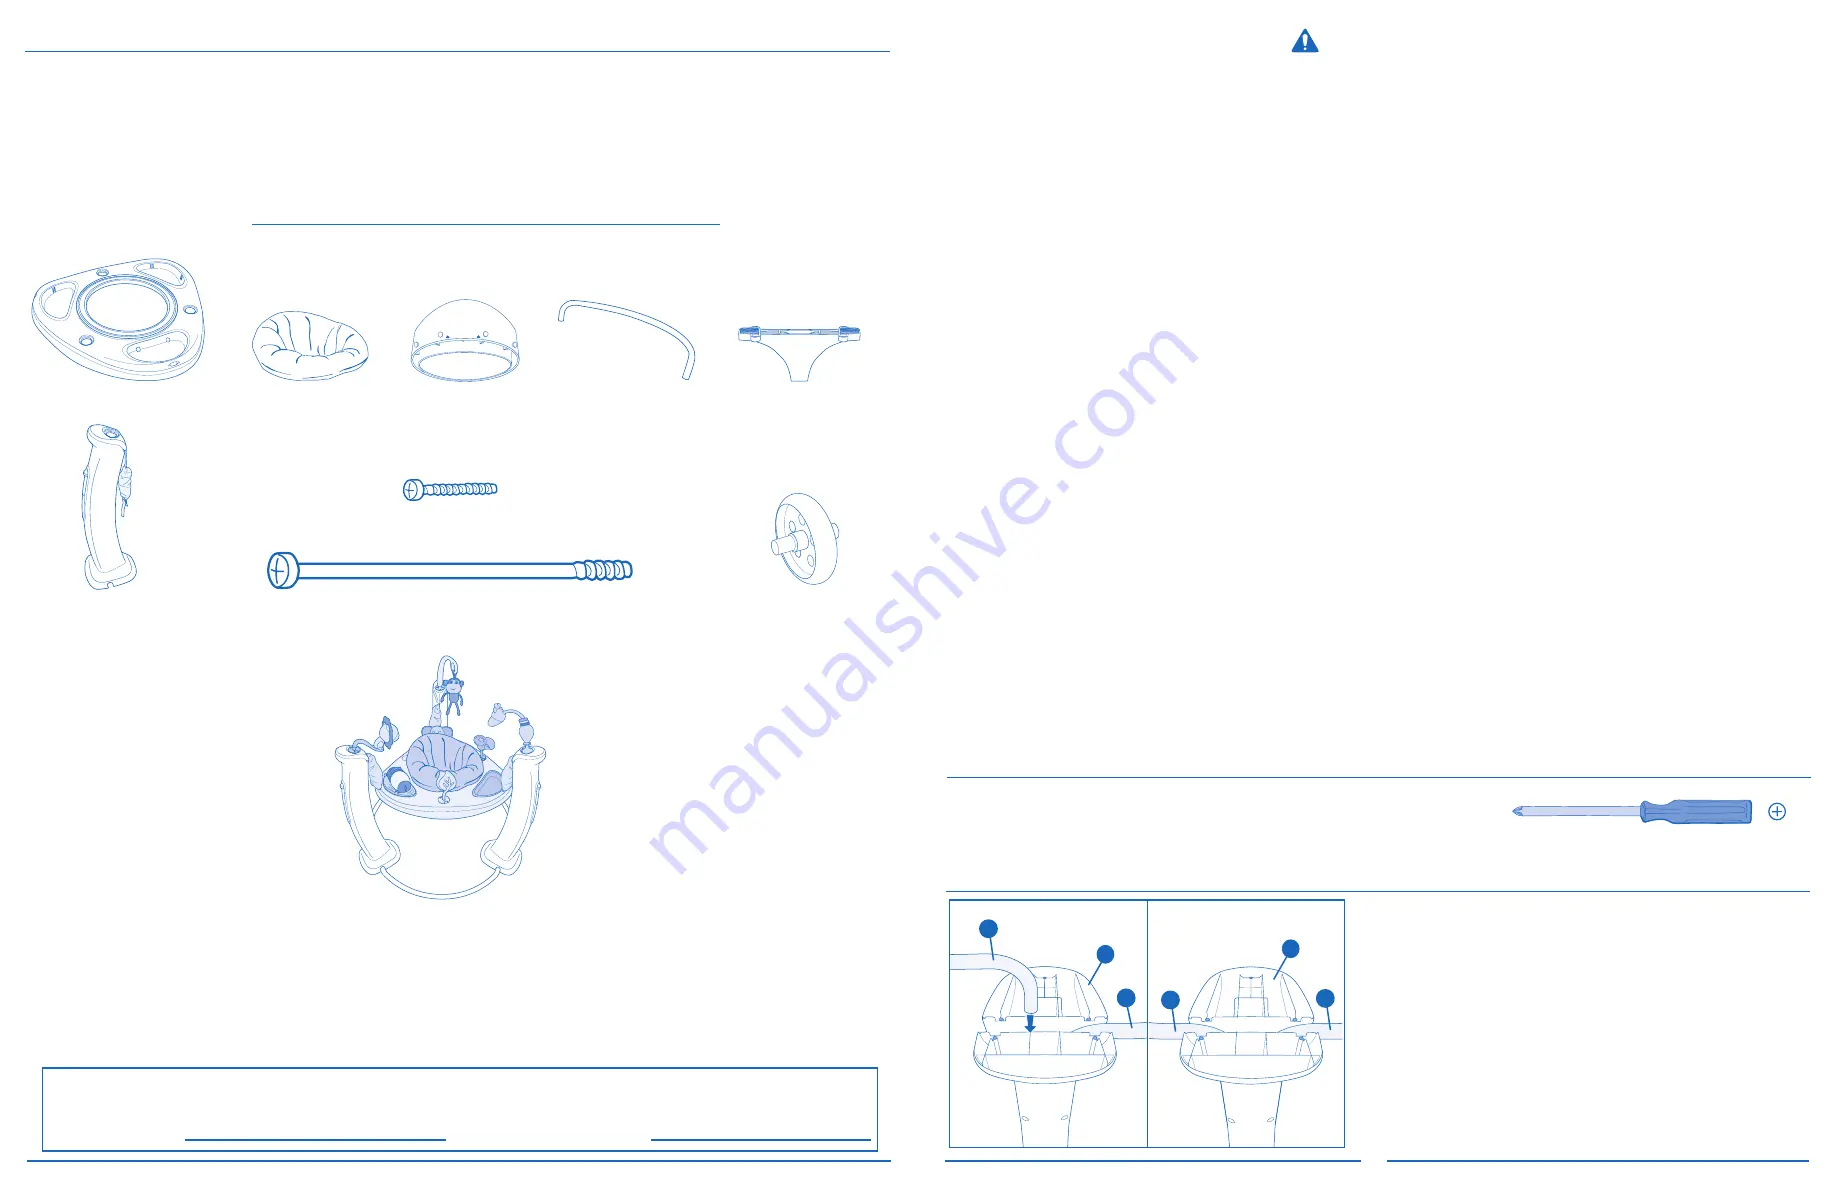
Locate two stabilizer tubes
A
and one pylon
B
.
Turn the pylon
B
upside down and insert one end of each
stabilizer tube
A
into the bottom of the pylon
B
, as shown.
Make sure both stabilizer tubes are fully inserted into the
bottom of the pylon.
1
(1) Hardware Kit Bag
1 Instructions
3 8-16 x 75 mm Screws
12 8-16 x 18 mm Screws
(1) Toy Kit Bag
6 Bags of Toys (including small tray)
WARNING
Warnings ...............................................................................................................................................................................
1
Assembling the ExerSaucer .....................................................................................................................................................
1
Adjusting the Height ..............................................................................................................................................................
5
Attaching the Toys ..................................................................................................................................................................
5
Care and Maintenance ..........................................................................................................................................................
6
Limited Warranty ....................................................................................................................................................................
7
Table of Contents
Tray
Seat Pad
Wheel (4)
Pylon (3)
Seat Ring
Stabilizer Tube (3)
Assembling the ExerSaucer
8-16 X 75 mm Screw (3)
8-16 X 18 mm Screw (12)
Foot (3)
READ AND FOLLOW ALL WARNINGS AND INSTRUCTIONS! FAILURE TO DO SO COULD RESULT IN
SERIOUS INJURY OR DEATH!
s
NEVER
leave child unattended.
ALWAYS
keep child in view while in the ExerSaucer®.
s2EADALLINSTRUCTIONSBEFOREASSEMBLYANDUSEOFTHE
ExerSaucer.
s+EEPINSTRUCTIONSFORFUTUREUSE
s +EEPCHILDRENAWAYFROMUNASSEMBLEDPRODUCT
s
Adult assembly required.
Take care when unpacking and assembling; contains small parts and some items with sharp edges.
s4OPREVENTAPOSSIBLECHOKINGHAZARDREMOVEANDIMMEDIATELYDISCARDPACKINGMATERIALBEFOREUSINGTHISPRODUCT
s
STRINGS CAN CAUSE STRANGULATION!
-
DO NOT
place the ExerSaucer
ANYWHERENEARCORDSFROMWINDOWBLINDSDRAPERIESPHONEETC
-
DO NOT
place items with a string around your child’s neck such as hood strings or pacifier cords.
-
DO NOT
suspend strings over product or attach strings to toys.
s
NEVER
use ExerSaucer near stairs or steps.
s
NEVER
use ExerSaucer
NEARRANGESRADIATORSSPACEHEATERSANDFIREPLACESORANYOTHERHOTSURFACES
s
NEVER
use ExerSaucer in or near swimming pools or other bodies of water.
s
DO NOT
fill the ExerSaucer tray with water.
s
DO NOT
adjust height while baby is sitting in ExerSaucer.
s
DO NOT
use the ExerSaucer
IFITISDAMAGEDBROKENORISMISSINGANYPARTS
s
NEVER
use as a sled.
s$/./4
allow child to sleep in ExerSaucer.
s$/./4
spin baby in seat. Only permit baby to rotate the seat.
s &ORUSEBYCHILDRENWHOAREATLEASTMONTHSOLD
AND
can hold up their head and neck unassisted.
s
FALL HAZARD!
Stop using ExerSaucer when your child reaches any of the following developmental stages:
- Can walk;
- Is over 30” (76 cm) tall;
- Can stand flat-footed in the ExerSaucer in the highest adjustment level;
- Can climb out of the product.
s
Allow only the baby’s toes to touch the base.
DO NOT
allow the baby to stand flat-footed on the base.
s$/./4
use or store this product outdoors.
s 4OAVOIDTIPOVERPLACEPRODUCTONFLATLEVELFLOOR
s$/./4
mix old and new batteries.
s$/./4
mix alkaline and standard (carbon-zinc) batteries. Use only batteries of the same or equivalent type.
s
DO NOT
DISPOSEOFBATTERIESINFIREASBATTERIESMAYEXPLODEORLEAK
s
DO NOT
use rechargeable batteries.
s
DO NOT
recharge non-rechargeable batteries.
s0ROMPTLYREMOVEOLDBATTERIESFROMTHETOY
s 2EMOVEBATTERIESBEFORESTORINGUNITFORAPROLONGEDPERIODOFTIME
Registration Information
0LEASEREGISTERTHISPRODUCTSOWECANREACHYOUIFTHEREISASAFETYALERTORRECALL7EWILLNOTSELLRENTORSHAREYOURPERSONAL
INFORMATION4OREGISTERYOURPRODUCTPLEASECOMPLETEANDMAILTHECARDTHATCAMEWITHITORVISITOURONLINEREGISTRATIONAT
http://plweb.evenflo.com/productreg.aspx
For future reference, record the Model Number and Date of Manufacture below.
Model Number:
Date of Manufacture:
Phillips Screwdriver
CAUTION:
Tighten all screws until snug; do not overtighten. Use only screws provided.
DO NOT USE POWER TOOLS.
Tools Required


