background image

99

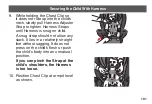
5. 

Fasten buckle by inserting one 

tongue at a time into the Harness 

Buckle listening for an audible 

CLICK

. Pull up firmly on both 

Buckle Tongues to make sure they 

are securely latched.

CHECK

 that the Buckle functions 

properly and is kept free of dirt 

and debris.
Make sure Harness Straps are not 

twisted.

6. 

Fasten Chest Clip by snapping 

both sides together. Listen for a 

CLICK

.

Securing the Child With Harness

 buckle

storage

PLACE


AT ARMPIT

CLICK! 

CLICK! 

Содержание Revolve 360

Страница 1: ...eat Owner s Manual Keep instructions for future use 2020 Evenflo Company Inc 25701580 10 20 To reduce the risk of serious injury or death read this owner s manual prior to installing and using this ch...

Страница 2: ......

Страница 3: ...greatly reduce the risk of serious injury or death to your child from a crash Do not be misled by the commonly used term safety seat no restraint system can prevent all injuries in all crashes Many pr...

Страница 4: ...traint Features 38 Seat Rotation 42 Adjustable Buckle Strap 44 Height Adjustable Headrest 45 Cup Holders 46 Body Pillow 47 Head Pillow 48 Tether Strap 49 Harness Strap Pads and Harness Covers 50 Lower...

Страница 5: ...75 Removing LATCH UAS 83 Booster Mode Forward Facing Only 85 Converting to Booster Mode 85 Installing the Booster 90 GENERAL INFORMATION Securing the Child with Harness 95 Securing the Child in Boost...

Страница 6: ...ation about airbag safety LATCH UAS Symbol Alerts you to important information about LATCH UAS safety Tether Anchor Symbol Alerts you to important information about Tether Anchor safety Aircraft Symbo...

Страница 7: ...rican Academy of Pediatrics AAP recommends keeping children REAR FACING for as long as possible until they reach the maximum height or weight for their child restraint in REAR FACING orientation Addit...

Страница 8: ...eterm and low birth weight infants are transported safely the guidelines published by the American Academy of Pediatrics AAP in Pediatrics 2009 123 1424 1429 reaffirmed June 2018 must be followed Pret...

Страница 9: ...hicle The hospital staff will check for any breathing difficulties or heart rate problems Your child s pediatrician will let you know if there are any special considerations for travel The number of t...

Страница 10: ...l Harness straps must be adjusted to be AT or JUST BELOW child s shoulders IMPORTANT Once your child exceeds any of the size requirements above they MUST use this child restraint in the FORWARD FACING...

Страница 11: ...er strap in rear fa cin g installation Ba ll must be in prop er zone for child siz e Ve hicle MUS T be on level grou nd 258 090 42 10 2 0 9 1 18 kg 20 40 lbs Do not install by this method for a child...

Страница 12: ...justed to be AT or JUST ABOVE child s shoulders IMPORTANT Once your child exceeds any of the size requirements for FORWARD FACING use above you MUST discontinue use of this child restraint with its in...

Страница 13: ...13 Child Requirements Forward Facing Mode When used FORWARD FACING make sure the child restraint is in the UPRIGHT position as shown...

Страница 14: ...ps of the child s ears are at or below the top of the booster seat headrest At least 4 years old IMPORTANT Once your child exceeds any of the size requirements above for BOOSTER mode you MUST disconti...

Страница 15: ...e middle of the shoulder If the child leans out or moves the belt behind the back or places it under the arm it will not provide the intended restraint You should consider using a booster seat if the...

Страница 16: ...icle equipped with an air bag unless the air bag has been deactivated Interaction between a REAR FACING restraint and air bags may cause serious injury or death Air bags may cause serious injury or de...

Страница 17: ...002 model year DO NOT use this restraint in a vehicle seating position equipped with a side air bag unless authorized by the vehicle manufacturer Model year 2002 and newer vehicles Refer to your vehic...

Страница 18: ...a sudden stop or crash Serious injury or death may result These instructions and the instructions in your vehicle owner s manual must be followed carefully If there is a conflict between the two the v...

Страница 19: ...used if available Some child restraints do not fit all vehicles or all seating locations There are many thousands of combinations of vehicle makes models child restraint configurations vehicle seat be...

Страница 20: ...e ONLY use this child restraint on vehicle seats with backs that lock into place VEHICLE TYPES IN WHICH THE RESTRAINT SYSTEM CANNOT BE USED This child restraint is not to be used in vehicles that do n...

Страница 21: ...t position The vehicle seat back that the child faces must be fully padded and free of any hard objects IMPORTANT Infants may have difficulty breathing when in an upright seated position Make sure the...

Страница 22: ...t where the child restraint is to be installed so the back of the child restraint rests against the vehicle seat back The headrest on the vehicle seat in front of the child should be put in its lowest...

Страница 23: ...of the booster seat headrest The shoulder belt MUST cross midway between the child s shoulder and neck The shoulder belt MUST NOT cross the child s neck or fall off the child s shoulder If you cannot...

Страница 24: ...installing the car seat in one of the harness modes DO NOT use this child restraint if it moves more than 2 5 cm 1 in side to side or front to back at the belt path in use Serious injury or death may...

Страница 25: ...T use this child restraint in a vehicle equipped with lap belts that only lock during a sudden stop or crash Emergency Locking Retractor ELR You must use a seating location with a lap shoulder belt or...

Страница 26: ...llow the vehicle seat belt release button to touch the child restraint Accidental contact may cause the seat belt to release If necessary turn the seat belt release button away from the child restrain...

Страница 27: ...on child restraint installation Lap Belt with Locking Latch Plate Not for use in Booster mode Once buckled the vehicle belt is tightened by pulling on the free end of the strap until the belt is tight...

Страница 28: ...ctor The latch plate slides freely along the lap shoulder belt Vehicle belts with sliding latch plates are typically locked at the shoulder belt retractor by buckling the belt and pulling all of the w...

Страница 29: ...l year 1996 or newer it likely has a vehicle belt system that can be locked when tightened and will not require use of a Locking Clip Consult your vehicle owner s manual before installing a locking cl...

Страница 30: ...Lower Anchors or bars and a Top Tether anchor that are built into your vehicle in vehicles built after September 1 2002 Your vehicle owner s manual may also refer to this system as ISOFIX or Lower Un...

Страница 31: ...quirements of Federal Safety Standard FMVSS 213 and Canadian Safety Standard CMVSS 213 with either installation method Either method is safe for your child when installed correctly When using either m...

Страница 32: ...rding installation of the child restraint and LATCH UAS If there is a discrepancy follow your vehicle owner s manual ONLY use for securing child restraint to vehicle lower anchor bars NEVER attach two...

Страница 33: ...stallation If you cannot tightly secure the child restraint try again or move it to another location Tether Strap Warnings ALWAYS USE A TETHER STRAP FOR HARNESS INSTALLATION To avoid a strangulation h...

Страница 34: ...the child s head falls forward increasing the risk of serious injury or death In hot or sunny weather ALWAYS check the areas of the child restraint that may contact your child e g buckle buckle tongue...

Страница 35: ...ed for use only in passenger and multi purpose passenger motor vehicles buses and trucks equipped with either lap belts only or lap shoulder belt systems When used WITHOUT the internal harness system...

Страница 36: ...venflo Company Inc 1801 Commerce Dr Piqua OH 45356 or call 1 800 233 2229 or register online at www evenflo com registercarseat For recall information call the U S Government s Vehicle Safety Hotline...

Страница 37: ...with Area Code Num de t l phone et indicatif r gional 8 Date of Purchase Date d achat ATTENTION This card may be important to the safety of your child Please complete using blue or black ink and mail...

Страница 38: ...Buckle 6 Buckle Strap 7 Harness Release Button under flap 8 Harness Adjustment Strap 9 Seat Removal Instructions under flap see pgs 55 56 10 Shoulder Belt Guide Booster Only 11 Harness Strap Pads and...

Страница 39: ...Handles one each side 17 Recline Adjuster see pg 41 18 Level Indicator see pg 40 19 Rotation Lock Indicator 20 Lower Anchor Assembly 21 Headrest Height Adjustment Handle 22 Tether Strap stored see pg...

Страница 40: ...y hombro 25809059 10 20 Cierre y bloquear 1 9 9kg 4 20 lbs Lower Connectors UAS Lap Shoulder Belt Lap Belt Always use tether strap in rear facing installation Ball must be in proper zone for child siz...

Страница 41: ...41 Child Restraint Features Tether Strap Tether Strap User Guide Storage and Recline Adjuster User Guide Storage Recline Adjuster Stored Unstored...

Страница 42: ...tation Lock Indicator will be GREEN NOTE The Revolve360 can only be rotated into FORWARD FACING mode in the most reclined position RE AR FA CING LE VE L INDICA TO R Be ad mu st be loc ate d wit hin ap...

Страница 43: ...tion Lock Indicator is GREEN 2 For REAR FACING mode ONLY also make sure that the Level Indicator is in correct zone for child size White Zone 1 9 9 kg 4 20 lbs Black Zone 9 1 18 kg 20 40 lbs 1 9 9k g...

Страница 44: ...NEVER underneath your child s bottom 1 Remove Body Pillow if used 2 Pull the Seat Cover forward Slide the Buckle Strap through the pad opening 3 Grasp the bottom of the Buckle Strap and twist it to al...

Страница 45: ...ne of the 14 locked positions For REAR FACING use adjust Headrest so the harness straps are AT OR JUST BELOW the child s shoulders For FORWARD FACING use adjust Headrest so the harness straps are AT o...

Страница 46: ...e interior of the seat shell and pull up to release To re install 1 Align tabs on base of cup holder with slots on Child Restraint and push down into slots 2 Rotate cup holder toward the outside of th...

Страница 47: ...the lower headrest harness positions make sure the bottom of the headrest flap is folded behind the body pillow flap as shown When used with a smaller child the body pillow side wings can be folded u...

Страница 48: ...into the slots on the headrest and attach hook and loop fasteners to back of headrest IMPORTANT Infants may have difficulty breathing when in an upright seated position Using additional padding or pil...

Страница 49: ...your vehicle Owner s Manual for exact locations anchor identification and requirements Refer to the appropriate vehicle installation method for Tether installation and storage instructions REAR FA CI...

Страница 50: ...this Child Restaint are equipped with Harness Strap Pads that are permanently attached Harness Covers are optional for added comfort and removeable for cleaning To install Harness Cover secure hook an...

Страница 51: ...Connectors Follow the instructions in this section to properly install the Lower Anchor Connectors on your child restraint Removing the Lower Anchor Connector To remove the Lower Anchor Connector fro...

Страница 52: ...l to lengthen the strap Storing the Lower Anchor Connector Lower Anchor Connectors MUST be stored when not in use Loose Connectors could seriously injure vehicle occupants in the event of a crash To s...

Страница 53: ...t to remove Insert seat onto base Align arrows Tire de la palanca para girar el asiento Alinee las echas Levante para quitar Alinee las echas Inserte el asiento en la base Quitar el asiento de la base...

Страница 54: ...estraint from the Base To remove the Child Restraint from the Base 1 Lift up on one of the two Rotation Levers at either side of the Headrest and rotate the seat shell until the arrow on the underside...

Страница 55: ...Installing Lap Shoulder Belt Preferred Method ALWAYS USE A TETHER STRAP FOR HARNESS INSTALLATION 1 BEFORE installing Child Restraint make sure vehicle is on level ground 2 Before placing Child Restrai...

Страница 56: ...ng Lap Shoulder Belt Preferred Method 3 Remove Tether from tether storage position under the Base and place the Base in an approved rear vehicle seating location 4 Locate the Tether Anchor in your veh...

Страница 57: ...ze handle on LockStrong belt tensioner until lock indicator turns RED then lift up on belt tensioner to allow access to the belt path 6 Route lap shoulder belt through belt path opening on window side...

Страница 58: ...fully close the LockStrong The lock indicator will turn GREEN when fully closed NOTE If belt tensioner does not fully close lock indicator still RED open the LockStrong and try loosening the lap shou...

Страница 59: ...revent proper operation of the Child Restraint Some vehicle lap shoulder belts have a plastic button or extra fold of webbing on the belt Do not allow these to interfere with belt routing through Lock...

Страница 60: ...at the Belt Path on the Child Restraint If Base moves more than 2 5 cm 1 in open LockStrong tension vehicle belt a little more and try again If Base still moves too much you may need to try a differe...

Страница 61: ...p shoulder belt NOTE Refer to your vehicle Owner s Manual for information 11 Pull the Tether Adjuster Strap to tighten 12 Install Seat Shell to Base pg 53 move seat shell to the appropriate REAR FACIN...

Страница 62: ...Always use tether strap in rear facing installation Ball must be in proper zone for child size Vehicle MUST be on level ground 25809042 10 20 9 1 18kg 20 40 lbs Do not install by this method for a ch...

Страница 63: ...63 Removing Lap Shoulder Belt Lap Shoulder Belt Rear Facing and Forward Facing 1 Remove Seat Shell from Base see pg 54 2 Unbuckle the lap shoulder belt and open the Lockstrong...

Страница 64: ...ap Shoulder Belt 3 Remove lap shoulder belt from belt path and close Lockstrong 4 Disconnect tether a Press Adjuster Release Button b Lengthen the Tether Strap c Unhook the Tether Strap from the Tethe...

Страница 65: ...ard Facing Installing Lap Belt ALWAYS USE A TETHER STRAP FOR HARNESS INSTALLATION 1 BEFORE installing Child Restraint make sure vehicle is on level ground 2 Before placing Child Restraint in vehicle r...

Страница 66: ...ng Installing Lap Belt 3 Remove tether from tether storage position under the Base and place the Base in an approved rear vehicle seating location 4 Locate the Tether Anchor in your vehicle and loosel...

Страница 67: ...on LockStrong belt tensioner until lock indicator turns RED then lift up on belt tensioner to allow access to the belt path 6 Route lap belt through belt path opening on window side of base and feed t...

Страница 68: ...cing Installing Lap Belt 7 Secure lap belt under tabs in blue belt path guide then pull up on free end of belt to remove slack making sure not to overtighten 8 After tightening Lap Belt secure the fre...

Страница 69: ...Facing Installing Lap Belt 9 Apply pressure to fully close the LockStrong The lock indicator will turn GREEN when fully closed NOTE If belt tensioner does not fully close lock indicator still RED open...

Страница 70: ...ure Base is installed tightly Base should not move more than 2 5 cm 1 in side to side or front to back at the Belt Path on the Child Restraint If Base moves more than 2 5 cm 1 in open LockStrong tensi...

Страница 71: ...Tether Adjuster Strap to tighten 12 Install Seat Shell to Base pg 53 move seat shell to the appropriate REAR FACING or FORWARD FACING position based on the child s size see pgs 10 and 12 and lock int...

Страница 72: ...ther strap in rear facing installation Ball must be in proper zone for child size Vehicle MUST be on level ground 25809042 10 20 9 1 18kg 20 40 lbs Do not install by this method for a child weighing m...

Страница 73: ...73 Lap Belt Only Rear Facing and Forward Facing Removing Lap Belt 1 Remove Seat Shell from Base see pg 54 2 Unbuckle the lap belt and open the Lockstrong...

Страница 74: ...oving Lap Belt 3 Remove lap belt from belt path and close Lockstrong 4 Disconnect tether a Press Adjuster Release Button b Lengthen the Tether Strap c Unhook the Tether Strap from the Tether Anchor d...

Страница 75: ...NSTALLATION 1 BEFORE installing Child Restraint make sure vehicle is on level ground WARNING DEATH or SERIOUS INJURY can occur REAR FACING DO NOT install by this method for a child weighing more than...

Страница 76: ...acing Installing LATCH UAS 2 Before placing Child Restraint in vehicle remove Seat Shell from Base see pg 54 3 Remove LATCH UAS anchors from storage locations on back side of base Remove each connecto...

Страница 77: ...Installing LATCH UAS 4 Remove tether from tether storage position under the Base and place the Base in an approved rear vehicle seating location 5 Locate the Tether Anchor in your vehicle and loosely...

Страница 78: ...er until lock indicator turns RED then lift up on belt tensioner to allow access to the belt path 7 Attach LATCH UAS Connectors to vehicle Lower Anchor Bars Connectors will make an audible CLICK when...

Страница 79: ...ockStrong The lock indicator will turn GREEN when fully closed NOTE If belt tensioner does not fully close lock indicator still RED open the LockStrong and try loosening the LATCH UAS strap slightly 2...

Страница 80: ...Base is installed tightly Base should not move more than 2 5 cm 1 in side to side or front to back at the Belt Path on the Child Restraint If Base moves more than 2 5 cm 1 in open LockStrong tension...

Страница 81: ...Tether Adjuster Strap to tighten 13 Install Seat Shell to Base pg 54 move seat shell to the appropriate REAR FACING or FORWARD FACING position based on the child s size see pgs 10 and 12 and lock into...

Страница 82: ...strap in rear fa cin g installation Ba ll must be in prop er zone for child siz e Ve hicle MUS T be on level grou nd 258 090 42 10 20 9 1 18 kg 20 40 lbs Do not install by this method for a child we i...

Страница 83: ...H UAS Rear Facing and Forward Facing Removing LATCH UAS 1 Remove Seat Shell from Base see pg 54 2 Disengage LATCH UAS connectors on both sides of Restraint by pulling Red Release Straps then open Lock...

Страница 84: ...UAS 3 Store LATCH UAS anchors in storage locations on back side of base 4 Disconnect tether a Press Adjuster Release Button b Lengthen the Tether Strap c Unhook the Tether Strap from the Tether Anchor...

Страница 85: ...d Facing Only 1 Loosen harness straps by pushing the harness release button on the front of the seat At the same time pull harness straps to extend completely 2 Unfasten the chest clip and buckle Conv...

Страница 86: ...e Forward Facing Only Converting to Booster Mode 3 Lift up headrest pad and push the shoulder straps into the sidewings as shown 4 Disconnect hook and loop connectors attaching seat pad to back pad bu...

Страница 87: ...Booster Mode 5 Remove Head and Body Pillow if installed then pull seat pad forward and remove buckle through bottom of seat pad to access seat pan 6 Grasp the bottom of the Buckle Strap and twist it...

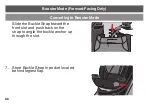
Страница 88: ...ard Facing Only Converting to Booster Mode Slide the Buckle Strap toward the front slot and push back on the strap to angle the buckle anchor up through the slot 7 Store Buckle Strap in pocket located...

Страница 89: ...89 Booster Mode Forward Facing Only Converting to Booster Mode 8 Replace Seat Pad and resecure hook and loop fasteners to Back Pad then continue with Installing the Booster on page 90...

Страница 90: ...sure vehicle is on level ground WARNING DEATH or SERIOUS INJURY can occur ALWAYS secure the booster seat with the vehicle seat belt or lower anchors when not occupied An unsecured booster seat can fl...

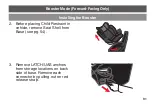
Страница 91: ...Installing the Booster 3 Remove LATCH UAS anchors from storage locations on back side of base Remove each connector by pulling out on red release strap 2 Before placing Child Restraint in vehicle rem...

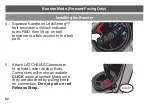
Страница 92: ...until lock indicator turns RED then lift up on belt tensioner to allow access to the belt path 5 Attach LATCH UAS Connectors to vehicle Lower Anchor Bars Connectors will make an audible CLICK when att...

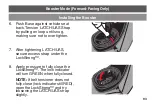
Страница 93: ...n fully closed NOTE If belt tensioner does not fully close lock indicator still RED open the LockStrong and try loosening the LATCH UAS strap slightly 6 Push Base against vehicle seat back Tension LAT...

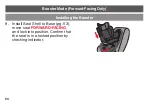
Страница 94: ...oster Mode Forward Facing Only Installing the Booster 9 Install Seat Shell to Base pg 53 move seat FORWARD FACING and lock into position Confirm that the seat is in a locked position by checking indic...

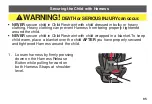
Страница 95: ...ent Harness from being properly tightened around the child NEVER secure child in Child Restraint with child wrapped in a blanket To keep child warm place a blanket over the child AFTER you have proper...

Страница 96: ...nst the Restraint Pull Harness Straps over the child s shoulders and around the child s waist Straps must lie flat free of twists and in the center of the child s shoulders NOTE If Buckle Strap is und...

Страница 97: ...at the Harness Straps are positioned properly NOTE If using the lower Headrest Harness positions make sure to tuck the excess Headrest Flap up behind the Headrest Pad The Headrest Flap is designed wit...

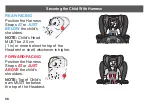
Страница 98: ...UST BELOW the child s shoulders NOTE Child s Head MUST be 2 5 cm 1 in or more below the top of the Headrest or shell whichever is higher FORWARD FACING Position the Harness Straps AT or JUST ABOVE the...

Страница 99: ...both Buckle Tongues to make sure they are securely latched CHECK that the Buckle functions properly and is kept free of dirt and debris Make sure Harness Straps are not twisted 6 Fasten Chest Clip by...

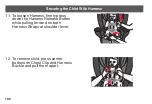
Страница 100: ...100 7 Push Chest Clip down away from the child s neck and towards the Harness Buckle Securing the Child With Harness 8 Pull up on both shoulder straps to remove all slack from the child s hips...

Страница 101: ...Harness Straps until Harness is snug on child A snug strap should not allow any slack It lies in a relatively straight line without sagging It does not press on the child s flesh or push the child s...

Страница 102: ...arness 11 To loosen Harness firmly press down the Harness Release Button while pulling forward on both Harness Straps at shoulder level 12 To remove child press center buttons on Chest Clip and Harnes...

Страница 103: ...and shoulder belt Never use a booster with only a lap belt as this could cause serious injuries Base of booster should be flat on vehicle seat After the child is in the booster pull the lap and should...

Страница 104: ...etched low and snug across the child s hips within the lower belt guides and fastened into the buckle Tops of the child s ears are at or below the top of the booster seat headrest The shoulder belt MU...

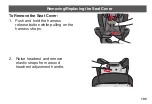
Страница 105: ...Replacing the Seat Cover To Remove the Seat Cover 1 Push and hold the harness release button while pulling on the harness straps 2 Raise headrest and remove elastic straps from around headrest adjust...

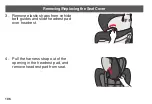
Страница 106: ...g Replacing the Seat Cover 3 Remove elastic straps from vehicle belt guides and slide headrest pad over headrest 4 Pull the harness strap out of the opening in the headrest pad and remove headrest pad...

Страница 107: ...the Seat Cover 5 Lower the headrest On the back of the car seat pull fabric at the top down to release plastic tabs 6 Locate flap on front side of the seatpad behind headrest and slide down to discon...

Страница 108: ...7 Lift up on back pad from rear of seat and pull out from around rotation handles on top of seat shell 8 Disconnect the hook and loop connectors in the lower part of back pad and remove back pad from...

Страница 109: ...fabric binding from around lower vehicle belt guides 10 Push buckle and harness adjustment strap throughs slot in seat Remove seat pad from seat NOTE It is not necessary to remove the cup holders in...

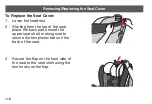
Страница 110: ...Lower the headrest 2 Starting from the top of the seat place the back pad around the upper seat shell making sure to secure the two plastic tabs on the back of the seat 3 Secure the flap on the front...

Страница 111: ...e the lower vehicle belt guides on either side of the seat into the channel around the perimeter of the seat Continue by tucking back pad into channel and around rotation handles until completely rese...

Страница 112: ...pad then pull Buckle Strap through appropriate slot in seat see pg 44 NOTE It is not necessary to remove the cup holders in order to replace the seat pad 7 From the front of the seat make sure the ha...

Страница 113: ...t guide Removing Replacing the Seat Cover 9 Replace the elastic straps at the back of the headrest and around the shoulder belt guides NOTE Pull the elastic into the belt guide and up around the chann...

Страница 114: ...LORINE BLEACH Tumble dry 10 15 minutes on low heat Remove immediately Soft goods include headrest pad seat pad head pillow body pillow harness covers and buckle cover Remove the foam inserts from the...

Страница 115: ...all screws and disassemble the restraint 3 Recycle all fabric padding plastic foam and metal parts if accepted by your local recycling center Responsibly discard the rest If your local recycling cent...

Страница 116: ...online at www evenflo com or contact ParentLink at 1 800 233 2229 When you contact us please have the product model number and date of manufacture found on the back of the child restraint Base Assemb...

Страница 117: ...117 Replacement Parts Harness Covers Headrest Pad LATCH Strap Seat Pad...

Страница 118: ...following these instructions store user guide as shown in pocket on rear of Child Restraint For future reference record the model number of your child restraint AND the date of manufacture below Model...

Страница 119: ...remedy of the Registrant Colors and fabrics change over time Accordingly we will replace your product or part with one of equal value Proof of registration or proof of purchase in the form of a receip...

Страница 120: ...ts based on Gold Lifetime Warranty and subject to the exclusions listed below Premier Consumer Resource Center located in the USA for product support installation and assembly advice Live Chat Support...

Страница 121: ...Warranty does not apply Misuse or poor maintenance Please refer to this instruction manual for guidance Sun intensity sweat detergents damp storage or frequent washings Airline or freight damage Impr...

Страница 122: ...USA Canada 1 800 233 2229 8 AM to 5 PM E T...

Отзывы: