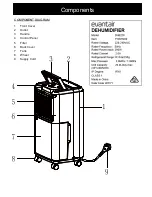
Evantair TWDH200 Скачать руководство пользователя страница 4

CONTROL PANEL

WARNING:  Keep all objects at least 1 metre from the front, sides and rear of the appliance.
WARNING:  In order to avoid overheating or risk of fire, do not cover the appliance.
WARNING:  Never leave this dehumidifier unattended when in use.
WARNING:  Do not use this appliance with a programmer, remote-control system, separate timer or 
any other device that switches the appliance on automatically.

Note:  When the appliance is turned on for the first time, it may release a slight odour. This odour 
is a normal occurrence caused by the initial starting of the unit and should not occur again.

Leave the appliance to stand for one hour after transport or after the unit has been on its side before 
connecting it to the mains supply to let the refrigerant settle.
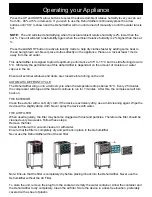
OPERATION
Ensure that the water container is positioned correctly.
Plug into power supply. The Power indicator will illuminate to show there is power to the unit.

Press the POWER button to turn on the unit.  

Press the SPEED button to select the fan speed desired (High or Low).

Press the TIMER button to select the desired amount of time you would like the Dehumidifier to run before 
turning off automatically (1 

– 24 hours).

LED INDICATORS
1. POWER 
2. TIMER  
3. FULL
4. LOW SPEED
5. HIGH SPEED
6. LAUNDRY

BUTTONS
A. POWER
B. TIMER  
C. SPEED   
D. LAUNDRY

E. UP ADJUSTMENT

F. DOWN ADJUSTMENT

Operating your Appliance

Always choose a safe location for the appliance, keeping in mind the safety precautions 
outlined.  Ensure all packaging has been removed from the unit before use. This appliance 
requires no installation, it should be used solely as a portable appliance.

Содержание TWDH200

Страница 1: ...ract 20L per day in an environment of 80 humidity and temperature of 30 C This is the world wide standard for rating dehumidifiers In NZ we do not have climatic conditions with this humidity and high...

Страница 2: ...a qualified electrical person for examination electrical service or repair 18 Do not remove plug from power socket by pulling cord always grip plug 19 Do not twist kink or wrap the cord around the app...

Страница 3: ...1 Front Cover 2 Outlet 3 Handle 4 Control Panel 5 Filter 6 Back Cover 7 Tank 8 Wheel 9 Supply Cord COMPONENT DIAGRAM Components...

Страница 4: ...necting it to the mains supply to let the refrigerant settle OPERATION Ensure that the water container is positioned correctly Plug into power supply The Power indicator will illuminate to show there...

Страница 5: ...lace in the Dehumidifier Never use the Dehumidifier without the air filter Note Ensure that the filter is completely dry before placing it back into the Dehumidifier Never use the Dehumidifier without...

Страница 6: ...ppliance has been allowed to cool down completely before cleaning Use a damp cloth not wet to wipe the exterior of the appliance to remove dust and dirt Use a vacuum cleaner to remove dust and fluff f...

Страница 7: ...ning the dehumidifier Is the intake duct or discharge duct obstructed Remove the obstruction from the discharge duct or intake duct No air is discharged Is the air filter clogged Clean the air filter...

Страница 8: ...he time of purchase It is in your interest to make sure this is done If the product is to be replaced cannot be repaired then that replacement will be of the same or similar product or accessory exclu...

Отзывы: