background image

6

Modular Push Bar Panic Bolt with Vertical Rods Rev.7

Installation – (continued)

4

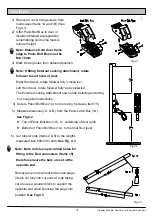
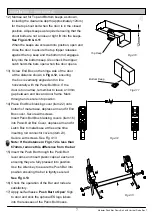
10) With the door in the closed position. Fully depress

the Push bar lever and holding the door in a closed 

position, adjust the top shoot bolt (Item 11) until a

3-4mm required clearance is achieved from the

underside of frame to top of shoot bolt. The bevel of shoot 

bolt must be facing the door (adjust if necessary) 

See Figs  4.7 & 4.8

With the door open, slide the top tripper guide (Item 7)

over the top shoot bolt and close the door. Fully depress 

the push bar lever, inset 3mm packer to hold the top 

shoot bolt. This now gives the position of the top guide.

Mark through and secure into position.

Fig 4.7

Fig 4.8

Bevelled edge

2-3mm

11) With the rods held into position by the top tripper, 

adjust the bottom shoot bolt to obtain a required 

clearance of 2-3mm. 

See Fig 4.9

Note:

Ensure bevelled edge of shoot bolt is facing the door

Slide the remaining plain guide down into position

maintaining a gap of 19mm between the underside of the 

guide and threshold. Mark through and secure into 

position 

See Fig 4.7

Fig 4.9

2-3mm

Bevelled edge

Содержание Push Bar Panic Bolt

Страница 1: ...and can be fitted on both left handed and right handed doors For internal use only Door Maximum specification of door on which this product should be fitted Maximum weight of door 200kg Maximum heigh...

Страница 2: ...n X 1 6 Top Keep X 1 7 Top Tripper Guide X 1 8 Plain Guides X 3 9 Bottom Keep X 1 10 Plastic End Caps X 2 11 Shoot Bolts X 2 PARTS LIST 12 Knurled Plugs X 2 13 Allen Key X 1 14 ES Logo Labels X 2 15 S...

Страница 3: ...eel or aluminium Doors Door size limitations Maximum clear opening height 2450mm Minimum clear opening width 400mm per door Single Door Rebated Double Door Non Rebated Double Door Door shown with Modu...

Страница 4: ...level Fig 4 3 6 Cut tubular rods Items 2 3 to the lengths measured less 88mm for both See Fig 4 3 Note Both rods have pre drilled holes for fitting to the Rod connectors Items 18 therefore ensure the...

Страница 5: ...in guide Item 8 onto the top rod Item 3 then screw the shoot bolt Item 11 fully into the knurled plug Item 12 Slip the two remaining plain guides Items 8 over the bottom rod Item 2 then screw the rema...

Страница 6: ...uide Item 7 over the top shoot bolt and close the door Fully depress the push bar lever inset 3mm packer to hold the top shoot bolt This now gives the position of the top guide Mark through and secure...

Страница 7: ...Bolt Box If the door is too narrow remember to leave a 10mm gap between end box and door frame Mark through and secure into position 14 Place End Box blanking cover item 22 onto bottom of metal base d...

Страница 8: ...rectly and periodically apply grease to top and bottom shoot bolts PLEASE LEAVE THESE INSTRUCTIONS WITH THE END USER Stancliffe Street Mill Hill Blackburn BB2 2QR Tel 44 0 1254 274100 Fax 44 0 1254 27...

Отзывы: