background image


26 


Содержание E1560

Страница 1: ... personal injury or property damage Please Note Once your European Home product has been installed and switched to the ON position the fire will instantly flash This is normal operating procedure simply indicating that there is power running to the fire and NOT a fault 11 10 2020 ESERIES ENGLISH Models E810 E32H E40 E60 E72 E1560 INSTRUCTIONS MUST BE KEPT AFTER INSTALLATION FOR FUTURE MAINTENANCE ...

Страница 2: ...9 Product operation 19 10 Technical Specification 20 37 11 Problem Solving 38 41 12 E tab App Pairing 42 50 13 Warranty 48 This guide is designed to aid in the installation and continued performance of this product This product conforms with all health safety and environmental protection standards as indicated by a CE mark For optimum performance this product requires a well insulated location and...

Страница 3: ...d be supervised to ensure that they do not play with the appliance 5 The appliance is not intended for use by young children or infirmed persons without supervision 6 In the event of a malfunction disconnect power at the service panel and have the unit inspected by a reputable electrician before reusing 7 If the power cord is damaged it must be replaced by the manufacturer or its service agent or ...

Страница 4: ... Do not change the plug in any way Always plug heaters directly into a wall outlet receptacle Never use with an extension cord or relocatable power tap outlet power strip 18 Do not burn wood or other materials in the electric fireplace 19 Do not strike the fireplace glass 20 Always use a certified electrician should new circuits or outlets be required 21 Always use properly grounded fused and pola...

Страница 5: ...ience 3 Remove electric fireplace front glass and hardware from the box and remove all packaging materials before installation 4 Store the fireplace in a safe dry and dust free location until you are ready to install the fireplace Grounding Instructions This product must be grounded If it should malfunction or breakdown grounding provides a path of least resistance for electric current to reduce t...

Страница 6: ...6 COLOUR CODING FOR INTERNATIONAL WIRING ...

Страница 7: ...esives as this can also alter the airflow and hinder any further servicing of the product Installing Product Each product is supplied complete with one or more wall mounting brackets Dependent on Model Establish the desired finished height from floor level to the bottom of the plaster kit of the product Fix the wall bracket to the wall ensuring to use the correct hardware fixings given the wall co...

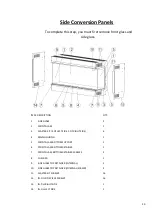
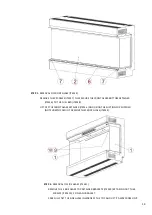
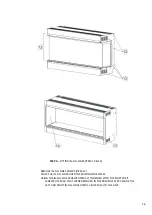
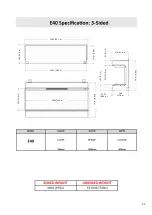
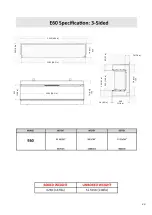
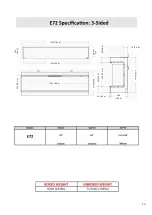
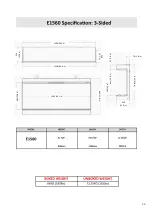
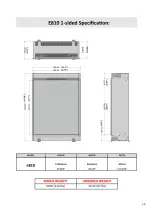
Страница 8: ...8 3 SIDED INSTALLATION GUIDE ...

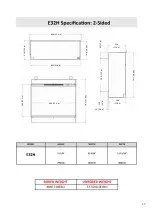
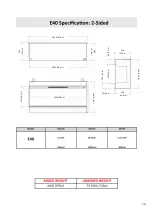
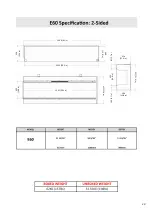
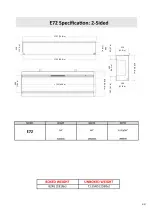
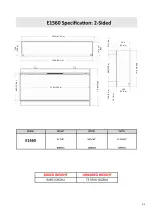
Страница 9: ...9 2 SIDED INSTALLATION GUIDE ...

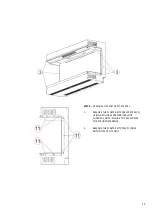
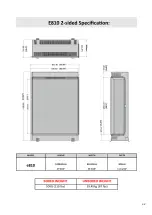
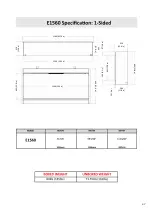
Страница 10: ...10 1 SIDED INSTALLATION GUIDE ...

Страница 11: ...11 Glass Removal 1 Remove the two screws located in the bottom glass retaining bar 2 Remove the bottom glass retaining bar ...

Страница 12: ...on cup has been provided to aid with this step Please note The suction cup is provided for support only not to hold the full weight of the glass Please note It is recommended that this step is carried out by 2 persons to reduce the risk of injury 4 Place the log set as stated and replace the glass by reversing steps 3 to 1 ...

Страница 13: ...3 OFRIGHT SIDE 6 4 MAIN HOUSING 1 5 FRONT GLASS BOTTOM SUPPORT 1 6 FRONT GLASS BOTTOM RETAINER 1 7 FRONT GLASS BOTTOM RETAINER SCREWS 2 8 FUEL BED 1 9 SIDE GLASS TOP RETAINER INTERNAL 2 10 SIDE GLASS TOP RETAINER INTERNAL SCREWS 4 11 PLASTER KIT SCREWS 16 12 IN FILL SIDE PIECE SCREWS 16 13 IN FILL RIGHT SIDE 1 14 IN FILL LEFT SIDE 1 Side Conversion Panels ...

Страница 14: ...LIFT OFF THE FRONT GLASS RETAINER ITEM 6 AND USING THE SUCTION CUP SUPPLIED NOT SHOWN CAEFULLY REMOVE THE FRONT GLASS ITEM 2 STEP 2 REMOVAL OF SIDE GLASS ITEM 1 REMOVE THE 2 SIDE GLASS TOP RETAINER BRACKETS ITEM 9 BY TAKING OUT THE 4 SCREWS ITEM 10 2 ON EACH BRACKET CAREFULLY TILT THE SIDE GLASS INWARDS AT THE TOP AND LIFT IT AWAY FROM UNIT ...

Страница 15: ...VAL OF PLASTER KIT ITEM 3 1 REMOVE THE PLASTER KIT SCREWS ITEM 11 USING A PHILLIPS SCREWDRIVER NOT SUPPLIED NOTE ENSURE TO KEEP SCREWS FOR FUTURE REFERENCE 2 REMOVE THE PLASTER KIT ITEM 3 FROM BOTH SIDES OF THE UNIT ...

Страница 16: ...S OVER THE EXISTING SIDE PIECES USING THE IN FILL SIDE SCREWS ITEM 12 TOGETHER WITH THE PLASTER KIT SCREWS ITEM 11 THAT WERE REMOVED IN THE PREVIOUS STEP SECURE THE LEFT AND RIGHT IN FILL SIDES ITEM 13 ITEM 14 TO THE UNIT STEP 4 FITTING IN FILL SIDES ITEM 13 14 ...

Страница 17: ...ntrol can be used on either OS or Android operating systems To obtain the App please visit either the Apple App Store or Google Play and follow the on screen instructions Screen shot taken from Apple App Store Home Screen shot taken from E Touch App E Touch App Interface ...

Страница 18: ...gs E40 E1000 Log Set X 1 6 logs E60 E1000 Log Set X 2 12 logs E72 E1000 Log Set X 3 18 logs E1560 E1000 Log Set X 3 18 logs E700 LOG SET X 2 Applicable with E32H E810 Log Set Guidance WOODLAND LOG SET A A A A B B B B C C Please note Log sets can be arranged to suit personal preference ...

Страница 19: ...1000 X 1 Log Layout Applicable with E40 E1000 X 2 Log Layout Applicable with E60 E1000 X 3 Log Layout Applicable withE72 E1560 B F A C D E A A B B C C D D E E F F C C C C E E E A A A B B B D D D F F F E E E ...

Страница 20: ...he App control Heater unit cut out This is a safety feature to safeguard against further damage to the product If the airflow is restricted the heater will automatically turn off This is can occur due to incorrect installation or obstruction To reset the heater function isolate from the mains power supply Leave product to cool After a suitable cooling down period remove the obstruction ifobstructe...

Страница 21: ...21 834 32 9 in 802 31 6 in 316 12 5 in 240 9 5 in 800 31 5 in 590 23 2 in 790 31 1 in 790 31 1 in 590 23 2 in 300 11 8 in 16 64 in 105 4 1 in 95 3 7 in 74 2 9 in ...

Страница 22: ...22 1035 40 7 in 1003 39 5 in 316 12 4 in 300 11 8 in 1003 39 5 in 357 14 0 in 556 21 9 in 316 12 4 in 300 11 8 in 556 21 9 in 355 14 0 in 95 3 7 in 16 25 0 64 in 105 4 1 in ...

Страница 23: ...23 1501 59 1 in 1503 59 2 in 1535 60 4 in 557 21 9 in 355 14 0 in 243 9 6 in 316 12 4 in 300 11 8 in 557 21 9 in 355 14 0 in 95 3 7 in 105 4 1 in 16 63 in 74 2 9 in ...

Страница 24: ...24 1784 70 3 in 1752 69 in 1752 69 in 243 9 6 in 315 12 4 in 610 24 in 410 16 1 in 610 24 in 410 16 1 in 74 2 9 in 300 11 8 in 16 63 in 96 3 8 in 105 4 1 in ...

Страница 25: ...25 1506 59 3 in 1538 60 6 in 1504 59 2 in 605 23 8 in 809 31 8 in 246 9 7 in 316 12 4 in 605 23 8 in 809 31 8 in 300 11 8 in 97 3 8 in 106 4 2 in 70 2 8 in ...

Страница 26: ...26 ...

Страница 27: ...27 844 33 2 in 802 31 6 in 316 12 5 in 300 11 8 in 800 31 5 in 790 31 1 in 590 23 2 in 590 23 2 in 790 31 1 in 316 12 4 in 300 11 8 in 105 4 1 in 95 3 7 in 16 0 6 in ...

Страница 28: ...28 1048 41 3 in 1005 39 6 in 1003 39 5 in 357 14 0 in 556 21 9 in 300 11 8 in 316 12 4 in 300 11 8 in 556 21 9 in 316 12 4 in 355 14 in 95 3 7 in 105 4 1 in 16 0 6 in ...

Страница 29: ...29 1548 61 in 1503 59 2 in 1501 59 1 in 316 12 4 in 300 11 8 in 355 14 0 in 557 21 9 in 557 21 9 in 300 11 8 in 316 12 4 in 355 14 0 in 95 3 7 in 105 4 1 in ...

Страница 30: ...30 1797 70 8 in 1752 69 0 in 1752 69 0 in 610 24 0 in 409 16 1 in 610 24 0 in 409 16 1 in 316 12 4 in 300 11 8 in 316 12 4 in 300 11 8 in 95 3 7 in 105 4 1 in ...

Страница 31: ...31 316 12 4 in 1553 61 15 in 1506 59 3 in 300 11 8 in 1504 59 2 in 605 23 8 in 809 31 8 in 809 31 8 in 605 23 8 in 316 12 4 in 300 11 8 in 97 3 8 in 106 4 2 in 16 6 in ...

Страница 32: ...32 ...

Страница 33: ...33 854 33 6 in 802 31 6 in 316 12 5 in 300 11 8 in 800 31 5 in 590 23 2 in 790 31 1 in 316 12 5 in 790 31 1 in 590 23 2 in 300 11 8 in 95 3 7 in 16 6 in 105 4 1 in ...

Страница 34: ...34 1005 39 6 in 1063 41 8 in 1003 39 5 in 556 21 9 in 357 14 0 in 556 21 9 in 300 11 8 in 300 11 8 in 316 12 4 in 357 14 0 in 104 4 1 in 16 3 64 in 95 3 7 in ...

Страница 35: ...35 1563 61 5 in 1503 59 2 in 1501 59 1 in 355 14 0 in 557 21 9 in 300 11 8 in 316 12 4 in 300 11 8 in 557 21 9 in 316 12 4 in 355 14 0 in 95 3 7 in 105 4 1 in ...

Страница 36: ...36 1810 71 3 in 1752 69 0 in 409 16 1 in 1752 69 0 in 610 24 0 in 316 12 4 in 300 11 8 in 316 12 4 in 300 11 8 in 610 24 0 in 409 16 1 in 95 3 7 in 105 4 1 in 16 6 in ...

Страница 37: ...37 1568 61 74 in 1504 59 2 in 1506 59 3 in 605 23 8 in 809 31 8 in 809 31 8 in 605 23 8 in 316 12 4 in 300 11 8 in 300 11 8 in 316 12 4 in 16 6 in 106 4 2 in 97 3 8 in ...

Страница 38: ...38 ...

Страница 39: ...es cleaning out Please see EH YouTube video Blower clogged Check the correct air gap has been adhered to when installing Recommended clearance is 4 100mm Installation airflow restricted Troubleshooting Flow Chart 1 Flames not working correctly Ribbons are statically connected to glass Spray some anti static spray beneath the tray Please note If this product is freshly installed please leave runnin...

Страница 40: ... onto fan cradle Please see EH YouTube video Fan has come loose Fan requires cleaning out If problem persists a replacement fan may be required Please see EH YouTube video Fan clogged Adjust fan to stop catching on the case Please see EH YouTube video Fan catching on housing 3 Noisy Heater Fan unbalanced Adjust fan to stop catching on the case If problem persists replacement fan unit maybe require...

Страница 41: ...LED shorting out Check to be sure the power lead is plugged in adequately Unit not plugged in correctly Fuse blown Check fuse box Remote needs pairing See separate pairing instructions for guide Remote App not paired 5 Fire not turning on Rocker switch has not been turned to the ON position Double check switches are turned to the ON position 6 No lights Loose connection or disconnected wire Check ...

Страница 42: ... Double check timer settings 8 LED streaking LED dropped down LED needs to be re stuck into place 9 Heater cutting out Build up of hot air triggering heater cut out unit Ensure the appliance has the required air gap for air to circulate and prevent build up Recommended 4 100mm 10 Noisy fans Fan has slipped off centre of mechanism Press red button on side of fan to re centre to stop it from catchin...

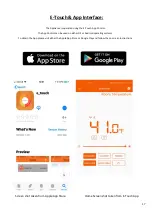
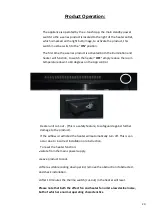
Страница 43: ...43 E Tab Controller 1 2 3 1 Volume Control 2 Power button Press and hold for 3 seconds to turn ON OFF ...

Страница 44: ... Access either the Apple app store or Googleplay this is depending on the operating system of your smart phone or tablet 2 Search locate and download the app entitled e touch 3 Open the e touch App and the above screen will appear 4 To ADD your product simply click the buttonat the top right of the screen The e touch App will then begin to scan for your European home product PLEASE NOTE Once fully...

Страница 45: ...han a foot away from the product To ensure successful pairing please hold your device toward the bottom right hand side of the fire 5 Once the e touch App has discovered your product the above screen will appear 6 To connect your fireplace simply click on the fireplace icon 7 Your product will now be paired and ready to operate ...

Страница 46: ... effect E Temperature control keys Single press to increase or decrease temperature when setting desired room temperature Please note to activate the heater the temperature must be set higher than the ambient room temperature To de activate the heater the temperature must be set lower than the ambient room temperature F Room temperature display This displays the desired room temperature PLEASE NOT...

Страница 47: ...ccess the program the 7 day programmable timer please follow the below steps 1 Click the TIME SET button on the home screen and the above image will appear 2 Click the WEEK MODE button and the timer summary screen will appear see over page 2 ...

Страница 48: ... ON C Off time Click to set a time for the heater to switch off OFF D Target Gear Click to set the heater to switch on Heat low or High E Target temperature Click to set what temperature you would like the program to reach before the thermostat is activated F Repeat Click to set what day s you would like the program to repeat A B E F D C 52 F ...

Страница 49: ... timing program please follow the below steps 1 Select the time on which you would like the heater to activate 2 Select the time on which you would like the heater to de activate 3 Select the temperature you would like the heater to activate at 1 2 3 ...

Страница 50: ... which day or days you would like your timing program to activate or repeat 6 To confirm your timing program click OK 7 Ensure that the WEEK button is highlighted on the home screen to activate your timingprogram Once you have activated your timing program this can be bypassed by highlighting the HOLIDAY button on the home screen 4 6 5 ...

Страница 51: ...On the app home screen in the top left corner you will see the setting icon Press to open 2 You will then see the Unit of temperature option Press to open the selection panel 3 You will then be able to select your preferred unit of temperature ...

Отзывы: