


10
switches the appliance on automatically. Also do not use the appliance with an
external voltage regulator such as dimmer, speed controller etc. That produces
hazard too!
ASSEMBLY
Remove all the packaging material and check that all the parts are present. Ensure
that definitely no packaging material has remained around the ‘head’ of the radiator
(lamp, cap and switches). Ensure there is a clear work space and keep flammable
materials out of the area.
Check the device, the electrical cable and the plug for damage. Do not connect the
device to the mains if you notice any damage!
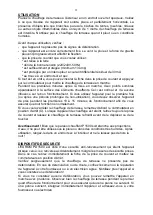
1 -
Head terrace radiator
2 -
Switch
3 -
Stand
4 -
Decorative hood
5 -
Base
6 -
Electric cable
Place the stand on the base and screw it in place with 3 M6x50 bolts
Place the decorative hood over the attachment
Push the plug from the top through the stand and the base of the terrace radiator.
Now place the head of the terrace radiator on the stand. Be careful with the cord!
Attach the head to the stand by screwing the two parkers in the appropriate holes.
Secure the electric cable at the bottom of the base, in two places, using the
supplied plastic clamps. Make sure there is no excess cable in the stand or base,
but that the cable is also not stretched too tight.
Warning!
Do not connect the terrace radiator to the mains if you observe any
damage (whether to the radiator, cable or plug), and do not connect it before you
have fully assembled it!
USE
Place the terrace radiator outdoors in a large open space. Ensure that the floor is
sturdy, flat and fully horizontal. There must be no objects such as branches,
parasols, tarpaulins, curtains, furniture or any flammable objects whatsoever within a
radius of 1 metre around the terrace heater. Do not use the terrace radiator when it is
raining or in wet conditions.


