background image

00058952.DOC, Version 1.2

26/26

Should you have further questions, please contact your dealer.

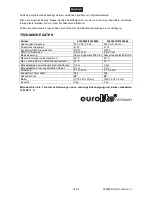
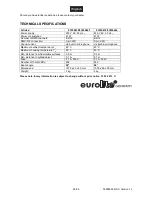
TECHNICAL SPECIFICATIONS

Articles:

51930418/51930443

51930419/51930444

Power supply:

230 V AC, 50 Hz ~

230 V AC, 50 Hz ~

Power consumption:

41 W

41 W

Number of DMX channels:

4/6/19

4/6/19

DMX-512 connection:

3-pin XLR

3-pin XLR

Sound-control:

via built-in microphone

via built-in microphone

Maximum ambient temperature 

T

a

:

45° C

45° C

Maximum housing temperature 

T

B

:

50° C

50° C

Min. distance from flammable surfaces:

0.5 m

0.5 m

Min. distance to lighted object:

0.1 m

0.1 m

Fuse:

F 1 A, 250V

F 1 A, 250V

Number of 10mm LEDs:

252

252

Beam angle:

20°

40°

Dimensions:

1075 x 65 x 90 mm

1075 x 65 x 90 mm

Weight:

2 kg

2 kg

Please note: Every information is subject to change without prior notice. 31.03.2011  ©

Содержание LED Bar 2 RGBA 252/10

Страница 1: ... Copyright Nachdruck verboten Reproduction prohibited Für weiteren Gebrauch aufbewahren Keep this manual for future needs BEDIENUNGSANLEITUNG USER MANUAL LED Bar 2 RGBA 252 10 ...

Страница 2: ...ry includes 15 SAFETY INSTRUCTIONS 15 OPERATING DETERMINATIONS 17 DESCRIPTION OF THE DEVICE 18 INSTALLATION 18 Overhead rigging 18 Attachment 20 DMX 512 control 20 Connection between devices 21 Connection with the mains 21 OPERATION 21 Stand Alone Mode 22 Auto Mode 22 DMX Mode 22 Master Slave Mode 25 Sound Control Mode 25 CLEANING AND MAINTENANCE 25 Replacing the fuse 25 TECHNICAL SPECIFICATIONS 2...

Страница 3: ...Produkts weitergeben sich die letzte Version der Anleitung im Internet herunter laden EINFÜHRUNG Wir freuen uns dass Sie sich für einen EUROLITE LED Bar 2 RGBA 252 10 entschieden haben Wenn Sie nachfolgende Hinweise beachten sind wir sicher dass Sie lange Zeit Freude an Ihrem Kauf haben werden Lieferumfang 1 Gerät 1 Bedienungsanleitung Nehmen Sie das Gerät aus der Verpackung SICHERHEITSHINWEISE AC...

Страница 4: ...n Sie darauf dass die Netzleitung nicht gequetscht oder durch scharfe Kanten beschädigt werden kann Überprüfen Sie das Gerät und die Netzleitung in regelmäßigen Abständen auf Beschädigungen Werden Verlängerungsleitungen verwendet muss sichergestellt werden dass der Adernquerschnitt für die benötigte Stromzufuhr des Gerätes zugelassen ist Alle Warnhinweise für die Netzleitung gelten auch für evtl V...

Страница 5: ... kann die Isolation reduzieren und zu tödlichen Stromschlägen führen Beim Einsatz von Nebelgeräten ist zu beachten dass das Gerät nie direkt dem Nebelstrahl ausgesetzt ist und mindestens 0 5 m von einem Nebelgerät entfernt betrieben wird Der Raum darf nur so stark mit Nebel gesättigt sein dass eine gute Sichtweite von mindestens 10 m besteht Die Umgebungstemperatur muss zwischen 5 C und 45 C liege...

Страница 6: ...n Sie bitte unbedingt darauf dass das Gerät im Lieferzustand verpackt wird Beachten Sie bitte dass eigenmächtige Veränderungen an dem Gerät aus Sicherheitsgründen verboten sind Der Serienbarcode darf niemals vom Gerät entfernt werden da ansonsten der Garantieanspruch erlischt Wird das Gerät anders verwendet als in dieser Bedienungsanleitung beschrieben kann dies zu Schäden am Produkt führen und de...

Страница 7: ...he Einrichtungen mindestens einmal jährlich durch einen Sachkundigen geprüft werden Vorgehensweise Das Gerät sollte idealerweise außerhalb des Aufenthaltsbereiches von Personen installiert werden WICHTIG ÜBERKOPFMONTAGE ERFORDERT EIN HOHES MAß AN ERFAHRUNG Dies beinhaltet aber beschränkt sich nicht allein auf Berechnungen zur Definition der Tragfähigkeit verwendetes Installations material und rege...

Страница 8: ...ontagefläche mindestens die 10 fache Punktbelastung des Eigengewichtes des Gerätes aushalten kann Der Installationsort muss so gewählt werden dass das Gerät absolut plan an einem festen erschütterungs freien schwingungsfreien und feuerfesten Ort befestigt werden kann Mittels Wasserwaage muss überprüft werden dass das Gerät absolut plan befestigt wurde Das Gerät muss außerhalb des Handbereichs von ...

Страница 9: ...Aufbau einer seriellen DMX Kette Schließen Sie den DMX Ausgang des ersten Gerätes der Kette an den DMX Eingang des nächsten Gerätes an Verbinden Sie immer einen Ausgang mit dem Eingang des nächsten Gerätes bis alle Geräte ange schlossen sind Achtung Am letzten Gerät muss das DMX Kabel durch einen Abschlusswiderstand abgeschlossen werden Dazu wird ein XLR Stecker in den DMX Ausgang am letzten Gerät...

Страница 10: ...t dem EUROLITE LED Bar 2 RGBA 252 10 lassen sich bis zu 13 verschiedene Chaser auswählen Auswählen eines Chasers Drücken Sie die MODE Taste um den internen Programm Modus zu wählen Wählen Sie den gewünschten Chaser 01 13 über die UP oder DOWN Tasten aus Siehe folgende Tabelle Drücken Sie die ENTER Taste um jeweils die Geschwindigkeit und Flash Einstellungen zu wählen Über die UP oder DOWN Tasten k...

Страница 11: ...tartadresse einzustellen drücken Sie die MODE Taste bis das Display DMX512 MODE anzeigt Drücken Sie die Enter Taste und das Display zeigt 001 an Sie können nun die gewünschte Adresse über die UP oder DOWN Tasten auswählen Bitte drücken Sie nochmal die ENTER Taste zur Bestätigung und um einen DMX Kanal Modus auswählen DMX Channel Auswahl Auswählen eines DMX Kanal Modus bis zu 19 Kanal Belegung Nach...

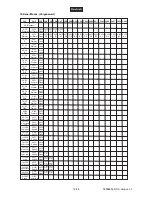
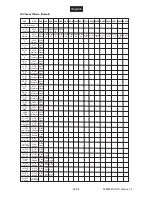
Страница 12: ...5 G3 0 255 B3 0 255 A3 211 255 Sound 0 255 Sensitivity 0 255 Speed 0 255 Speed 0 255 Speed 0 255 Speed 0 255 Speed 0 255 Speed 0 255 Speed 0 255 Speed 0 255 Speed 0 255 Speed 0 255 Speed 0 255 Speed 0 255 Dimmer 0 255 Dimmer 0 255 Dimmer 0 255 Dimmer 0 255 Dimmer 0 255 Dimmer 0 255 Dimmer 0 255 Dimmer 0 255 Dimmer 0 255 Dimmer 0 255 Dimmer 0 255 Dimmer 0 255 Dimmer 0 255 Dimmer 16 20 R 21 25 G 26 ...

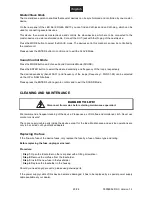
Страница 13: ... gewünschte Empfindlichkeit Sensit 00 31 und Häufigkeit der loops Frequency FQN 01 99 können jeweils mit den UP oder DOWN Tasten gewählt werden Bitte drücken Sie nochmal die ENTER Taste zur Bestätigung und um den SOUND Modus zu verlassen REINIGUNG UND WARTUNG Vor Wartungsarbeiten unbedingt allpolig vom Netz trennen LEBENSGEFAHR Das Gerät sollte regelmäßig von Verunreinigungen wie Staub usw gereini...

Страница 14: ...ung 230 V AC 50 Hz 230 V AC 50 Hz Gesamtanschlusswert 41 W 41 W Anzahl der DMX Steuerkanäle 4 6 19 4 6 19 DMX 512 Anschluss 3 pol XLR 3 pol XLR Musiksteuerung über eingebautes Mikrofon über eingebautes Mikrofon Maximale Umgebungstemperatur Ta 45 C 45 C Max Leuchtentemp im Beharrungszustand TB 50 C 50 C Mindestabstand zu entflammbaren Oberflächen 0 5 m 0 5 m Mindestabstand zum angestrahlten Objekt ...

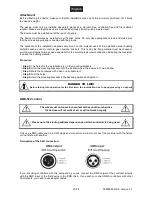
Страница 15: ...TRODUCTION Thank you for having chosen a EUROLITE LED Bar 2 RGBA 252 10 If you follow the instructions given in this manual we are sure that you will enjoy this device for a long period of time Delivery includes 1 Device 1 User manual Unpack your device SAFETY INSTRUCTIONS CAUTION Be careful with your operations With a dangerous voltage you can suffer a dangerous electric shock when touching the w...

Страница 16: ...from time to time If extension cords are used make sure that the core diameter is sufficient for the required power consumption of the device All warnings concerning the power cords are also valid for possible extension cords Always disconnect from the mains when the device is not in use or before cleaning it Only handle the power cord by the plug Never pull out the plug by tugging the power cord ...

Страница 17: ...device must only be operated in an altitude between 20 and 2000 m over NN Never use the device during thunderstorms Over voltage could destroy the device Always disconnect the device during thunderstorms The symbol m determines the minimum distance from lighted objects The minimum distance between light output and the illuminated surface must be more than 0 1 meters This device is only allowed for...

Страница 18: ...ion of the device has to be built and constructed in a way that it can hold 10 times the weight for 1 hour without any harming deformation The installation must always be secured with a secondary safety attachment e g an appropriate catch net This secondary safety attachment must be constructed in a way that no part of the installation can fall down if the main attachment fails When rigging derigg...

Страница 19: ...e device s weight DANGER OF FIRE When installing the device make sure there is no highly inflammable material decoration articles etc within a distance of min 0 5 m Mount the device to your trussing system using appropriate clamps For overhead use always install an appropriate safety bond You must only use safety bonds complying with DIN 56927 quick links complying with DIN 56927 shackles complyin...

Страница 20: ...m load and the building material Procedure Step 1 The holes for the installation are on the mounting brackets Step 2 Hold the mounting brackets onto the location where the device is to be installed Step 3 Mark the boreholes with a pen or a suitable tool Step 4 Drill the holes Step 5 Hold the mounting brackets in the desired position and tighten it DANGER TO LIFE Before taking into operation for th...

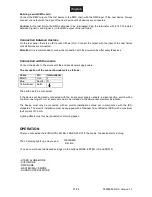
Страница 21: ...ply cable The occupation of the connection cables is as follows Cable Pin International Brown Live L Blue Neutral N Yellow Green Earth The earth has to be connected If the device will be directly connected with the local power supply network a disconnection switch with a minimum opening of 3 mm at every pole has to be included in the permanent electrical installation The device must only be connec...

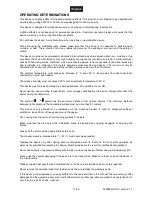
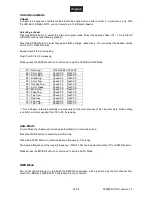
Страница 22: ...Color flow Speed 00 Flash 00 06 Overlap flow Speed 00 Flash 00 07 Color chase Speed 00 Flash 00 08 Multi color Speed 00 Flash 00 09 Fade flow Speed 00 Flash 00 10 Two flow Speed 00 Flash 00 11 One way Speed 00 Flash 00 12 Two way Speed 00 Flash 00 13 Two color Speed 00 Flash 00 Not a Chaser rather a possibility to individually set the color intensity of the singular colors Flash setting is valid f...

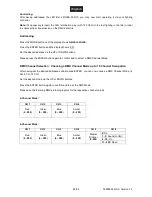
Страница 23: ... press the ENTER button again to confirm and to select a DMX Channel Mode DMX Channel Selection Choosing a DMX Channel Mode up to 19 Channal Occupation After having set the desired addresses and pressed ENTER you can now choose a DMX Channel Mode 4 CH 6 CH 19 CH Set the desired mode via the UP or DOWN buttons Press the ENTER button again to confirm and to exit the DMX Mode Please see the following...

Страница 24: ... G3 0 255 B3 0 255 A3 211 255 Sound 0 255 Sensitivity 0 255 Speed 0 255 Speed 0 255 Speed 0 255 Speed 0 255 Speed 0 255 Speed 0 255 Speed 0 255 Speed 0 255 Speed 0 255 Speed 0 255 Speed 0 255 Speed 0 255 Dimmer 0 255 Dimmer 0 255 Dimmer 0 255 Dimmer 0 255 Dimmer 0 255 Dimmer 0 255 Dimmer 0 255 Dimmer 0 255 Dimmer 0 255 Dimmer 0 255 Dimmer 0 255 Dimmer 0 255 Dimmer 0 255 Dimmer 16 20 R 21 25 G 26 3...

Страница 25: ...requency of the loops Frequency FQN 01 99 can be selected via the UP or DOWN buttons Please press the ENTER button again to confirm and to exit the SOUND Mode CLEANING AND MAINTENANCE Disconnect from mains before starting maintenance operation DANGER TO LIFE We recommend a frequent cleaning of the device Please use a soft lint free and moistened cloth Never use alcohol or solvents There are no ser...

Страница 26: ...nection 3 pin XLR 3 pin XLR Sound control via built in microphone via built in microphone Maximum ambient temperature Ta 45 C 45 C Maximum housing temperature TB 50 C 50 C Min distance from flammable surfaces 0 5 m 0 5 m Min distance to lighted object 0 1 m 0 1 m Fuse F 1 A 250V F 1 A 250V Number of 10mm LEDs 252 252 Beam angle 20 40 Dimensions 1075 x 65 x 90 mm 1075 x 65 x 90 mm Weight 2 kg 2 kg ...

Отзывы: