background image

00055335.DOC, Version 1.3

17/23

DESCRIPTION OF THE DEVICE

Features

DMX-controlled LED curtain

• Black curtain with 120 red, green, blue and yellow 5 mm LEDs
• Easy installation via seamed edge with 20 mm eyelets in 20 cm distances
• Operating modes: full on, auto, sound-active, DMX512
• Sound-control via built-in microphone
• Static colors, color-change speed, different programs and strobe effect adjustable via DIP switches on
control unit
• Strobe effect with adjustable color and speed (1-12 flashes/sec.)
• DMX512 control via regular DMX controller (occupies 8 channels)
• Several curtains can be linked via DMX512
• Water-repellent and flame-resistant
• Ready for connection with power plug
• Ideal for party rooms, small discotheques or mobile discotheques

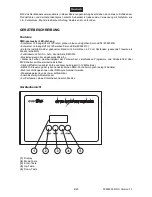
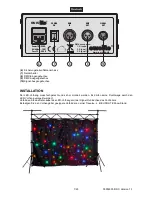
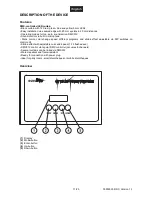
Overview

(1) 

Display

(2) 

Mode-button

(3) 

Enter-button

(4) 

Up-button

(5) 

Down-button

Содержание CRT-120LED curtain

Страница 1: ... Copyright Nachdruck verboten Reproduction prohibited Für weiteren Gebrauch aufbewahren Keep this manual for future needs BEDIENUNGSANLEITUNG USER MANUAL CRT 120 LED curtain ...

Страница 2: ...UCTIONS 14 OPERATING DETERMINATIONS 16 DESCRIPTION OF THE DEVICE 17 Features 17 Overview 17 INSTALLATION 18 Overhead rigging 19 DMX 512 connection connection between fixtures 20 Addressing 21 Connection with the mains 21 OPERATION 21 DMX controlled operation 21 CLEANING AND MAINTENANCE 22 Replacing the fuse 23 Replacing the LEDs 23 TECHNICAL SPECIFICATIONS 23 Diese Bedienungsanleitung gilt für die...

Страница 3: ...ise beachten sind wir sicher dass Sie lange Zeit Freude an Ihrem Kauf haben werden Nehmen Sie den CRT 120 aus der Verpackung SICHERHEITSHINWEISE ACHTUNG Seien Sie besonders vorsichtig beim Umgang mit gefährlicher Netzspannung Bei die ser Spannung können Sie einen lebensgefährlichen elektrischen Schlag erhalten Dieses Gerät hat das Werk in sicherheitstechnisch einwandfreiem Zustand verlassen Um die...

Страница 4: ...Netzleitung gelten auch für evtl Verlängerungsleitungen Gerät bei Nichtbenutzung und vor jeder Reinigung vom Netz trennen Fassen Sie dazu den Netzstecker an der Griffläche an und ziehen Sie niemals an der Netzleitung Ansonsten kann das Kabel und der Stecker beschädigt werden was zu tödlichen Stromschlägen führen kann Sind Stecker oder Geräteschalter z B durch Einbau nicht erreichbar so muss netzse...

Страница 5: ...Halten Sie das Gerät von direkter Sonneneinstrahlung auch beim Transport in geschlossenen Wägen und Heizkörpern fern Die relative Luftfeuchte darf 50 bei einer Umgebungstemperatur von 45 C nicht überschreiten Dieses Gerät darf nur in einer Höhenlage zwischen 20 und 2000 m über NN betrieben werden Verwenden Sie das Gerät nicht bei Gewitter Überspannung könnte das Gerät zerstören Das Gerät bei Gewit...

Страница 6: ... gesäumten Rand mit 20 mm Ösen in 20 cm Abständen passende Traverse als Zubehör erhältlich Funktionsmodi Full On Auto Sound Aktiv DMX512 Musiksteuerung über eingebautes Mikrofon Statische Farben Geschwindigkeit der Farbwechsel verschiedene Programme und Strobe Effekt über DIP Schalter an Steuereinheit einstellbar Strobe Effekt mit variabler Farbe und Geschwindigkeit 1 12 Blitze Sek DMX512 Steuerun...

Страница 7: ...alter Netzanschluss 7 Netzschalter 8 DMX Eingangsbuchse 9 DMX Ausgangsbuchse 10 Signal Ausgangsbuchse INSTALLATION Der LED Vorhang muss fachgerecht und sicher montiert werden Es dürfen keine Fluchtwege durch den LED Vorhang versperrt werden Verbinden Sie das Datenkabel des LED Vorhangs mit der Signal Out Buchse des Controllers Befestigen Sie den Vorhang über geeignete Verbinder an einer Traverse z...

Страница 8: ...e außerhalb des Aufenthaltsbereiches von Personen installiert werden WICHTIG ÜBERKOPFMONTAGE ERFORDERT EIN HOHES MAß AN ERFAHRUNG Dies beinhaltet aber beschränkt sich nicht allein auf Berechnungen zur Definition der Tragfähigkeit verwendetes Installations material und regelmäßige Sicherheitsinspektionen des verwendeten Materials und des Gerätes Versuchen Sie niemals die Installation selbst vorzune...

Страница 9: ...nicht mehr als Sicherungsseil eingesetzt werden LEBENSGEFAHR Vor der ersten Inbetriebnahme muss die Einrichtung durch einen Sachverständigen geprüft werden Anschluss an den DMX 512 Controller Achten Sie darauf dass die Adern der Datenleitung an keiner Stelle miteinander in Kontakt treten Die Geräte werden ansonsten nicht bzw nicht korrekt funktionieren Beachten Sie dass die Startadresse abhängig v...

Страница 10: ...rün Schutzleiter Der Schutzleiter muss unbedingt angeschlossen werden Wenn das Gerät direkt an das örtliche Stromnetz angeschlossen wird muss eine Trennvorrichtung mit mindestens 3 mm Kontaktöffnung an jedem Pol in die festverlegte elektrische Installation eingebaut werden Das Gerät darf nur an eine Elektroinstallation angeschlossen werden die den VDE Bestimmungen DIN VDE 0100 entspricht Die Hausi...

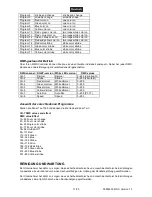
Страница 11: ... LED version DMX values CH 1 Dimmer Dimmer 0 255 dark bright CH 2 Strobe Strobe 0 255 slow fast CH 3 Red dimmer White dimmer 0 255 CH 4 Green dimmer White dimmer 0 255 CH 5 Blue dimmer White dimmer 0 255 CH 6 Yellow dimmer White dimmer 0 255 CH 7 Auto Run Auto Run 0 255 P1 17 CH 8 Speed Speed 0 255 Auswahl der verschiedenen Programme Stellen Sie Kanal 1 auf 255 und danach die Werte über Kanal 7 ei...

Страница 12: ...Sie die defekte Sicherung aus dem Sicherungshalter Schritt 3 Setzen Sie die neue Sicherung in den Sicherungshalter ein Schritt 4 Setzen Sie den Sicherungshalter wieder im Gehäuse ein Sollten einmal Ersatzteile benötigt werden verwenden Sie bitte nur Originalersatzteile Wenn die Anschlussleitung dieses Gerätes beschädigt wird muss sie durch eine besondere Anschluss leitung ersetzt werden die von Ih...

Страница 13: ...ller Maße LxBxH 220 x 125 x 65 mm Controller Gewicht 1 kg Maximale Umgebungstemperatur ta 45 C Maximale Leuchtentemperatur im Beharrungszustand tC 60 C Mindestabstand zu entflammbaren Oberflächen 0 5 m Mindestabstand zum angestrahlten Objekt 0 1 m Sicherung F 2 A 250 V Zubehör EUROLITE Show Stand I Alu Best Nr 59007010 Kabelbinder 350x4 8mm schwarz 100 St Best Nr 30006080 Sicherungsseil 3x600mm bi...

Страница 14: ...s given in this manual we are sure that you will enjoy this device for a long period of time Unpack your CRT 120 SAFETY INSTRUCTIONS CAUTION Be careful with your operations With a dangerous voltage you can suffer a dangerous electric shock when touching the wires This device has left our premises in absolutely perfect condition In order to maintain this condition and to ensure a safe operation it ...

Страница 15: ...tion of the device All warnings concerning the power cords are also valid for possible extension cords Always disconnect from the mains when the device is not in use or before cleaning it Only handle the power cord by the plug Never pull out the plug by tugging the power cord Otherwise the cable or plug can be damaged leading to mortal electrical shock If the power plug or the power switch is not ...

Страница 16: ... insulation particularly in cars and heaters The relative humidity must not exceed 50 with an ambient temperature of 45 C This device must only be operated in an altitude between 20 and 2000 m over NN Never use the device during thunderstorms Over voltage could destroy the device Always disconnect the device during thunderstorms The symbol m determines the minimum distance from lighted objects The...

Страница 17: ...microphone Static colors color change speed different programs and strobe effect adjustable via DIP switches on control unit Strobe effect with adjustable color and speed 1 12 flashes sec DMX512 control via regular DMX controller occupies 8 channels Several curtains can be linked via DMX512 Water repellent and flame resistant Ready for connection with power plug Ideal for party rooms small discoth...

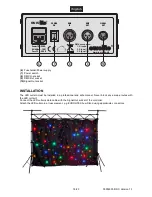
Страница 18: ... 10 6 Fuseholder Power supply 7 Power switch 8 DMX In socket 9 DMX Out socket 10 Signal Out socket INSTALLATION The LED curtain must be installed in a professional and safe manner Never block any escape routes with the LED curtain Connect the LED curtains data cable with the Signal Out socket of the controller Attach the LED curtain to a truss element e g EUROLITE Show Stand using appropriate conn...

Страница 19: ... technical installations and working material used for operating places of events and productions for scenery presentations Procedure The device should be installed outside areas where persons may walk by or be seated IMPORTANT OVERHEAD RIGGING REQUIRES EXTENSIVE EXPERIENCE including but not limited to calculating working load limits installation material being used and periodic safety inspection ...

Страница 20: ...e the installation has to be approved by an expert DMX 512 connection connection between fixtures The wires must not come into contact with each other otherwise the fixtures will not work at all or will not work properly Please note the starting address depends upon which controller is being used Only use a DMX cable and 3 pin XLR plugs and connectors in order to connect the controller with the fi...

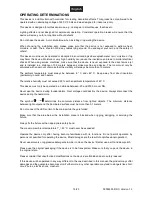
Страница 21: ... with a maximum fault current of 30 mA Lighting effects must not be connected to dimming packs OPERATION After you connected the effect to the mains the CRT 120 starts running Via the function buttons you can select the desired mode ALL All On all LEDs are on at the same time PU Program selection of the different programs SP Speed the controller runs through the program The program speed can be ad...

Страница 22: ...hat safety relating and machine technical installations are inspected by an expert after every four years in the course of an acceptance test The operator has to make sure that safety relating and machine technical installations are inspected by a skilled person once a year The following points have to be considered during the inspection 1 All screws used for installing the devices or parts of the...

Страница 23: ...If necessary remove the retaining adhesive at the connectors in order to disconnect the plugs 4 Connect the spare module using the same polarity 5 From the front of the cloth pull the black plastic ring around the LED from the PCB of the defective module and remove the module 6 Insert the LED of the spare module from the rear through the hole in the cloth and from the front insert a black plastic ...

Отзывы: