background image

Downloaded from www.vandenborre.be

7
EN

5 - I

NSTALLING YOUR WINE CABINET

- When your appliance is delivered, ensure, after unpacking, that your cabinet shows no exterior appearance defects (impacts, buckling, etc.).

- Open the door and check the integrity of the inside of your appliance (walls, shelves, hinges, control strip, etc.).

- In the event of a problem, contact your EuroCave dealer.

- Now move your cabinet to its chosen location. This location should:

- be open to the exterior to enable air circulation (not a closed cupboard, etc.),
- be removed from any heat source,
- not be too damp (laundry room, utility, bathroom, etc.),
- have a solid and flat floor,
- have an electrical power supply (standard power socket, 16A, with earth and differential circuit breaker, 30 mA)*.

* not valid for some countries.

- Do not place your cabinet in an area that might be flooded.

- Avoid water splashes over all or part of the back of the appliance.

- Place the water recuperation tank on the compressor stand (you will find this in the “accessories” bag in your cabinet),
sliding it under the little outlet hose from the casing, with the deepest part of the tank under the hose.

- Ta ke the power lead, (which you will find in the “accessories” bag in your cabinet), and connect it to the connector at the
bottom left of the cabinet (see adjoining diagram).

- Release the power cable so that it is accessible and position your appliance, leaving a space of 8 to 10cm between the
wall and the rear of your wine cabinet.

- Release the power cable so that it does not enter into contact with any part of the appliance.

-

Wait 48 h

before plugging in, so that the internal circuit fluids can settle.

- gently tip cabinet backwards in order to adjust the front feet (by unscrewing or tightening), so as to achieve a level for
your cabinet (we recommend the use of a spirit level).

- Remove the protective elements inside your cabinet.

- Position the carbon filter, which you will find in the “accessories” bag, placing it inside the cabinet in the breather hole at the top left (see adjoining diagram).

- This wine cabinet is designed to be used as a free standing unit only.

- Never connect several wine cabinets to a multi-socket.

N.B.:Whenever moving your cabinet, never tip by more than 45°,

And always on the lateral face on the electrical lead side.

Did you know?

A wine cabinet has to be designed so that no bottle comes into contact with the back  wall. If this were to
happen, the condensation on the wall could trickle over the shelves and damage the bottle labels. Incidentally,
contact with the cold wall could create a frost point, which would be harmful to your wine.

I - Generalities

Содержание Premiere V266

Страница 1: ... n l o a d e d f r o m w w w v a n d e n b o r r e b e Mode d emploi Gamme Essentielle V266 User Manual Essentielle Range V266 Gebrauchsanweisung Reihe Essentielle V266 Modo de empleo Gamma Essentielle V266 ...

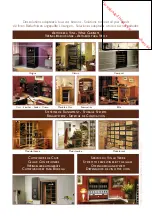
Страница 2: ...BINETS WEINKLIMASCHRÄNKE ARMARIOS PARA VINOS SYSTÈMES DE RANGEMENT STORAGE SYSTEMS REGALSYSTEME SISTEMAS DE COLOCACIÓN CLIMATISEURS DE CAVE CELLAR CONDITIONERS WEINKELLERKLIMAGERÄTE CLIMATIZADORES PARA BODEGA SERVICE DU VIN AU VERRE SYSTEM TO SERVE WINES BY THE GLASS OFFENAUSSCHANKSYSTEM DISPENSADOR DE VINO POR COPA Origine Classic Compact Cuir Leather Leder Cuero Meuble àVins Elite Modulothèque M...

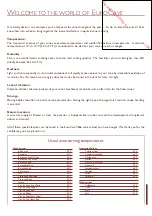
Страница 3: ...n fatal for the finest wines Storage Moving bottles too often is harmful to wine preservation Having the right type of storage which restricts undue handling is essential Natural aeration A constant supply of filtered air from the exterior is indispensable in order to avoid the development of unpleasant odours and mould All of these specific features can be found in the EuroCave V266 wine cabinet ...

Страница 4: ...lities p 7 II Door reversibility p 8 6 LAYOUT STORAGE l Various types of storage p 9 lI Recommendations on your wine cabinet layout p 9 lII Adding sliding shelves p 9 lV Modification to cabinet layout p 10 7 COMMISSIONING YOUR WINE CABINET l Connection p 10 II Switching on the cabinet p 10 III Description of control panel p 11 IV Temperature setting p 12 8 EVERYDAY MAINTENANCE p 13 9 TROUBLESHOOTI...

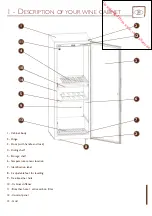
Страница 5: ... 9 13 7 6 3 12 2 2 1 1 Cabinet body 2 Hinge 3 Door with handle and lock 4 Sliding shelf 5 Storage shelf 6 Temperature sensor location 7 Identification label 8 2 adjustable feet for levelling 9 Free breather hole 10 Cabinet stiffener 11 Breather hole active carbon filter 12 Control panel 13 Grid 14 Lock receiver 8 ...

Страница 6: ...ld always observe certain basic precautions especially 3 ELECTRICAL POWER SUPPLY Disposal of packaging The packaging units used by EuroCave are entirely made of recyclable materials After unpacking your cabinet take the packaging to a waste disposal centre For the most part it will be recycled Recycling A caring gesture Electrical and electronic equipment have potentially hazardous effects on the ...

Страница 7: ...ag in your cabinet and connect it to the connector at the bottom left of the cabinet see adjoining diagram Release the power cable so that it is accessible and position your appliance leaving a space of 8 to 10cm between the wall and the rear of your wine cabinet Release the power cable so that it does not enter into contact with any part of the appliance Wait 48 h before plugging in so that the i...

Страница 8: ...he guidelines Fig D Stand the cabinet upright Dismantle the lock receiver by removing the screws see Fig E Reassemble the lock receiver on the opposite side Position the door onto the pin of the lower hinge Hold the door against the door seal Place the pin of the upper hinge in the corresponding slot of the door Fit the 3 screws Ensure that the hinge is fixed properly into place if not adjust it S...

Страница 9: ...ight is distributed over a wider area Also make sure that bottles do not touch the back or the walls of the cabinet Please distribute bottles as evenly as possible over all of the upper area of the wine cabinet try not to put all your bottles either at the top or at the bottom Be sure to follow the storage recommendations according to the type of storage shelves in your cabinet and never pile bott...

Страница 10: ...eplace the sliding shelf as shown opposite Installing the front section of the guide Installing the rear section of the guide 7 COMMISSIONING YOUR WINE CABINET 1 Connection Check that the plug is connected to a power supply presence of correct amp fuses functioning 30 mA differential circuit breaker not applicable to certain countries Make sure you wait 48H before commissioning I1 Switching on Pre...

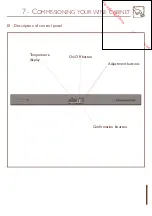
Страница 11: ...o w n l o a d e d f r o m w w w v a n d e n b o r r e b e 11 EN 7 COMMISSIONING YOUR WINE CABINET III Description of control panel On Off button Temperature display Adjustment buttons Confirmation boutton ...

Страница 12: ... no button is pressed within the 15 seconds following programming The recommended control range for preserving and maturing your wine is from 48 F to 59 F the default setting is 54 F To operate correctly your cabinet should be located in a room with a temperature between 32 F and 95 F When there has been a significant modification in set temperatures it can take several hours for your wine cabinet...

Страница 13: ...must be carried out by a qualified refrigeration technician who will check the circuit is waterproof before powering up In the same way any intervention on the electrical circuit must be carried out by a qualified electrician Your EuroCave wine cabinet is a tried and tested easy to use appliance The following few maintenance operations will enable your cabinet to provide you with many years of fai...

Страница 14: ...idth Depth Empty weight Usage limits Consumption kg Min T F Max T F per 24h kWh V266 1744 654 689 71 32 95 0 9 24h consomption measured with a solid door and an outside temperature of 25 C 77 F Setting precision 1 C 2 F Display precision 1 C 2 F 10 TECHNICAL SPECIFICATIONS ...

Страница 15: ...D o w n l o a d e d f r o m w w w v a n d e n b o r r e b e 11 SIMULATIONS DE RANGEMENT 11 STORAGE LAYOUT EXAMPLES 11 LAGERUNGS BEISPIELE 11 SIMULACIONES DE COLOCACIÓN 51 ...

Страница 16: ...s en configurations usine avec des bouteilles Bordeaux Tradition The cabinet capacities are calculated in factory configuration using traditional Bordeaux bottles Die Kapazitäten der Schränke werden mit Bordeauxflaschen Tradition in Fabrik Konfigurationen berechnet Las capacidades de las bodegas están calculadas en configuraciones de fábrica con botellas BurdeosTradición ...
Страница 17: ...D o w n l o a d e d f r o m w w w v a n d e n b o r r e b e NOTES ...

Страница 18: ...D o w n l o a d e d f r o m w w w v a n d e n b o r r e b e 54 NOTES ...

Страница 19: ...photocopying reproduction translation wether partial or total are strictly prohibited without prior written consent from EuroCave Die Angaben in diesem Dokument können ohne Ankündigung geändert werden EuroCave gewährt keine Garantie wenn das Gerät anders als für seine gedachte Zweckbestimmung eingesetzt wird EuroCave haftet nicht für Fehler die diese Anweisung enthalten könnte und auch nicht für S...

Страница 20: ... glass system don t hesitate to contact your EuroCave or Around Wine dealer for further information Seit mehr als 30 Jahren führend im Bereich der Lagerung der Präsentation und dem Ausschank vonWeinen schlägt Ihnen EuroCave Lösungen vor die jedem Ihrer Bedürfnisse angepasst sind Wein Zigarrenklimaschränke Weinkeller Kompaktklimaanlagen Geräte für den glasweisen Offenausschank Weinkeller Regalsyste...

Отзывы: