Fig. 4
Locking
Notch
Locking
Latch
Before First Use
Remove all packing materials and
manual from inside your slushie maker.
Do
NOT
immerse the motor base in
water or other liquids. Hand wash all
the parts, (the lid, the ice canister, ice
paddles, slushie paddles and the
slushie container), making sure that the
spigot is open when washing to allow
water to flow through. Parts should be
washed with warm water and a mild
dish washing detergent and wiped
completely dry. Do
NOT
use abrasive
cleaners to clean as these may damage
your appliance. The drive spline may be
wiped clean with a damp cloth.
3
Features
•
Large slushie container
32 oz (1 liter) capacity slushie
container.
•
Efficient dispensing
Dual action agitator- slushie paddles
change direction in the dispense
position to scrape the ice crystals
through the spigot more efficiently.
Assembling the Slushie Maker
Note:
Do not plug the power cord
into an electrical outlet until the unit
is fully assembled.
1. Place the slushie container on the
motor base. Ensure that the
container is sitting correctly on the
drive spline, with the spigot directly
over the drink tray. (Fig 1)
Using Your Slushie Maker
Your slushie maker can make up to 32
oz (1 liter) of slushies or an individual
serving size. The ingredients will
decrease in volume once the ice crystals
have formed, however to ensure that the
brine (ice and salt) used to make
slushies, or the slushie mixture is not
contaminated, you must not exceed the
capacity of 32 oz of liquid (1 liter) in the
slushie container.
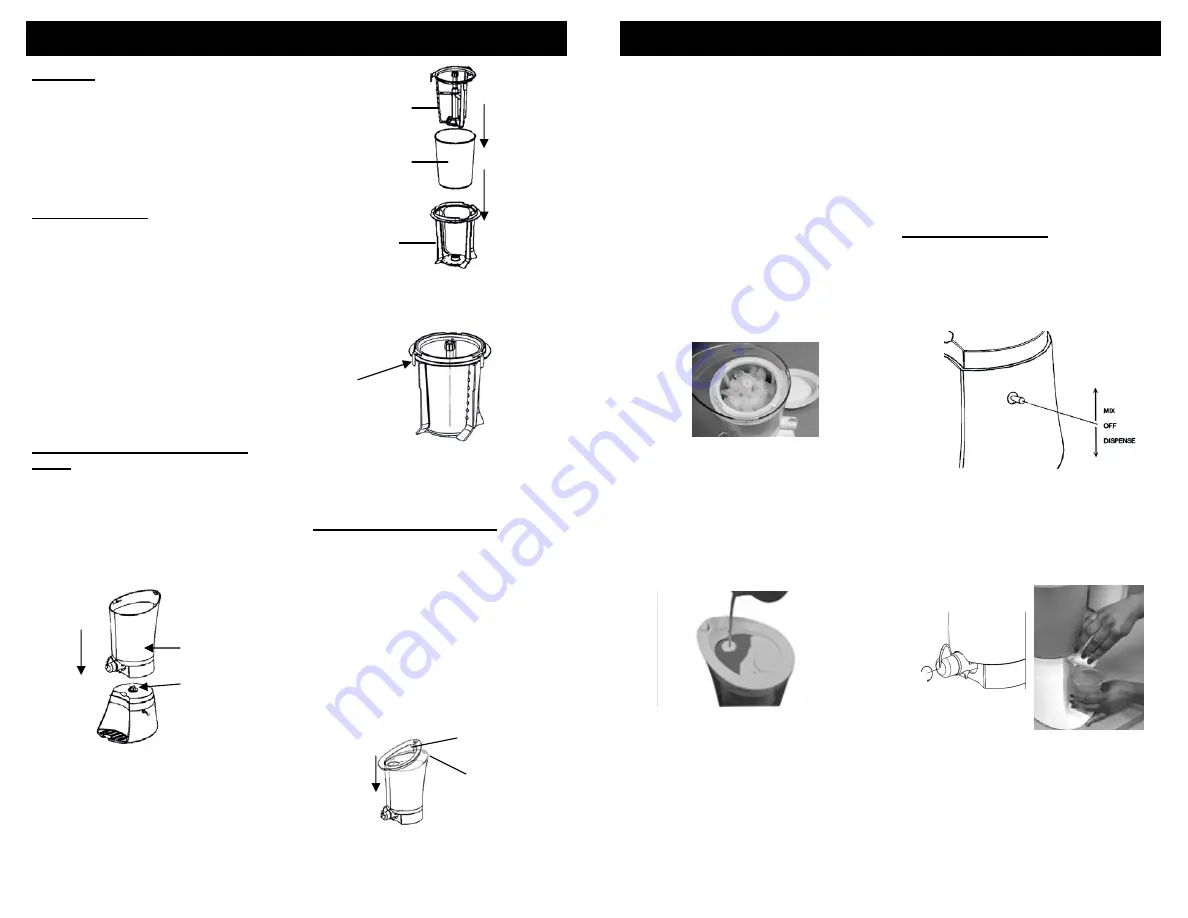
1. To secure the lid onto the slushie
container, place the front end on first,
then secure the locking latch onto the
rear locking notch of the canister.
(Fig. 4)
Fig. 1
Drive
Spline
Slushie
Canister
2. Insert the ice canister into the
slushie paddles, then insert the ice
paddles into the ice canister.
(Fig. 2)
Fig. 2
Ice
Paddles
Ice
Canister
Slushie
Paddles
3. The locking latches on the ice paddles
should easily snap onto the slushie
paddles. (Fig. 3)
Fig. 3
Locking
Latches
4. Place the canister assembly into the
slushie container, ensuring that the
ice canister sits flush onto the drive
spline at the base of the slushie
container.
OPERATING INSTRUCTIONS
OPERATING INSTRUCTIONS
4
Fig. 6
NOTE:
Place a cup or glass on the drink
tray when the unit is running incase of
dripping.
8. Leave the unit on for approximately
10-15 minutes, depending on the
slushie mix used or until the mixture
reaches the desired consistency. Do
not turn the unit "Off" during use as
the mixture may thaw.
9. Add more ice cubes and salt if
necessary through the ice/salt inlet.
Fig. 7
2. Place a serving glass onto the drink
tray, then turn the spigot handle
clockwise, to the pour position.
(Fig. 8)
3. The slushie mixture will begin to pour
out into the glass. (Fig. 9)
Fig. 8
Fig. 5
4. To shut off the dispenser, turn the
spigot handle counter clockwise.
5. Flip the Mix/Off/Dispense switch to
the “Mix” position. Switch to the “Off”
position when you are finished using
the slushie maker.
NOTE:
Ensure that the spigot is in the
closed position to avoid spillage.
7. Slowly pour the slushie mixture into the
rear section of the lid. The liquid will
pour into the slushie container, you will
begin to see it rotating in the slushie
container. (Fig. 6)
CAUTION: Do not
exceed 32 oz (1 liter)
of liquid indicated with a MAX line on the
slushie container.
Fig. 9
Dispensing Slushies
1. When peaks form, slushie mixture
has reached the best consistency.
To serve the slushie mixture, flip
the Mix/Off/Dispense switch to the
lowest position, “Dispense”, to
serve the slushies. (Fig. 7)
2. Once the lid is secured to the ice
container, to start the unit, flip the
Mix/Off/Dispense switch up to the “Mix”
position. The slushie and ice paddles
will begin to rotate.
3. To fill the ice canister, place 2 oz of
water into the ice canister through the
ice/salt inlet.
4. Place 1 layer of ice cubes into the
ice canister. Ice canister should be
approximately half full.
5. Add 1 ice/salt inlet cap of rock salt or
coarse sea salt to the ice cubes.
6. Repeat steps 4 and 5. Ice level should
be approximately 1-inch below the rim
of the ice canister. (Fig. 5) This leaves
room to add more ice and salt if
required later.
HINT:
Regular square ice cubes work best.
CAUTION: Do NOT
exceed filling the ice
canister 1-inch from the top as there is a
risk that the slushie mixture will become
contaminated with salt.
IMPORTANT: Do not
use the slushie
maker to freeze liquids without any sugar
(such as water) as this may damage the
appliance. Water will freeze very quickly to
the exterior of the ice canister and could
damage the unit.


