INSTRUCTIONS FOR USE
Operating Controls
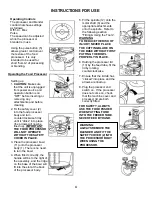
The processor and blender
control dials have settings
as follows:
Off/1-9 + Max
Pulse
The speed can be adjusted
while the processor or
blender is in use.
Using the pulse button (5)
allows greater control over
the texture of the food
processed. It is only
intended to be used for
short “bursts” of processing
or blending.
Operating the Food Processor
Setting up
1.
CAUTION:
Make sure
that the unit is unplugged
from power source and
operation button is on
“OFF” before inserting or
removing any
attachments and before
cleaning.
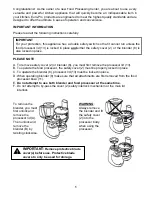
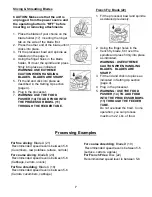
2. Fit the safety cover (2)
into the food processor
body and turn
counterclockwise firmly
until it “clicks” into place
(the arrows will now be
lined up).
IMPORTANT
THE FOOD PROCESSOR
WILL NOT OPERATE
WITHOUT THE SAFETY
COVER IN PLACE.
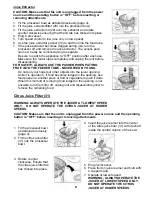
3. Place the processor bowl
(11) onto the processor
body (1). There is no need
to turn the bowl.
4. When fitted correctly, the
handle will be to the right of
the assembly, and the ridge
on the base of the bowl will
fit into the slot at the back
of the processor body.
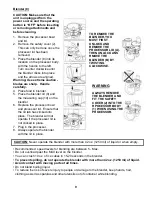
5. Fit the spindle (12) onto the
motor shaft (6) and the
appropriate attachments
onto the spindle. Refer to
the following section
“Fitting & Using the Tools”.
WARNING
TO REDUCE THE RISK OF
INJURY, NEVER PLACE
THE CUTTING BLADE ON
THE BASE WITHOUT FIRST
PUTTING THE BOWL
PROPERLY IN PLACE.
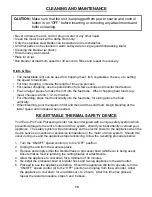
6. Holding the processor lid
(13) by the feed tube, fit the
lid by rotating
counterclockwise.
7. Ensure that the lid tab has
“clicked” into place and the
arrows are lined up.
8. Plug the processor and
switch on. If the processor
does not come on, check
that the machine cover and
processor lid are both
correctly fitted.
FOR SAFETY, ALWAYS
USE THE FOOD PUSHER
WHEN PUTTING FOOD
INTO THE FEEDER TUBE.
NEVER FEED BY HAND.
WARNING:
ALWAYS REMOVE THE
BLENDER AND FIT THE
SAFETY COVER (2) INTO
THE PROCESSOR BODY
WHEN USING THE
PROCESSOR.
4

