background image

11. Adjusting the thread tension

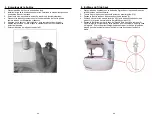
Test the stitch tension on a scrap piece of the 

same fabric you are going to use.  When the 

thread tension is properly adjusted, the upper and 

lower threads tension is equal and strong enough 

to lock both threads in the center of the material.

If the upper tension is too tight, the upper thread 

lies straight along the surface of the fabric.  Adjust 

the tension by turning the tension dial counter 

clockwise. (Fig. 1)

If the upper tension is too loose, the bottom thread 

lies straight along the bottom of the fabric. Adjust 

by turning the tension dial clockwise. (Fig. 2)

Fig. 1

Fig. 2

Please note:

The bobbin thread tension has been adjusted at 

the factory and does not need readjustment.  If the 

upper tension adjustment does not correct the 

problem, then remove the bobbin and reinsert it 

making sure that the magnetism of the bobbin 

case is activated.

11

12. Troubleshooting

Do not pull the fabric.  Let 

the machine feed by itself.

Pulled the fabric when 

sewing.

Replace with w new 

needle and tighten the 

presser foot.

Presser foot too loose.

Replace with a new 

needle.

Needle bent or deformed.

Breaking needle

Adjust the thread tension 

dial.

Upper thread too tight or 

lower thread too loose.

Stitches too loose or 

uneven

Reinsert the needle 

making sure to push it up 

as high as it can go.

Needle not inserted 

corrected.

Replace with a new 

needle.

Needle is blunt.

Rethread the upper and 

lower thread again.

Upper thread is jamming 

under the presser foot.

Breaking thread

Rethread the needle 

making sure the thread 

goes from left to right.

Needle threaded 

incorrectly.

Replace with a new lower 

bobbin.

No more thread in lower 

bobbin.

Bobbin thread can 

not be drawn up

Tighten the presser foot.

Presser foot is too loose.

Replace with a new 

needle.

Needle is bent.

Remove and reinsert the 

needle.

Needle is not properly 

inserted.

Skipping stitches

Make sure that the AC/DC 

adapter is connected to 

the proper position on the 

machine.

AC/DC adapter is not 

connected to the right 

position.

Replace batteries with 

new ones.

Used and new battery are 

used together.

Replace batteries with 

new ones.

Battery power low.

Reinsert using the 

diagram provided inside 

the battery compartment.

Batteries installed 

incorrectly.

No power supply or 

machine runs slowly

Solution

Probable Cause

Problem 

12

Содержание Dressmaker.PLUS 970C

Страница 1: ...N Model Modelo Modèle 970C COMPACT SEWING MACHINE MÁQUINA DE COSER COMPACTA MACHINE À COUDRE COMPACTE EURO PRO Operating LLC U S Boston Ma 02465 Canada 4400 Bois Franc St Laurent QC H4S 1A7 Tél 1 800 361 4639 www euro pro com Copyright EURO PRO Operating LLC ...

Страница 2: ...edle to break 7 Do not use bent needles 8 Do not push or pull fabric while stitching It may deflect the needle causing it to break 9 Switch the sewing machine off when making any adjustments in the needle area such as threading needle changing needle threading bobbin or changing presser foot 10 Always unplug sewing machine from electrical outlet when removing covers lubricating or when making any ...

Страница 3: ... the Foot Control Receptacle on the machine 4 The sewing machine can be controlled by applying pressure to the foot control CAUTION Always turn the sewing machine Off and unplug from the electrical outlet when the machine is not in use Using the sewing machine with batteries 1 Open the battery compartment cover that is on the bottom of the sewing machine 2 Insert 4 AA alkaline batteries making sur...

Страница 4: ...5 4 Threading the upper thread 6 1 Place the upper bobbin or large spool of thread on the spool pin with the thread unwinding in a counter clockwise direction 2 Pull the thread to the left and pass through the first thread guide 1 3 Pass the thread between the two discs of the tension dial 2 4 Thread it through the hole in the take up lever 3 and then down through the second thread guide 4 and the...

Страница 5: ... Remove the bobbin cover and take out the empty bobbin Fig 1 2 Place the new bobbin in the bobbin case with the thread unwinding in a clockwise direction Fig 2 Fig 3 3 Leave about 4 inches of thread extended out from the bobbin case 4 Holding the upper bobbin thread loosely in one hand turn the hand wheel counter clockwise Fig 4 The needle will go down picking up the lower bobbin thread Keep turni...

Страница 6: ... the Off position to stop sewing Fig 3 6 Turn the hand wheel counter clockwise to raise the needle to its highest position Fig 4 Lift the presser foot and pull out the thread tension release bar Then gently remove the fabric away from the sewing machine 7 Cut the thread using the thread cutter Important Do not touch the tension dial during sewing because it may cause the machine to jam Fig 1 Fig 2...

Страница 7: ...er foot too loose Replace with a new needle Needle bent or deformed Breaking needle Adjust the thread tension dial Upper thread too tight or lower thread too loose Stitches too loose or uneven Reinsert the needle making sure to push it up as high as it can go Needle not inserted corrected Replace with a new needle Needle is blunt Rethread the upper and lower thread again Upper thread is jamming un...

Страница 8: ... los mismos permanezcan enchufados o con las baterías colocadas 2 Siempre desenchufe este artefacto del tomacorriente y o quítele las baterías inmediatamente después de usarlo y antes de proceder a su limpieza Advertencia Para reducir el riesgo de quemaduras incendio descarga eléctrica o daños personales 1 No permita que sea utilizado como un juguete Tenga mucho cuidado al usar cualquier artefacto...

Страница 9: ...ón de la tensión del hilo 13 Perilla de tensión del hilo 14 Barra de la aguja Vista frontal 15 El dibujo puede no ser igual al producto real Vista posterior 1 Eje porta carretes de la bobina 2 Corta hilos 3 Elevador del pie prénsatelas 4 Guía de enhebrado 5 Aguja 6 Pie prénsatelas 7 Tomacorrientes de CA CC 8 Tomacorrientes de pedal de control Accesorios Bobinas vacías x2 Bobinas con hilo x2 Eje po...

Страница 10: ...tá marcado a los costados del compartimiento 3 Vuelva a colocar el tornillo de sujeción CUIDADO Verifique que el botón de encendido esté en la posición Off Apagado cuando cambie o coloque baterías nuevas Si la máquina está en posición On Encendido arrancará inmediatamente al colocarle las baterías y podría provocar lesiones al operador 17 3 Devanado de la bobina 1 Coloque un carrete de hilo en el ...

Страница 11: ...ando puntadas correctamente y SOLO use el interruptor de encendido o el pedal de control TRAS VERIFICAR QUE LA AGUJA ESTÁ BIEN POSICIONADA Y QUE LAS PUNTADAS ESTÁN BIEN 20 1 Coloque la bobina superior o un carrete grande de hilo en el eje porta carretes de tal manera que el hilo se desenrosque en sentido antihorario 2 Tire el hilo hacia la izquierda y páselo a través de la primer guía del hilo 1 3...

Страница 12: ...Fig 3 Fig 5 21 9 Comenzar a coser Puede iniciar una costura empleando tanto el cable de alimentación y el pedal de control como insertando baterías en el respectivo compartimiento y usando los controles sobre la propia máquina de coser 1 Suba la aguja hasta su posición superior girando la manivela en sentido antihorario y luego libere el pie prénsatelas 2 Coloque ambos hilos tanto el superior como...

Страница 13: ...uce entre ambos hilos quede trabado en el centro del material Si la tensión del hilo superior es demasiada el hilo inferior quedará derecho por sobre el tejido Ajuste la tensión girando la perilla de tensión en sentido antihorario Fig 1 Si la tensión del hilo superior es muy poca el hilo inferior quedará derecho en la parte inferior del tejido Ajuste la tensión girando la perilla de tensión en sen...

Страница 14: ...________________________________________________ Modelo del artefacto _________________________________________________________________________ Fecha de compra Nombre del negocio _________________________________________________________________________ Nombre del dueño _________________________________________________________________________ Dirección Ciudad Provincia Código postal Impreso en Chin...

Страница 15: ...coudre lors des réglages dans la zone de l aiguille tels que l enfilage le changement d aiguille la mise en place de la canette ou le changement de pied presseur 9 Éteignez la machine à coudre lors des réglages dans la zone de l aiguille tels que l enfilage le changement d aiguille la mise en place de la canette ou le changement de pied presseur 10 Débranchez toujours la machine à coudre avant de ...

Страница 16: ... machine 4 La machine à coudre peut être contrôlée en appliquant de la pression sur la commande au pied MISE EN GARDE Mettez toujours la machine à coudre en arrêt et débranchez la prise électrique lorsque la machine n est pas en fonctionnement Utilisation de la machine à coudre avec des piles 1 Ouvrez le compartiment de la batterie qui se trouve en bas de la machine à coudre 2 Installez 4 piles al...

Страница 17: ...et coupez le fil 31 4 Enfilage du fil du haut 32 1 Placez la bobine supérieure ou la bobine de fil grande sur le porte bobine avec le fil déroulé en sens antihoraire 2 Tirez le fil vers la gauche et passez le autour du premier guide fil 1 3 Passez le fil entre les deux disques du bouton de tension 2 4 Enfilez à travers le trou dans le levier de fil 3 puis en dessous du deuxième guide fil 4 et puis...

Страница 18: ... couverture de la bobine et retirez la bobine vide Fig 1 2 Placez la nouvelle bobine dans le boîtier de la canette avec le fil déroulé en sens horaire Figures 2 et 3 3 Laissez environ 10 cm 4 pouces de fil étendu à partir du boîtier de la canette 4 En tenant la bobine supérieure dans une main tournez la manivelle en sens antihoraire Fig 4 L aiguille descendra en ramassant le fil de la bobine infér...

Страница 19: ...êt Fig 3 6 Tournez la manivelle en sens antihoraire pour soulever l aiguille à sa position plus élevée Fig 4 Soulevez le pied presseur et tirez de la barre de libération de la tension du fil Puis retirez doucement le tissu de la machine à coudre 7 Coupez le fil à l aide du coupe fil Important Ne touchez pas le bouton de tension lorsque la machine est en marche puisque cela peut bloquer la machine ...

Страница 20: ...ou épointée L aiguille est cassée Ajuster le bouton de tension du fil Le fil supérieur est trop serré ou le fil inférieur est trop relâché Les points ne sont pas assez serrés ou sont irréguliers Réinstallez l aiguille en vous assurant de la soulever à sa position la plus élevée L aiguille n est pas insérée correctement Remplacez avec une nouvelle aiguille L aiguille est épointée Renfilez le fil su...

Страница 21: ...ale et ou conventionnelle La seule responsabilité d EURO PRO Operating LLC s il y en a une se limite aux obligations spécifiques exprimées sous cette obligation de garantie Veuillez inclure la preuve d achat Pour le support au service à la clientèle appelez le 1 800 361 4639 ou visitez notre site web au www euro pro com CARTE D ENREGISTREMENT DU PROPRIÉTAIRE S V P remplir et poster cette carte d e...

Отзывы: