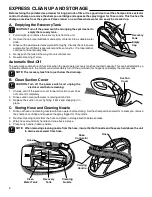
IMPORTANT: For best results, remove all solid material from the area before using the portable deep cleaner.
5
A. Fill Shampoo Cartridge
1. Lift carrying handle to upright position and remove
cleaning nozzle.
2. Pull out the shampoo cartridge, remove the cap
and fill with Eureka All Purpose Shampoos and
Concentrates only.
3. Close cap tightly and replace shampoo cartridge.
Cartridge must be fully seated in place to function
correctly.
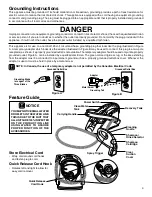
NOTE: Familiarize yourself with the parts of the portable deep cleaner by reading this ownerʼs manual before
using.
B. Fill Clean Water Tank
1. Lift up and pull out clean water tank.
2. Fill tank with hot tap water (not boiling), replace
cap.
3. Gently push until the clean water tank is fully seated
into position.
Shampoo
Cartridge
Clean
Water
Tank
Fill Cap
EXPRESS SET UP
Cleaning
Nozzle
Hose
Carrying Handle
EXPRESS USE
WARNING : Never carry this portable deep
cleaner while in use. Use only on level
surfaces.
1. Remove cleaning nozzle from storage position.
2. Unhook hose from storage handle.
3. Connect cleaning nozzle to hose. Ensure locking tab
is in place.
4. Push power switch to “ON” position
5. Move the shampoo/rinse selector to shampoo setting.
6. Holding the nozzle approximately 1-inch above the surface to be cleaned,
squeeze the spray trigger. Pull the nozzle backward at a moderate pace for
no more than five sconds to avoid over soaking.
7. Release the spray trigger to stop the solution flow.
8. Place the brush of the cleaning nozzle directly onto surface. Gently scrub
the spot by moving the cleaning nozzle forward and backward across spot
applying light pressure. As the nozzle moves over the surface, it picks up the
dirty water and places it in the recovery tank.
9. Move the nozzle over the carpet/upholstery several more times without pushing
the spray trigger. This removes excess water and helps the carpet/upholstery
dry faster.
(For best suction results, slightly tilt nozzle forward for a more direct contact
between suction cover and carpet or upholstery.)
10. For clean water rinse, move the shampoo/rinse selector to the rinse setting,
squeeze the spray trigger and repeat steps 6 through 9.
11. For heavily soiled areas, repeat this procedure as needed.
NOTE : If the cleaning solution and water are not released from the nozzle,
there may be an air lock. With the unit off, raise the nozzle and engage
the trigger for 4 seconds. Turn unit on to resume spraying.
Power Switch
(O = OFF,
I = ON)
Cleaning
Nozzle
Carrying
Handle
Cleaning
Nozzle
Hose
Connector
Spray
Trigger
Shampoo
Cartridge
Shampoo/Rinse Selector

