background image

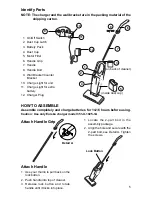
Identify Parts

NOTE: The charger and the wall bracket are in the packing material of the

shipping carton.

  1. On/Off Switch

  2. Dust Cup Latch

  3. Battery Pack

  4. Dust Cup

  5. Motor Filter

  6. Handle Grip

  7. Handle

  8. Handle Bolt

  9. Wall Bracket/Counter

Bracket

10. Charge Light for unit

11. Charge Light for extra

battery

12. Charger Plug

HOW TO ASSEMBLE

Assemble completely and charge batteries for 14-16 hours before using.

Caution: Use only Eureka charger model 351-U-1025-1A

5

1

4

2

5

6

7

11

10

9

12

8

3

(inside dust cup)

(on back of cleaner)

Attach Handle Grip

1. Locate the 2-part bolt in the

assembly package.

2. Align the hole and secure with the

2-part bolt, see Detail A. Tighten
the screws.

Attach Handle

1. Use your thumb to pull back on the

lock button.

2. Push handle into top of cleaner.

3. Release lock button and rotate

handle until it locks into place.

Detail A

Lock Button

Ä

Ä

Содержание 96B

Страница 1: ...sion toll free at 1 800 282 2886 7 a m to 8 p m Central Standard Time Monday through Saturday For replacement of broken or missing items to be shipped direct to you call 1 800 438 7352 8 a m to 4 45 p...

Страница 2: ...ILATE OR INCINERATE BATTERIES AS THEY WILL EXPLODE AT HIGH TEMPERATURES Leaks from battery cells can occur under extreme usage or temperature conditions If the liquid gets on the skin 1 wash quickly w...

Страница 3: ...hargeur ou l aspirateur avec les mains mouill es NE PAS MUTILER OU INCINERER LES PILES LES PILES EXPLOSENT A DES TEMPERATURES EXCESSIVES Il peut y avoir des fuites des l ments des piles lorsque celles...

Страница 4: ...on If you prefer you can write to The Eureka Company 807 North Main Street Bloomington IL 61701 USA In Canada write to The Eureka Company 866 Langs Drive Cambridge Ontario N3H 2N7 Refer to The Eureka...

Страница 5: ...ASSEMBLE Assemble completely and charge batteries for 14 16 hours before using Caution Use only Eureka charger model 351 U 1025 1A 5 1 4 2 5 6 7 11 10 9 12 8 3 inside dust cup on back of cleaner Attac...

Страница 6: ...ext to an electrical outlet Take the battery out of the cleaner and put in the charger stand as shown to the right The charge light will indicate that the battery is charging Charge Light for Unit Cha...

Страница 7: ...routine maintenance Keep the cleaner operating at top efficiency Empty the dust cup after each use Empty Dust Cup 7 1 Slide dust cup latch up 2 Pull dust cup from handle section and lift from the noz...

Страница 8: ...or dispose of in fire Dispose of properly A municipal waste will not dispose of the battery Use a recycling center if one is convenient Otherwise take or send the battery to your nearest Eureka Warra...

Страница 9: ...e and Handling Charge Within the U S A TOTAL 2001 White Consolidated Industries Inc Printed in China Method of Payment No C O D s Check or money order payable to The Eureka Company Do not send currenc...

Страница 10: ......

Страница 11: ...lude the model type and serial number from the data plate on the cleaner Further Limitations and Exclusions Any warranty that may be implied in connection with your purchase or use of the cleaner incl...

Страница 12: ...2001 White Consolidated Industries Inc Part No 59807A 2 01 Printed in China...

Отзывы: