Eureka 5190 Series Скачать руководство пользователя страница 13

13

b

a

3

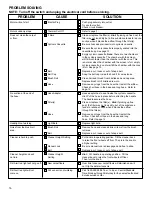
How To Empty Cyclonic Cassette

NOTE: Turn off the switch and unplug the electrical cord before emptying cyclonic cassette. Never operate the

vacuum cleaner without the cyclonic cassette or the filter.

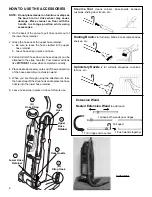
Emptying the Cyclonic Cassette:

FOR INSTRUCTIONS ON HOW TO REMOVE THE CYCLONIC CASSETTE FROM
THE CASSETTE BODY, SEE ABOVE.

It is clearly visible when the dust compartment is full and needs emptying.
Lift screen as shown (3) to completely empty cyclonic cassette. It is possible
to clean out the cyclonic cassette by using another vacuum.

CAUTION: The cyclonic cassette can be washed in warm water, if desired,

but strong detergents should not be used. Dry thoroughly before
using again.

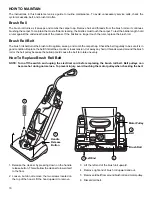
NOTE: The compartment with the screen (a) will fill much faster with

larger dirt particles than the compartment with the cone (b).
This is normal, empty the cyclonic cassette when the side with
the screen is full, do not wait for the side with the cone to fill
completely.

Check and clean the Cassette Micron Filter once a month to maintain
good performance. The filter can be cleaned by vacuuming with another
cleaner or brushing dust off into the trash. Recommended changing of
the Cassette Micron Filter is once every three months.

Remove cyclonic cassette by pushing up lever (1), unhooking (2) by swinging
outward from vacuum body. When replacing cyclonic cassette, hook at top
where shown (2), and swing back into place until lever (1) snaps into place.

2

1

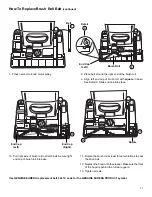
To Change Cassette Micron Filter:

NOTE: Turn off the switch and unplug the electrical cord before changing the Cassette Micron Filter. Never operate

the vacuum cleaner without the cyclonic cassette or the filter.

|

1. Remove the filter frame by grasping the handle on the back of the filter frame and pulling firmly. The filter frame will drop

down staying connected at the hinges on the bottom.

2. Remove old filter from filter frame and replace with a new filter.

3. Reconnect filter frame to cassette body by swinging filter frame up and pushing against cassette body until it snaps into

place.

To Change the Cassette Micron Filter:

1

2

3

1. Filter Frame

2. Filter

3. Cassette Body

Use GENUINE EUREKA replacement
filter, 60696. Look for the GENUINE
EUREKA product symbol.

|

|

|

|

|

Содержание 5190 Series

Страница 1: ...clonic Upright Vacuum Cleaner Owner s Guide 5190 Series Household Type IMPORTANT Do not return this product to the store For assembly problems or questions contact Eureka s Customer Service Division toll free at 1 800 282 2886 7 a m to 8 p m Central Standard Time Monday through Saturday For replacement of broken or missing items to be shipped direct to you call 1 800 438 7352 8 a m to 4 45 p m Cen...

Страница 2: ... Do not unplug by pulling on cord To unplug grasp the plug not the cord Do not handle plug or vacuum cleaner with wet hands Do not put any object into openings Do not use with any opening blocked keep free of dust lint hair and anything that may reduce airflow This vacuum cleaner creates suction and contains a revolving brush roll and a power drive wheel Keep hair loose clothing fingers and all pa...

Страница 3: ...en tirant sur le cordon Pour débrancher tenez la fiche et non le cordon Ne pas manipuler la fiche ou l aspirateur avec les mains mouillées Ne pas rien insérer dans les ouvertures Ne pas utiliser si des ouvertures sont bloquées assurez vous qu elles soient dégagées de poussière mousse cheveux ou toute autre chose qui pourrait réduire le passage de l air Cet aspirateur crée de la succion et contient...

Страница 4: ...o 5670 6169 Canada 1 800 282 2886 If you prefer you can write to The Eureka Company Service Division 807 North Main Street Bloomington Illinois 61701 USA In Canada write to The Eureka Company 866 Langs Drive Cambridge Ontario N3H 2N7 Refer to The Eureka Limited Warranty for complete service information DO NOT OIL the motor or the brush roll at any time The bearings are permanently lubricated and s...

Страница 5: ...mission cable between the upper and lower handle Lift the upper handle and place it over the lower handle Line the holes up one on each side of the lower handle The transmission cable should stay in place in the lower handle tube during assembly Lower Handle Upper Handle STEP 4 Move flexible hose off hose hook to allow easier access to the handle area While the holes in the handle are lined up put...

Страница 6: ...e handle in the upright position Do not place cleaner on furniture or steps as the brush roll may cause damage A carpet should be cleaned regularly over heavily travelled areas and once a week over the entire carpeted area Make several passes forward and back over the carpet covering small areas at a time The time required to clean the carpet will depend on several factors including type of carpet...

Страница 7: ... button to the self propelled position and begin to vacuum When finished cleaning return handle grip selector button to manual position and place handle upright 7 Thermal Cut Off This cleaner has a special thermostat that protects the cleaner in case of motor overheating If the cleaner suddenly turns off follow this procedure 1 Push on off rocker switch to OFF position 2 Unplug cleaner 3 Check for...

Страница 8: ...completed correctly 4 Place desired accessory onto end of the wand portion of the hose assembly or extension wand 5 When you are through using the attachments take the hose strap off the strap hook and replace the hose nozzle into the lower hose retainer 6 Leave hose strap in place on hose for future use Dusting Brush is for furniture blinds books lamp shades shelves etc Crevice Tool cleans corner...

Страница 9: ...uent cleaning after the first few times you use your new Eureka vacuum the red light should go on less The red light indicates dirt dust etc is still being removed from the area being cleaned NOTE The dirt alert feature is not intended to be used for above the floor cleaning with attachments Infrared emitter and sensor Hose Retainer Hose How to Check the Dirt Alert Sensors To check if dirt sensor ...

Страница 10: ...n Replace the belt if it stretches cracks or loses tension Cut away any hair or threads wound around the brush roll or the belt pulley because the buildup could cause the belt to rotate unevenly How To Replace Brush Roll Belt NOTE Turn off the switch and unplug the electrical cord before replacing the brush roll belt Belt pulleys can become hot during normal use To prevent injury avoid touching th...

Страница 11: ...GENUINE EUREKA replacement belt 54312 Look for the GENUINE EUREKA PRODUCT symbol 10 Pull right side of brush roll to stretch belt Secure right end cap of brush roll into base 8 Place belt around the right end of the brush roll 9 Align left end cap of brush roll with square in base See Detail 9 Slide end cap into place 7 Place new belt around motor pulley 7 8 9 10 11 12 Belt End Cap Left Brush Roll...

Страница 12: ...ide faces upward 6 Lift the cleaner and rest it against a support or counter 7 Pull upward on the attached wand portion of the hose assembly and remove from the hose retainer 8 Check for clogs in the hose retainer and throughout the hose assembly 9 Use a tool that will not puncture the hose Clear any debris from the hose retainer or the hose assembly that could restrict the air movement 10 Flexing...

Страница 13: ...r once a month to maintain good performance The filter can be cleaned by vacuuming with another cleaner or brushing dust off into the trash Recommended changing of the Cassette Micron Filter is once every three months Remove cyclonic cassette by pushing up lever 1 unhooking 2 by swinging outward from vacuum body When replacing cyclonic cassette hook at top where shown 2 and swing back into place u...

Страница 14: ...mes To remove HEPA Filter 1 Push down latch and rotate the HEPA filter back 2 Then lift the filter up to remove To replace HEPA Filter 1 Place bottom tabs of new filter into slots 2 Rotate the HEPA filter toward cleaner 3 Push upward on the latch to secure into place Obtain replacement filters from a local dealer or order them from The Eureka Company Bloomington IL Latch MICRON Filter on selected ...

Страница 15: ... light bulb 1 Lower handle to remove two screws from lens cover 2 Lift lens cover from cleaner 3 Push light bulb into socket turn to release 4 Place new light bulb into socket turn to secure 5 Make sure bulb will not touch lens cover 6 Replace lens cover 7 Secure with two screws Use 15 watt replacement light bulb part number 48815 2 1 Handle Release 4 3 ...

Страница 16: ...ching the handle The handle secures the hose Filter s Clean or replace the filter s Hint If picking up fine dust the filter may not look dirty but a fine substance tends to reduce suction when it blocks the airflow through the filter s Hose Remove any clogs from the hose that restrict the airflow Check short hose in the base and long hose Refer to page 12 Headlight not working Light Bulb Replace l...

Страница 17: ...he Eureka Company Do not send currency Charge to my Visa 13 15 digits MasterCard 13 digits Amer Express 15 digits Acct number Expiration Date Signature full name as shown on acct TOTAL Postage Handling Charge within U S A Tax add state tax local taxes as required by law Total prices subject to change without notice 5 50 Genuine Eureka Bags Belts and Filters Accessories Tools Miscellaneous Parts Th...

Страница 18: ......

Страница 19: ...odel type and serial number from the data plate on the cleaner Further Limitations and Exclusions Any warranty that may be implied in connection with your purchase or use of the cleaner including any warranty of Merchantability or any warranty for Fitness ForAParticular Purpose is limited to the duration of this warranty Some states do not allow limitations on how long an implied warranty lasts so...

Страница 20: ...ry Items in This Carton Questions Do Not Return To Store Call 1 800 282 2886 7 a m to 8 p m Central Standard Time Monday through Saturday Don t Forget to Use Genuine Eureka Belts and Filters Caution Damages caused by the use of non genuine Eureka bags are not covered by the Eureka Limited Warranty 1 dusting brush 1 upholstery nozzle 2 wands ...

Отзывы: