Eureka 3276AVZ Скачать руководство пользователя страница 4

2

Eureka Customer Service HELPLINE 1-800-282-2886

www.eureka.com

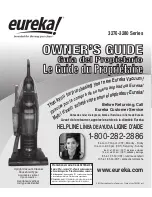
How to Identify Parts of Vacuum Cleaner

EXT-U Belt

HEPA Filter

HF7

Screen

Filter

DCF21

Brush Roll

Handle

Hose

Turbo Nozzle

Power Switch

Filter and Screen 

(located inside dust cup)

Dust Cup
Nested Crevice Tool
& Extension Wand

HEPA Filter Compartment

Height Adjustment Knob

Brush Roll Cover

Self-Cleaning Duster

(some models)

Duster Activation Lever

Headlight

Cord Retainer

Hose Hook

Dusting Brush

Quick Release Cord Wrap
Carrying Handle

Power Cord

Lower Cord Wrap
Hose Retainer

Handle Release

Maintenance Schedule

Maintenance Schedule is also located on back side of dust cup.

!

READ ALL INSTRUCTIONS BEFORE USING THIS VACUUM CLEANER. Moving parts! Make sure power switch is in OFF (O) position before plugging in power cord.

DUST CUP – Empty after each use 

HEPA FILTER HF7 – Replace within 6 months

FILTER DCF21 – Clean or replace regularly, to maintain suction

Close bottom lid 

until it clicks.

Align lid at front; press down

until lid snaps into place.

Rinse filter and dust cup;

dry thoroughly.

Press lever to release bottom lid. 

Debris will empty.

Empty debris. Pull back

latch to lift off lid.

Pull out filter. 

Reinstall filter and

screen inside dust cup.

Rinse dust cup;

dry thoroughly.

BRUSH ROLL – Clean monthly

EXT-U BELT – Replace worn, cut or out of shape belt

Lay flat, grasp cover and pull off.

Lift out filter and replace.

Содержание 3276AVZ

Страница 1: ...et ta ar ri io o Thank you for purchasing your new Eureka Vacuum Gracias por la compra de su nueva aspiradora Eureka Merci d avoir achet votre nouvel aspirateur Eureka Upright Vacuum Cleaner Household...

Страница 2: ...m Cleaner Refer to Quick Start Guide for assembly and use This Owner s Guide provides important instructions to prolong the life of your Eureka vacuum cleaner Inspection Carefully unpack and inspect y...

Страница 3: ...othing fingers and all parts of body away from openings and moving parts Do not place vacuum cleaner on furniture or stairs as the brush roll may cause damage Use extra care when cleaning stairs Place...

Страница 4: ...ance Schedule is also located on back side of dust cup READ ALL INSTRUCTIONS BEFORE USING THIS VACUUM CLEANER Moving parts Make sure power switch is in OFF O position before plugging in power cord DUS...

Страница 5: ...and near ridges and pull apart Push crevice tool into wand and place on end of hose Telescopic Self Cleaning Duster on some models Use for furniture blinds pictures and high reach areas Can be used in...

Страница 6: ...ve brush roll and belt Thread new belt around motor shaft and brush roll Fig 4 5 Insert left end of brush roll first Make sure end cap fits into base Fig 5 Pull right side of brush roll to stretch bel...

Страница 7: ...fill out and return the warranty registration card accompanying your vacuum Obtaining Warranty Service To obtain warranty service you must return the vacuum or vacuum part along with proof of purchase...

Страница 8: ...Make sure filter screen and dust cup are installed properly No suction at the end of hose Dust cup and filter Hose Empty dust cup clean and or change filter Clean or replace filters regularly to maint...

Отзывы: