


INSTRUCTIONS FOR THE TALKING MICROWAVE OVEN (TMO)
Plug in your TMO and it is ready to use. When first powered up the TMO will be in microwave mode with the
power level High. To use, set cook time, select power level, and press start.
The TMO has 2 modes of operation: Microwave Oven and Kitchen Timer.
Please read the instructions below for the mode you wish to use. Refer to
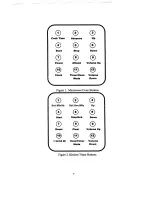
the Button Diagrams are on the next page.
. Operating Instructions for the Microwave Oven mode
Button 1 (Cook Time remaining) - If set, announces the current cook time. If not set announces, "Cook time not
set. Set cook time."
To set cook time minutes keep button 1 depressed until you hear "Set cook time minutes".
To increase minutes press button 3, to decrease minutes press button 6.
To set cook time seconds press button 2 and you will hear "Set cook time seconds."
To increase number of seconds press button 3, to decrease seconds use button 6.
Note: Holding buttons 3 or 6 down will increase or decrease the time in increments of 5 (seconds or minutes).
To exit cook time set mode; press button 1, or to Start the oven, press button 4. The microwave will announce
the current power level, cook time and "microwave running"
Use button 5 to Stop the microwave. The microwave will announce "microwave halted" and the remaining cook
time. You can restart the oven, using button 4 (start). The oven will chime if no cook time is remaining.
Use button 7 to set the Power Level. When button 7 is momentarily pressed the TMO will announce the current
power level. Keep the button pressed and you will hear the current power level and then "set power level". Use
buttons 3 and 6 to set the desired power level. Note: The power level will reset to high after each cook period.
Button 8 allows you to set the Attend to Food period. When you press and hold button 8, you will hear "set
attend to food, minutes. Use buttons 3 and 6 to set the desired number of minutes. Press button 2 to advance
to attend to food seconds. Use buttons 3 and 6 to set the desired seconds. Press button 8 to exit the setting
mode and hear the new Attend to food period. This function is useful for basting or checking food during a long
cooking time. After stopping the oven to attend to the food, press button 4 to re-start.
Button 10 is the clock. Press button 10 and the TMO announces the current time. If you keep the button
depressed, you will hear "set clock hours". Use buttons 3 and6 to set the current hour. Press button 2 to
advance to minutes. Use buttons 3 and 6 to set the current minutes Press button 10 again to exit the clock
mode and hear the new time. If time is not set you will hear "zero PM".
. Operating Instructions for the Kitchen Timer mode
Button 11 is the Oven Timer mode. Changes the TMO from microwave oven mode to kitchen timer mode.
Button 10 will select either "1 hour timer" or "24 hour timer".
Use button 1 to set timer. In the 1 hour timer mode, use buttons 3 and 6 to set desired minutes. Use button 2 to
advance to seconds. Use buttons 3 and 6 to set desired seconds. In the 24hour timer mode, use buttons 3 and
6 to set hours. Press button 2 to advance to minutes and use buttons 3 and 6 to set minutes.
Button 4 - Start timer
Button 5 - Stop timer
Button 7 - Reset timer
Button 8 - Clear timer
Buttons 9 and 12 are Volume Up and Volume Down. Increase or decrease the volume through 8 levels. The
volume control buttons are used in both oven and timer modes.
MADE IN THE USA
Warranty
Your microwave carries a one-year parts and labor warranty. This warranty does not cover damages as a result misuse,
improper handling of the unit, or exposure to extreme temperature or moisture. ETS reserves the right to repair or replace
units covered under the conditions of the warranty at its discretion. If you experience problems with your unit, call ETS at
1-866-700-3923, to obtain a return authorization number. Units needing repair outside the warranty period, or units that
have been damaged or are not covered under the warranty can be repaired by ETS for a minimal cost under most
conditions.
6
Содержание TMOD-GEJES1036WF
Страница 7: ...7...