ETNA VV155WIT Скачать руководство пользователя страница 8

8

INGEBRUIKNAME

Voor u het toestel kunt gebruiken

Opstellen

Plaats het toestel op een plek waar de 
omgevingstemperatuur voldoet aan de 
klimaatklasse waarvoor het toestel ontworpen 
is . U kunt de klimaatklasse vinden op het 
typeplaatje . In onderstaande tabel vind 
u de klimaatklasses en de bijbehorende 
omgevingstemperatuur:
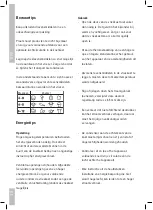
SN  10 - 32 °C (koude omgeving)

16 - 32 °C (normaal)

ST  16 - 38 °C (semi-tropisch)

16 - 43 °C (tropisch)

Het apparaat moet door minimaal twee personen 
worden verplaatst en geïnstalleerd . 

Wees voorzichtig bij het verplaatsen van 
het apparaat om te voorkomen dat de vloer 
beschadigd raakt .

Zorg ervoor dat het apparaat tijdens de 
installatie de voedingskabel niet beschadigd .

Plaats het toestel op een vlakke, stabiele 
ondergrond .

Zorg voor voldoende ventilatie, houd rondom 
het toestel minimaal 10 cm ruimte vrij .

Met de stelvoeten kunt u het toestel waterpas 
zetten .

Laat het toestel nadat het geplaatst is 
minimaal 3 uur staan voordat u de stekker in 
het stopcontact steekt .

Reinigen

Maak eerst het interieur schoon en droog . 
Gebruik voor het schoonmaken een sopje van 
een neutraal schoonmaakmiddel (allesreiniger 
of afwasmiddel) . Het interieur na het 
schoonmaken afnemen met schoon water en 
droogwrijven .

Laat het toestel 1 à 2 uur drogen .

Stel de thermostaat in op de middelste stand . 
Steek de stekker in het stopcontact . Het 
toestel koelt nu continu tot de ingestelde 
temperatuur is bereikt . 

Содержание VV155WIT

Страница 1: ...GEBRUIKSAANWIJZING INSTRUCTIONS FOR USE VRIESKAST FREEZER VV555WIT VV155WIT...

Страница 2: ...en van de temperatuur 9 Tips 10 Bewaartips 10 Energietips 10 Storingen 11 Storingen zelf verhelpen 11 Onderhoud 12 Ontdooien 12 Reinigen 12 Installatie 13 Wijzigen draairichting van de deur 13 Bovenbl...

Страница 3: ...TL lampen in het apparaat zijn bedoeld om de binnenruimte te verlichten en niet geschikt als kamerverlichting WAARSCHUWING Dit apparaat is bedoeld voor huishoudelijk gebruik of gelijksoortige toepass...

Страница 4: ...paraat niet in gebieden die te vochtig of te koud zijn zoals bijgebouwen garages of kelders Til de voorkant van het apparaat op als u hem wilt verplaatsen om krassen op de vloer te voorkomen Aansluiti...

Страница 5: ...sator niet aan Ze zijn heet Onderhoud en reiniging WAARSCHUWING Gevaar voor letsel of schade aan het apparaat Schakel het apparaat uit en trek de stekker uit het stopcontact voordat u onderhoudshandel...

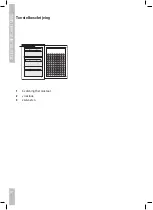
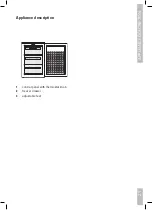
Страница 6: ...6 TOESTELBESCHRIJVING Toestelbeschrijving 1 bediening thermostaat 2 vrieslade 3 stelvoeten...

Страница 7: ...lichtingsbureau voor de voeding in Den Haag kan u informatie verschaffen over het bewaren van levensmiddelen In deze handleiding vindt u informatie over de installatie veiligheid bediening en onderhou...

Страница 8: ...Zorg ervoor dat het apparaat tijdens de installatie de voedingskabel niet beschadigd Plaats het toestel op een vlakke stabiele ondergrond Zorg voor voldoende ventilatie houd rondom het toestel minimaa...

Страница 9: ...de lage diepvriestemperaturen zijn gewenst dan is een stand van de temperatuurregelaar max aan te bevelen Wilt u de ingevroren levensmiddelen lang bewaren dan moet de temperatuur minimaal 18 C bedrage...

Страница 10: ...troming rondom de vrieskast mogelijk is Gebruik Open de deur van de vrieskast niet vaker dan nodig is Dat geldt in het bijzonder bij warm en vochtig weer Zorg er ook voor dat de vrieskast maar zo kort...

Страница 11: ...et stopcontact Thermostaat foutief ingesteld Dooiwaterafvoer verstopt Onjuiste opstelling levensmiddelen in de koelkast Er ligt een voorwerp tegen het toestel Lamp defect Storing Toestel doet niets la...

Страница 12: ...onherstelbare schade aan het toestel veroorzaken Reinigen Waarschuwing Trek voor het schoonmaken de stekker uit het stopcontact De stekker nooit aan het snoer uit het stopcontact trekken Gebruik voor...

Страница 13: ...op een niet krassend oppervlak 4 Verwijder de twee schroeven 8 terwijl u het onderste scharnier ondersteunt 2 Verwijder het onderste scharnier 2 5 Verwijder het pootje links voor 4 en verplaats het n...

Страница 14: ...Stap 2 Til de plaat aan de achterkant op en verwijder hem uit de voorste bevestigingspunten Stap 3 Verwijder de 10 schroeven op het kunststof frame en het metalen scharnier Stap 4 Verwijder het scharn...

Страница 15: ...mag worden gevoegd maar naar een speciaal centrum voor gescheiden afvalinzameling van de gemeente moet worden gebracht of naar een verkooppunt dat deze service verschaft Het apart verwerken van een h...

Страница 16: ...16...

Страница 17: ...emperature 24 Tips 25 Tips on keeping food 25 Energy tips 25 Faults 26 Trouble shooting 26 Maintenance 27 Thawing 27 Cleaning 27 Installation 28 Door Swing Reversal 28 Remove the top panel 29 Environm...

Страница 18: ...s appliance The lamp is not suitable for household room illumination WARNING This appliance is intended to be used in household and similar applications such as Farm houses staff kitchen areas in shop...

Страница 19: ...this appliance in areas that are too humid or too colds such as the construction appendices garages or wine cellars When you move the appliance lift it by the front edge to avoid scratching the floor...

Страница 20: ...ssor or the condenser They are hot Care and cleaning WARNING Risk of injury or damage to the appliance Before maintenance deactivate the appliance and disconnect the mains plug from the mains socket T...

Страница 21: ...21 APPLIANCE DESCRIPTION Appliance description 1 control panel with thermostat knob 2 freezer drawer 3 adjustable feet...

Страница 22: ...ity of the food These instructions for use contain information about the installation safety control and maintenance of your appliance The installation instructions are intended for the installer who...

Страница 23: ...when moving the appliance During installation make sure the appliance does not damage the power cable Make sure that there is sufficient ventilation leave a space of 10 cm around the appliance You can...

Страница 24: ...commended temperature setting middle position If frozen products are stored for a longer period and low temperatures are required the setting max is advised The temperature should be ate least 18 C if...

Страница 25: ...is wet and hot Once you open the door mind to close it as soon as possible Turn the thermostat knob from higher to lower setting as soon as possible depends on how loaded the appliance is ambient tem...

Страница 26: ...he socket Thermostat has been set incorrectly Melt water drain is blocked Food has been placed incorrectly in the refrigerator Object touching the appliance Lamp defective Problem Appliance is not doi...

Страница 27: ...o unsafe situations and may cause irreparable damage to the appliance Cleaning Attention Before cleaning the appliance disconnect the plug from the wall socket Never disconnect the plug from the wall...

Страница 28: ...door off the bottom hinge pin and place it on a nonscratching surface 4 Remove the two screws 8 holding the bottom hinge 2 Remove the bottom hinge 2 5 Remove the left front leg 4 and transfer it to t...

Страница 29: ...2 screws at the top of the appliance Step 2 Lift the top panel at the backside and remove it Step 3 Remove the 10 screws on the frame and the metal hinge as well Step 4 Remove the frame and the metal...

Страница 30: ...wheeled dustbin This means that at the end of its working life the product must not be disposed of as urban waste It must be taken to a special local authority differentiated waste collection centre...

Страница 31: ...31...

Страница 32: ...559766 VER 1 11 01 2016 559766 559766...

Отзывы: