background image

FR 10

INSTALLATION

Généralités

Le raccordement électrique de cet appareil doit être effectué par un 

installateur agréé, qui connaît et applique les normes de sécurité en 

vigueur. Cet appareil est conformément aux directives Européens.

Important:

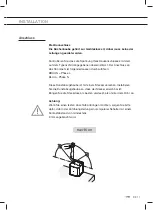
•  La distance entre le point le plus bas de la hotte aspirante et la 

plaque de cuisson doit être d’au moins 65 cm. Sur les taques de 

cuisson électriques, céramique ou à induction, cette distance doit 

être d’au moins 55 cm.

•  L’évacuation peut uniquement être reliée  à un conduit en 

ventilation centrale méchanique. 

•  Ne pas oublier les règlements locaux en vigueur concernant 

l’aération des appareils à gaz.

•  Un conduit d’évacuation court et un nombre limité de coudes 

assurent un meilleur fonctionnement de la hotte.

•  Avant de commencer à percer, assurez vous qu’il ne passe pas 

de conduites à l’endroit choisi.

•  Le tuyau de connexion a un diamètre de 125 mm. 

Il est conseillé d’utiliser aussi ces diamètres pour le tube 

de connexion.

•  Le matériel d’installation livré avec la hotte en question, est 

approprié pour des murs en béton renforcé et en briques. 

Certains types de murs demanderont des chevilles et des vis 

spéciales.

Содержание T4406L

Страница 1: ...700004125000 T4406LRVS T4409LRVS GEBRUIKSAANWIJZING MODE D EMPLOI BEDIENUNGSANLEITUNG INSTRUCTIONS FOR USE AFZUIGKAP HOTTE ASPIRANTE DUNSTABZUGSHAUBE COOKER HOOD 3LIK0986...

Страница 2: ...isation FR 3 FR 13 DE Anleitung DE 3 DE 13 EN Manual EN 3 EN 13 Gebruikte pictogrammen Pictogrammes utilis s Benutzte Piktogramme Pictograms used Belangrijk om te weten Important savoir Wissenswertes...

Страница 3: ...Inleiding 4 Veiligheid Let op 5 Gebruik Bediening 7 Onderhoud Reinigen 8 Vetfilters verwijderen 9 Lampen vervangen 9 Installatie Algemeen 10 Elektrische aansluiting 11 Montage van de schouwkap 12 Bij...

Страница 4: ...afzuigsysteem en is voorzien van een elektrische klep In deze handleiding staat beschreven op welke manier u de afzuigkap zo optimaal mogelijk kunt benutten U vindt informatie over de bediening en ac...

Страница 5: ...ilter niet of niet goed gemonteerd is Gebruik de afzuigkap niet om tegenaan te leunen Gebruik de afzuigkap nooit als afzetvlak tenzij dit uitdrukkelijk is aangegeven Zorg voor voldoende ventilatie wan...

Страница 6: ...ruikt worden De vetfilters kunnen heet worden tijdens gebruik Wacht na het koken minimaal 30 minuten met schoonmaken Bij reparatie of schoonmaakbeurten moet de stroom uitgeschakeld worden Neem de stek...

Страница 7: ...kelt Het controlelampje C gaat branden Schuif de snelheidsregelaar op stand 0 De elektrische klep wordt gesloten Wacht na het uitschakelen minimaal 10 seconden voordat u de kap weer inschakelt Verlich...

Страница 8: ...iften Afzuigkap Maak de afzuigkap schoon met een sopje en een zachte doek Daarna met schoon water nabehandelen Gebruik geen agressieve schoonmaakmiddelen zoals bijvoorbeeld soda Het lakwerk van de afz...

Страница 9: ...kker uit het stopcontact of zet de schakelaar in de meterkast op nul Trek het vetfilter naar u toe en kantel het naar voren omlaag Lampen Lampen vervangen Verwijder de vetfilters Vervang de spaarlamp...

Страница 10: ...De afvoer mag uitsluitend op een CMV kanaal worden aangesloten Neem de plaatselijk geldende voorschriften in acht met betrekking tot de beluchting van gasapparaten Hoe korter de afvoerpijp en hoe min...

Страница 11: ...isinstallatie De aansluiting op het elektriciteitsnet moet als volgt uitgevoerd worden BRUIN L fase BLAUW N nulleiding Deze afzuigkap is voorzien van een aansluitstekker Installeer de afzuigkap zodani...

Страница 12: ...muur met de pluggen en schroeven B Let op de afstand tussen de beugel en het plafond zie maatvoering Plaats de afvoerbuis op de flens D en vervolgens op de aansluiting van het afvoerrooster Steek de s...

Страница 13: ...ing van elektrische huishoudelijke apparatuur te wijzen is op het product het symbool van een doorgekruiste vuilnisbak aangebracht Dit betekent dat het apparaat aan het einde van zijn levensduur niet...

Страница 14: ...NL 14...

Страница 15: ...4 S curit Recommandations 5 Utilisation Commande 7 Entretien Nettoyage 8 Elimination des filtres 9 Changement d ampoules 9 Installation G n ralit s 10 Connexion lectrique 11 Montage de la hotte chemin...

Страница 16: ...extraction central et est munie d un volet lectrique Ce manuel vous indique comment utiliser au mieux votre hotte aspirante Vous trouverez ci apr s des informations sur la commande de l appareil et de...

Страница 17: ...les enfants N utilisez jamais la hotte aspirante lorsque le filtre n est pas correctement mont Ne vous appuyez pas sur la hotte aspirante La hotte ne doit jamais tre utilis e comme plan pour d poser q...

Страница 18: ...la cuisson Les filtres chauffent lors de l utilisation Apr s avoir cuisin il convient d attendre au moins 30 minutes avant de proc der au nettoyage Le courant doit tre coup lors d une r paration ou d...

Страница 19: ...au la hotte Signal lumineux C s allume Faites glisser le r gulateur de vitesse en position 0 Le volet lectrique va se fermer Apr s l extinction veuillez attendre au moins 10 secondes avant d allumer n...

Страница 20: ...nt mentionn es Hotte Vous pouvez nettoyer la hotte l eau savonneuse et une serviette douce puis rincer l eau claire Ne pas utiliser de produits d entretien abrasifs Frotter la peinture laqu e de votre...

Страница 21: ...tion d interruption du courant Inclinez le panneau vers le bas Appuyez sur la fermeture du filtre graisse et inclinez le filtre graisse vers l avant pour l ter Changement d ampoules D pose des filtres...

Страница 22: ...peut uniquement tre reli e un conduit en ventilation centrale m chanique Ne pas oublier les r glements locaux en vigueur concernant l a ration des appareils gaz Un conduit d vacuation court et un nomb...

Страница 23: ...La connection avec le r seau lectrique doit tre x cut e comme suit BRUN Phase L BLEU Phase N Cette hotte aspirante est quip e d une fiche de raccordement Installez la hotte de mani re ce que la prise...

Страница 24: ...de des chevilles et des vis B Faites attention la distance entre l trier et le plafond reportez vous aux dimensions Placez le tuyau d vacuation sur le flasque D et ensuite sur le raccord de la grille...

Страница 25: ...ernementales Pour rappeler l obligation de traiter s par ment les appareils lectro m nagers a t appos sur le produit un symbole repr sentant un conteneur ordures barr d une croix Cela signifie qu l is...

Страница 26: ...FR 14...

Страница 27: ...inleitung 4 Sicherheit Worauf Sie achten m ssen 5 Gebrauch Bedienung 7 Pflege Reinigen 8 Fettfilter entfernen 9 Lampen auswechseln 9 Installation Allgemein 10 Elektroanschluss 11 Montage der Haube 12...

Страница 28: ...konzipiert und ist mit einer elektrischen Klappe ausgestattet In dieser Anleitung steht wie Sie dieses Induktionskochfeld so optimal wie m glich benutzen k nnen Sie finden hier alles ber die Bedienun...

Страница 29: ...Lehnen Sie sich nicht gegen die Dunstabzugshaube Die Dunstabzugshaube darf niemals als Abstellfl che verwendet werden sofern dies nicht ausdr cklich angegeben wird Sorgen Sie f r ausreichende Bel ftun...

Страница 30: ...ei Verwendung des Ger ts hei Warten Sie nach dem Kochen mindestens 30 Minuten vor der Reinigung Bei Reperatur oder Reinigung des Ger ts muss der Strom ausgeschaltet werden Ziehen Sie den Stecker aus d...

Страница 31: ...ten Die Kontrolleuchte C brennt Schieben Sie den Klappe regler zur Stufe 0 Die elektrische Klappe schlie t sich Warten Sie nach dem Ausschalten mindestens 10 Sekunden bevor Sie das Kochfeld wieder ein...

Страница 32: ...zur ckzuf hren sind Dunstabzugshaube Die Dunstabzugshaube k nnen Sie mit Seifenlauge und einem weichen Tuch reinigen danach mit klarem Wasser nachsp len Gebrauchen Sie keine agressiven Putzmittel wie...

Страница 33: ...n oder den Schalter im Sicherungskasten auf Null stellen Das Fettfilter nach vorne ziehen und dann von vorne nach unten kippen Lampen Lampen auswechseln Entfernen Sie die Fettfilter Tauschen Sie die E...

Страница 34: ...luftf hrung darf nur an einen zentralen mechanischen Abzugskanal angeschlossen werden Denken Sie an die rtlichen Vorschriften bez glich Entl ftung von Gasger te Je k rzer das Abluftrohr und je weniger...

Страница 35: ...das Stromnetz ist folgendermassen durchzuf hren BRAUN Phase L BLAU Phase N Diese Dunstabzugshaube ist mit einem Stecker versehen Installieren Sie die Dunstabzugshaube so dass der Stecker erreichbar is...

Страница 36: ...ln und Schrauben an der Wand fest B Beachten Sie den Abstand zwischen B gel und Decke siehe Ma angaben Setzen Sie das Abluftrohr in das Ansatzst ck D und anschlie end in den Anschluss am Luftaustrittg...

Страница 37: ...haushaltsger te getrennt zu beseitigen ist das Produkt mit einer M lltonne die durchgestrichen ist gekennzeichnet Dies bedeutet das am Ende seiner Nutzzeit das Produkt nicht zusammen mit dem Siedlungs...

Страница 38: ...DE 14...

Страница 39: ...4 Safety Precautions you must take 5 Use Controls 7 Maintenance Cleaning 8 Removing the grease filters 9 Changing the light bulbs 9 Installation General 10 Electrical connection 11 Mounting the canopy...

Страница 40: ...ystem and is fitted with an electric flap This manual describes how you can make the best possible use of your extractor hood You can find information in it about the controls and background informati...

Страница 41: ...t lean against the cooker hood The hood must never be used as a support surface unless specifically indicated Make sure there is sufficient circulation when you use the cooker hood on a gas cooker The...

Страница 42: ...of 30 minutes after cooking before cleaning it The main current must be switched off during reparation or cleaning Remove the plug from the mains current or turn the switch in the meter cupboard to ze...

Страница 43: ...e switching the hood back off The control light C comes on Slide the flap control to position 0 The electric flap is closed After switching off wait at least 10 seconds before switching the hood back...

Страница 44: ...or any fire damage linked to inappropriate maintenance or failure to observe the above safety recommendations Cooker hood Clean the cooker hood with soapy water and a soft cloth Then wipe with clean w...

Страница 45: ...om the socket or switch the electricity off at the mains Pull the grease filter towards you and tilt it downwards at the front Lighting Changing the light bulbs Remove the grease filters Replace the e...

Страница 46: ...b this distance must be at least 55 cm The discharge may only be connected to a central mechanical extraction Consider local regulations with respect to the ventilation of gas appliances The shorter t...

Страница 47: ...he connection to the mains is carried out as follows BROWN phase L BLUE phase N This canopy hood has been provided with a power plug When installing the hood make sure that this plug remains accessibl...

Страница 48: ...and the screws B Take into account the distance between the brackets bracket and the ceiling Check size specifications Install the vent duct on the flange D and then onto the connecting surface of the...

Страница 49: ...in accordance with official regulations To draw attention to the fact that the segregated processing of electric household appliances is compulsory this appliance carries the symbol of a crossed out d...

Отзывы: