background image

14

DATA TAB

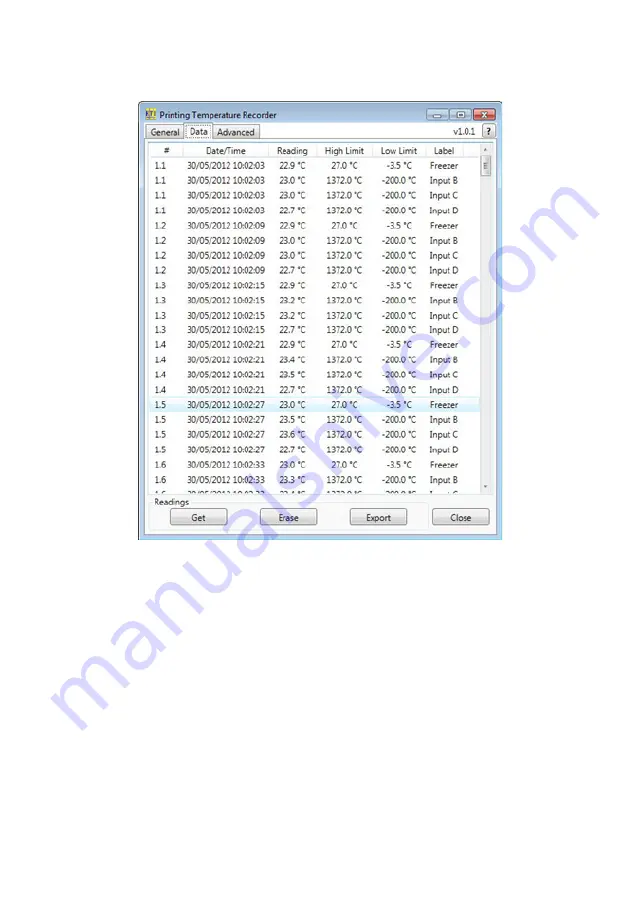
RETRIEVING STORED READINGS FROM THE PTR/DTR

To sort the readings by heading, click on a column header.

READINGS:

GET – retrieves all readings stored in the PTR/DTR.
ERASE – erases all readings stored in the PTR/DTR. 
EXPORT – export downloaded readings to Excel format.
CLOSE – closes the software.

DOWNLOAD READINGS FROM THE PTR/DTR

Click the 'Get' button in the 'Readings' section.

WARNING:

 Previously downloaded readings will be overwritten.

WARNING:

 Do not disconnect the PTR/DTR while readings are being 

transferred from it.

Содержание DTR

Страница 1: ...Software User Manual PTR DTR printing thermometer PTR DTR PC Software ...

Страница 2: ...ng an image 8 editing user fields 9 changing the date time format 9 defining the labels limits DTR 10 defining the labels limits PTR 11 changing the temperature units 11 saving the ticket layout settings to the PC 12 loading the ticket layout settings to the PC 13 deleting saved ticket layout settings 13 data tab 14 retrieving stored readings from the device 14 readings 14 download readings from t...

Страница 3: ...ticket headings summary mode 19 logging mode 19 ticket heaings logging mode 20 reading trim 20 advanced tab DTR 21 operation of the probe button 21 changing the delay time for remote button printing 21 number of copies to be printed using the remote 22 button auto off 22 ticket headings DTR 22 resetting the advanced settings to default values 23 notes 23 ...

Страница 4: ...ture is taken the label and limits will be printed on the ticket and stored with the readings The following pages explain how to adjust the user selectable information shown on the PTR DTR display and the printed ticket and retrieve the stored readings Place the CD in the CD drive TO INSTALL THE PTR DTR PC SOFTWARE The CD will auto run If it does not click Start Run browse to the CD drive and clic...

Страница 5: ...all users of the PC The default installation is Everyone Select the alternate button for Just me Advanced Users The final installation dialogue box gives a last opportunity to go back and revise the installation settings Click the Next button to install the software A moving bar will show the installation progress Click the Close button to exit the installation procedure An icon for the Printing T...

Страница 6: ... DTR SET configures the PTR DTR with selected settings and ticket layout STATUS Displays the number of readings stored in PTR DTR memory and the time the PTR DTR was synchronised TICKET PREVIEW Allows the Ticket layout to be modified in what you see is what you get WYSIWYG style Edit mode is entered by hovering the mouse cursor over the fields within the ticket area All user selectable fields and ...

Страница 7: ...his drop down list to select the appropriate one When a PTR DTR is selected the settings stored in it will be downloaded automatically WARNING any changes made to the currently displayed ticket layout or settings will be overwritten GETTING SETTINGS FROM THE DEVICE To retrieve the ticket layout and settings stored on the PTR DTR device click the Get button in the Settings section Do not disconnect...

Страница 8: ... the mouse cursor over the image area or existing image in the Ticket layout section The cursor will change to a hand shape and clicking on the area or image will show the Select image dialogue box Select an image file from the PC and click Open The PTR DTR can only print black and white so the image will be converted to black and white If contrast adjustment is needed use the slide control To mak...

Страница 9: ... User Fields 1 3 and Footers 1 4 Hover the mouse cursor over the corresponding field to highlight and click on it to modify If a field is left empty it will not be displayed on the Ticket layout when the edit mode is exited and therefore will not be printed CHANGING THE DATE TIME FORMAT To change the Date Time format to either UK dd mm yy hh mm ss or US mm dd yy hh mm ss hover the mouse cursor ove...

Страница 10: ...the label selected at the time The reading s alarm state is determined by its label s high and low limits To change the name of a label and its limits click on the Labels field on the ticket layout area Radio buttons on the left determine the selected label on instrument start up The high and low limits are selected from the drop down boxes The high limit must be greater than the low limit and vic...

Страница 11: ...Clicking on it will show the Inputs pop up box Edit the Input name and select the high and low limits from the appropriate scroll lists CHANGING THE TEMPERATURE UNITS To change temperature units to either C or F hover the mouse cursor over the Inputs field on the Ticket layout area The cursor will change to a hand shape and clicking on it will show the input pop up box Select the required measurem...

Страница 12: ...e PC along with the selected settings click the Save button in the Layout section To save the settings to a new name type the name in the Save settings as dialogue box To overwrite settings that have already been saved select a name from the list below the Save settings as dialogue box 12 ...

Страница 13: ...e Load button in the Layout section and select the settings from the list in the Load settings dialogue box DELETING SAVED TICKET LAYOUT AND SETTINGS To delete previously saved settings click on the Delete button in the Lay out section and select the settings from the list in the Delete settings dialogue box ...

Страница 14: ...n the PTR DTR ERASE erases all readings stored in the PTR DTR EXPORT export downloaded readings to Excel format CLOSE closes the software DOWNLOAD READINGS FROM THE PTR DTR Click the Get button in the Readings section WARNING Previously downloaded readings will be overwritten WARNING Do not disconnect the PTR DTR while readings are being transferred from it ...

Страница 15: ...appropriate column header Data from a DTR has reading numbers of 1 2 3 etc Data from a PTR has reading numbers of 1 1 1 2 1 3 etc This is be cause it is possible to have data from more than one logging session stored on the PTR ERASING READINGS FROM THE PTR DTR To clear all readings click on Erase button in Readings section WARNING once erased readings cannot be restored 15 ...

Страница 16: ...adings can be exported to an Excel file To do so click on the Export button in Readings section In the open dialogue box select appropriate format click OK and then type the file name or select an Excel file to overwrite in the Save file dialogue box ...

Страница 17: ...itch off automatically after given period of time when idle To enable this feature tick the Auto off checkbox in the Auto off section To disable Auto off de select the checkbox The auto off time can be set from 1 to 30 minutes The value cannot be changed when the Auto off feature is disabled ...

Страница 18: ...on of the Advanced settings tab TICKET HEADINGS ON DEMAND MODE To enable either of the logging modes click the Logging tick box Select the button for either Summary or Logging in the Print ticket box SUMMARY MODE In Summary mode the print button is pressed to obtain a ticket showing a summary of the log The information displayed includes the date and time battery status log status number of channe...

Страница 19: ...e user During the initial printing the instrument serial number a logo and a header can be printed Subsequent prints at each timed period contain the date time temperatures and Hi Lo Alarm status A start delay for the log can be set using the plus and minus buttons if the Start delay section of the Advanced tab A delay of up to 23 hours 59 minutes and 59 seconds can be set Setting 0 hours 0 minute...

Страница 20: ...re source value Use a temperature source value in the region of the anticipated measurement values For best accuracy the temperature the instrument and temperature source must be at equilibrium The source value should be read from a certified thermometer The trim value is changed using the drop down box adjacent to the input name The information in the heading fields of the printed ticket can be c...

Страница 21: ...DELAY TIME FOR REMOTE PROBE BUTTON To increase or decrease the printing delay time for prints taken with the remote button on the probe handle click the or boxes respectively The boxes are located next to Printing delay in seconds text in the Operation of the probe button section The minimum value is 0 seconds printing starts immediately and the maximum value is 30 seconds default 10 seconds ...

Страница 22: ...o maximise battery life the DTR can be set up to switch off automatically after given period of time when idle To enable this feature tick the Auto off checkbox in the Auto off section To disable Auto off de select the checkbox The auto off time can be set from 1 to 30 minutes The value cannot be changed when the Auto off feature is disabled TICKET HEADINGS DTR The information in the heading field...

Страница 23: ...To reset all advanced settings Operation of the remote button Auto off Ticket headings and Messages on the PTR DTR display click on the Default button in the Advanced Settings WARNING resetting advanced settings to default is an irreversible action NOTES ...

Страница 24: ...manufactured by Electronic Temperature Instruments Ltd Easting Close Worthing West Sussex BN14 8HQ tel 01903 202151 fax 01903 202445 email sales etiltd com www etiltd com 25 07 12 ...

Отзывы: