background image

14

4. Functions

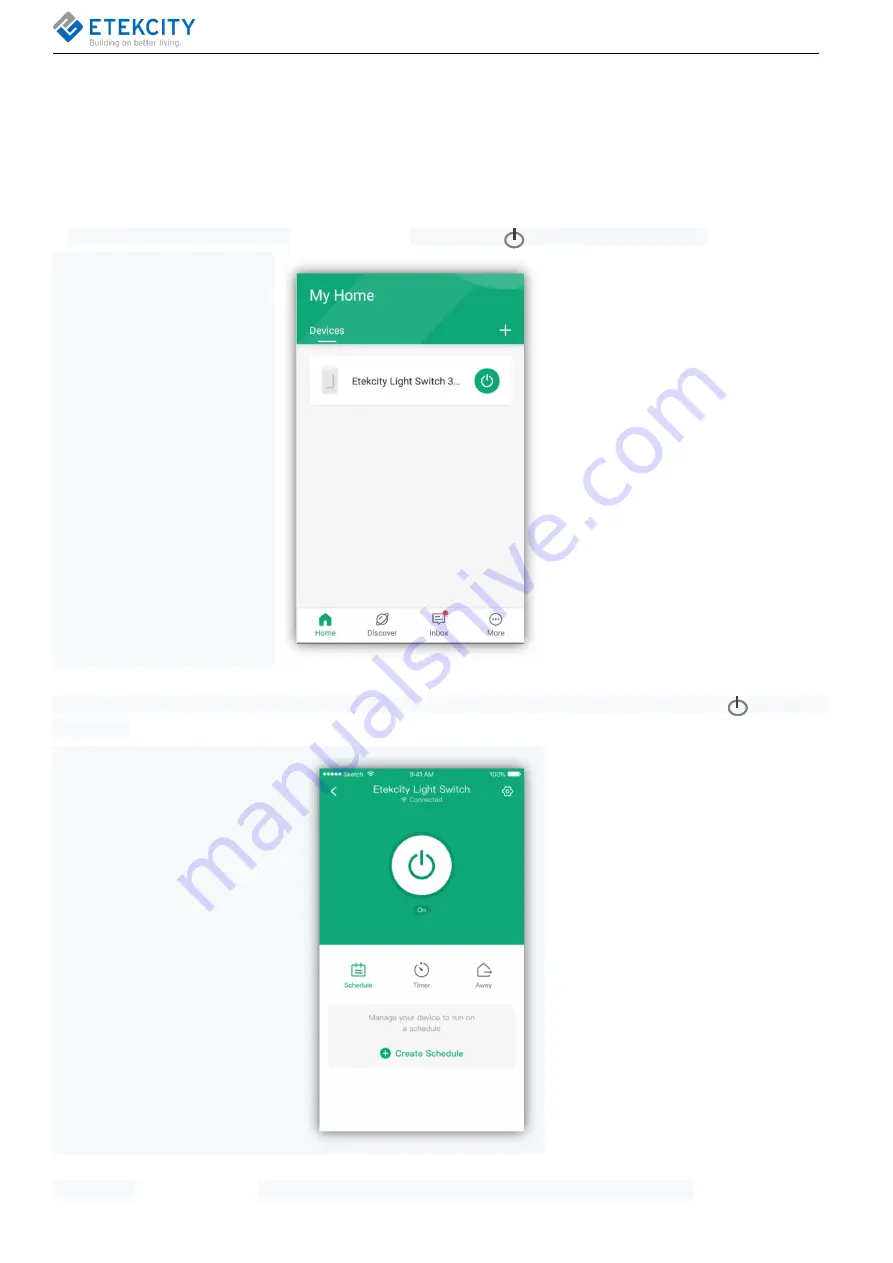
Turning Devices On/Off

Method 1:

On the “

My Home

” page or the

smart light switch

page, tap to

turn the devices on or off.

Method 2:

Tap on the smart switch’s name on the “My Home” screen to view device options and details. Tap

to turn the

light on/off.

NOTE

: The

smart light switch

will remain connected to the internet even when it is turned off

Содержание ESWL03

Страница 1: ...ETEKCITY Smart WiFi Light Switch Model No ESWL03 Questions or Concerns Mon Fri 9 00 AM 5 00 PM PT support etekcity com 855 686 3835 ...

Страница 2: ...use your phone to control your connected electrical appliances anywhere at any time Set up your smart outlet with the IFTTT if this then that app to program your smart home If you have any questions or concerns please reach out to our helpful Customer Support Team at support etekcity com We hope you enjoy your new smart light switch Become an Etekcitizen Exclusive deals giveaways and product regis...

Страница 3: ...Functions 14 Turning Devices On Off 14 Create Schedule 15 Set Timer 19 Away Mode 20 Smart light switch Settings 23 Share Your Smart light switch 24 Delete a Smart Outlet 24 5 More Features 25 Connecting with Amazon Alexa 25 Connecting with Google Home 25 Log Out 25 6 IFTTT 26 Pairing Your Smart Outlet with IFTTT 26 Create an Applet Using Existing VeSync Templates 28 Create a Custom Applet 29 7 Mai...

Страница 4: ...opriate circuit breaker in the OFF position or removing the appropriate fuse Use a non contact voltage tester to ensure all electrical power is off Installing and wiring with active electrical power may result in serious injury or death Only install the smart switch if you are comfortable with electrical work If not contact a qualified electrician Improper installation significantly increases risk...

Страница 5: ...lways stairs and living rooms In this configuration you can turn the light on and off from either location A smartphone or tablet running iOS 8 0 or higher or running Android 4 3 or higher A 2 4GHz WiFi connection supports 802 11b g n standard The smart switch is compatible with incandescent LED halogen and compact fluorescent light bulbs Function Diagram 1 Power Button 2 WiFi Indicator 3 Power In...

Страница 6: ...here is no guarantee that interference will not occur in a particular installation If this equipment does cause harmful interference to radio or television reception which can be determined by turning the equipment off and on the user is encouraged to try to correct the interference by one or more of the following measures Reorient or relocate the receiving antenna Increase the separation between ...

Страница 7: ...t switch is compatible with lights controlled by multiple switches Checking Wires 1 Use the voltage tester to test a powered electrical cable to make sure the voltage tester is working If the voltage tester lights up it s working 2 To avoid electric shock before installation TURN OFF POWER by turning off the circuit breaker Note You may need to shut off more than one circuit breaker or switch to m...

Страница 8: ...eler wire Line Live switch A This wire carries power into the circuit from the main service panel this is the source of power for your light and will always be energized regardless of how the switches are configured switch B This wire carries power from the switches to the light fixture this wire will only be energized when the light fixture is on All switches have a line wire CAUTION Never twine ...

Страница 9: ...tral wire which is usually white as well by screwing on a wire nut tightly around the 2 wires Note There will often be two neutral wires already connected by a wire nut Connect all the neutral wires together with one wire nut 3 For extra safety wrap electrical tape around the wires to make sure the copper conductor is fully concealed 4 Hook up the green wire to the ground wire which is also usuall...

Страница 10: ...app and IFTTT app user interfaces may appear slightly different A Connect your mobile device to a 2 4GHz WiFi network Note The smart light switch will only setup on a 2 4GHz network B Scan the QR code or download the VeSync app from the App Store or the Google Play store Note For Android users you must select Allow to use VeSync C Open the VeSync app Tap Sign Up to create a new account ...

Страница 11: ...your own VeSync account to use third party services and products such as the Amazon Echo Google Home and IFTTT The guest account will not work for this With a VeSync account you can also allow your family or friends to control your smart switch Configuration Add the smart light switch to your app ...

Страница 12: ...or light should blink blue 1 blink per second indicating that your smart switch is in Configuration Mode a If the LED indicator light is blinking tap Next b If the LED indicator light is not blinking tap My LED light is not blinking Press and hold the power button for 5 seconds until the LED indicator light blinks blue 1 blink per second Then tap It Started Blinking ...

Страница 13: ...rn off after 10 minutes F Type in the name of your home WiFi network and password then tap Join Network Note The smart switch configuration requires a 2 4GHz WiFi network G Tap Connect and select the WiFi network that reads VeSync_xxxx ...

Страница 14: ...nect To return to the Add Device page tap I Your setup is complete Give your switch a unique name or use the default name and tap Ok Note Tap to change the outlet icon You can change the device name and icon at any time Tap then tap Device Settings ...

Страница 15: ...smart light switch page tap to turn the devices on or off Method 2 Tap on the smart switch s name on the My Home screen to view device options and details Tap to turn the light on off NOTE The smart light switch will remain connected to the internet even when it is turned off ...

Страница 16: ...ight switch to turn on and off B Go to the Create Schedule page and set the working time of the smart light switch 1 To set a start time a Tap next to start b Scroll up and down to select time Alternatively tap for Sunrise and for Sunset c Tap to confirm Note You must allow the VeSync app to access your location to determine when Sunrise and Sunset are for your area ...

Страница 17: ...d time optional a Tap next to End b Scroll up and down to select time Alternatively tap for Sunrise and for Sunset c Tap to confirm Note You must allow the VeSync app to access your location to determine when Sunrise and Sunset are for your area a b c ...

Страница 18: ...17 4 Choose On or Off at end time 5 Repeat Optional Select days you want this task to repeat ...

Страница 19: ...18 6 Tap on the top right of the screen when you are done creating the schedule C Turn the schedule on or off on the smart light switch page by tapping the toggle next to the scheduled time ...

Страница 20: ... You can create a timer to turn your smart light switch on and off A Tap Timer Then Create Timer B Scroll up and down to set time and select On or Off C Tap to confirm and start timer Timer will start automatically ...

Страница 21: ...r NOTE If you selected On the timer will turn on after the timer ends To remove the timer entry tap on the timer entry then tap Delete Away Mode When you have a light plugged into your smart light switch you can use the Away Mode timer to turn your light ...

Страница 22: ...eone is home A Tap Away then Set Away Mode B Select an option from the Away Mode page 1 start Sets time to start Away Mode a Tap next to Start b Scroll up and down to select time c Tap to confirm 2 End Sets time to end Away Mode a Tap next to End ...

Страница 23: ... confirm 3 Repeat Select days you want to repeat Away Mode a Tap next to Repeat b Select days you want this task to repeat c Tap to confirm C You can turn the Away Mode timer on off at any time by tapping the toggle button to the right of the timer ...

Страница 24: ... you to A Edit your smart light switch name B Edit your smart light switch picture C Turn on off WIFI indicator light D Turn smart switch notifications on off by tapping E Share your smart light switch F Upgrade Firmware Tap to update firmware G Delete your smart light switch A C B D E F G ...

Страница 25: ...vice with Tap Invite C Tap to remove people you have shared your device with They will no longer be able to control your smart light switch Delete a Smart Outlet A You can delete your smart light switch from the VeSync app from the Device Settings screen To delete your device tap Delete Device B You can also delete your smart light switch s from the My Home screen in the VeSync app a iOS Swipe lef...

Страница 26: ...te your own VeSync account to connect with Alexa Connecting with Google Home To view instructions on the VeSync app tap More then tap Link to Google Assistant Note You must create your own VeSync account to connect with Google Home Log Out A On the My Home screen tap More B Tap your profile then tap Log Out Note You do not need to log out if you are not using a VeSync account A B a b ...

Страница 27: ...26 6 IFTTT Pairing Your Smart Outlet with IFTTT A Download the IFTTT app from the App Store or Google Play store B Open the app and tap sign up or sign in C Tap ...

Страница 28: ...27 D Enter VeSync and tap Services E Tap Connect F Enter your VeSync account details and tap Authorize ...

Страница 29: ... the IFTTT app and tap My Applets B Tap Services and tap VeSync C Scroll to search for an applet you want to use such as Turn on a VeSync smart device at sunrise or Activate a device every day at a specific time D Slide the toggle switch to turn on the applet ...

Страница 30: ...Device select the smart outlet that you want the applet to apply to and tap Save F The applet has been created successfully Create a Custom Applet A On the My Applets screen tap B Tap this to add a Trigger Service ...

Страница 31: ...very day at c Under Time select 11 45 PM Note Popular Trigger Services include Date Time Location and an Alexa or Google Home Command Different Trigger Services have different user interfaces C After selecting the Trigger Service tap this to enter an Action Service D Tap the VeSync icon ...

Страница 32: ...31 E Tap Activate a Device F Select the smart outlet and status you would like to activate turn on or turn off Tap Create Action G Tap Finish You ve created your own custom applet ...

Страница 33: ...Device Settings screen tap Upgrade Firmware Factory Reset Factory resetting the smart light switch can help you troubleshoot any issues you may have Please keep in mind that factory resetting a device will erase all of your custom settings and restore the factory default settings Press and hold the power button for about 15 seconds until the light indicator blinks blue rapidly then turns solid blu...

Страница 34: ...n _5G If your phone is attempting to connect to the 5G network try forgetting or temporarily disabling the 5G network Some routers hide the 2 4GHz WiFi network If you have trouble finding or setting up your 2 4GHz network please contact your router manufacturer for support Q I already have another smart switch connected Why won t this smart switch connect Close and relaunch the VeSync app then res...

Страница 35: ...My Home screen of the VeSync app Refresh your My Home screen by switching between screens or closing and reopening the app and the switch icon should appear Q Alexa or Google Home can t find my app or can t discover my smart outlet Make sure your wireless network router is close enough to your smart switch The smart switch must be within a 164 ft 50 m visible range from the router Try moving your ...

Страница 36: ... return transit Unsupervised use by children under 18 years of age Etekcity and its subsidiaries assume no liability for damage caused by the use of the product other than for its intended use or as instructed in the user manual Some states do not allow this exclusion or limitation of incidental or consequential losses so the foregoing disclaimer may not apply to you This warranty gives you specif...

Страница 37: ...ful Customer Support Team Your satisfaction is our goal Etekcity Corporation 1202 N Miller St Suite A Anaheim CA 92806 Email support etekcity com Toll Free 855 686 3835 Support Hours Monday Friday 9 00 am 5 00 pm PT Please have your order confirmation number ready before contacting customer support Back to Table of Contents ...

Отзывы: