Etec EXSS117 Скачать руководство пользователя страница 8

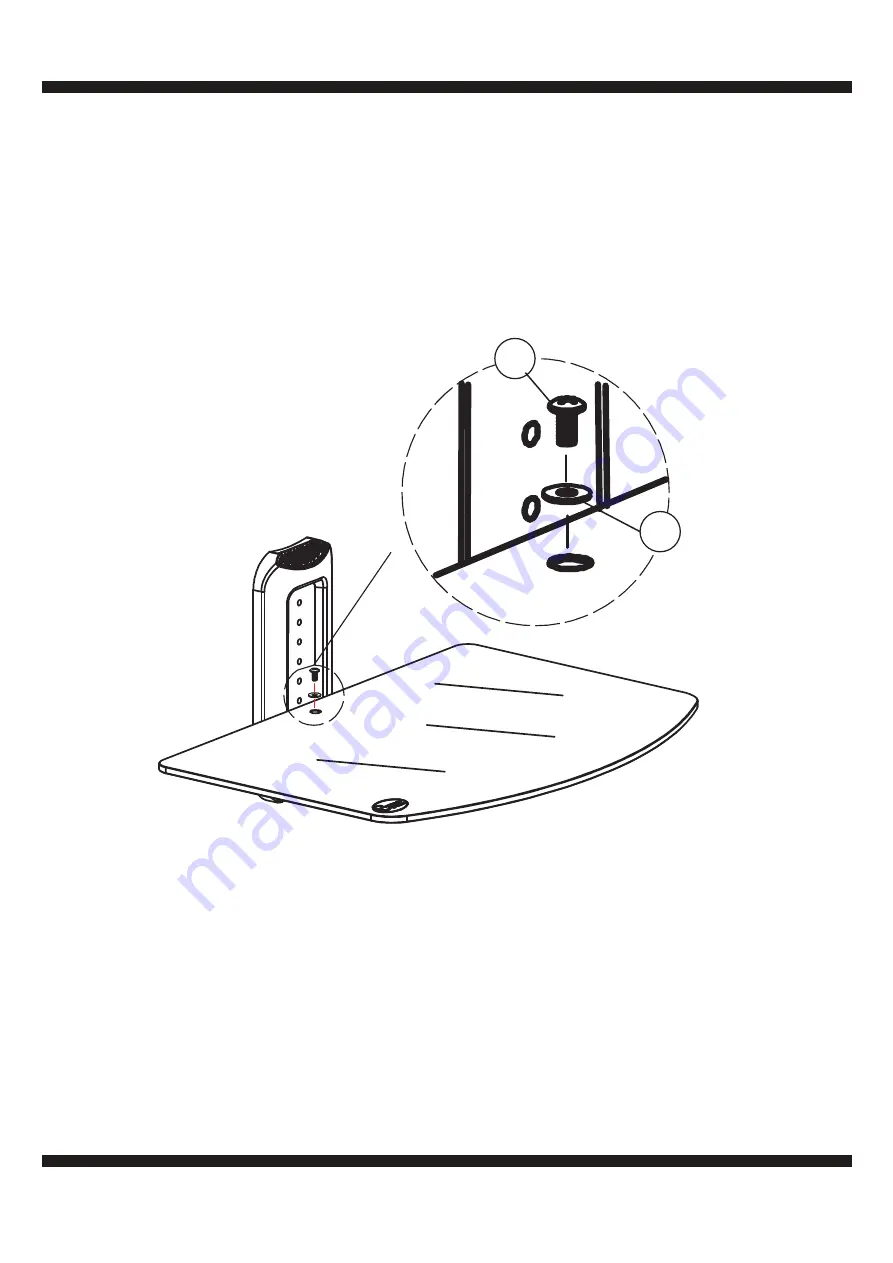
Step 6: Secure the Glass Shelf 

Secure the 

Glass Shelf (4) 

by inserting the 

Washer (I)

 and 

Shelf Security Bolt (D)

 into the hole in the

Glass Shelf (4) 

as shown in


Fig. 9.

Tighten the 

Shelf Security Bolt (D)

 using the 

Allen Wrench (H)

. Do not overtighten or the glass shelf

will break.

D

I

Fig. 9

8

Содержание EXSS117

Страница 1: ...EAD THIS FIRST Read this entire manual Do not attempt to install this product if you do not understand the instructions Contact a qualified mount installer if you have any doubts about a safe and secure mount installation or if you are not sure what specific wall materials you are attaching this mount to Check all the parts carefully to make sure there are no missing or damaged parts Improper inst...

Страница 2: ...be used Drill with a specific size drill bit to pre drill holes in the wall Stud finder Tape measure Pencil Screw drivers Socket wrenches Small hammer Safety goggles CHILD SAFETY How and where you use yourA V Component Wall Mount Stand is extremely important for Child Safety As you set up and use your new product keep all of these safety tips in mind One size ofA V Component Stand does not support a...

Страница 3: ...s Shelf Suction Pads Cable Management Clips Allen Wrench G E H 2 4 4 1 M6x8mm Bolts x4 x4 x1 1 1 2 1 3 1 4 1 Wall Plate Plastic Cover Shelf Support Glass Shelf 3 Washer I 1 Ix1 1 2x1 3 x1 x1 4 x1 Long Bolts Concrete Anchors Long Bolt Washers Shelf Security Bolt M6x8mm Glass Shelf Suction Pads Cable Management Clips Allen Wrench with Phillips End Washer Bolts M6x12mm ...

Страница 4: ...ired mounting location aligning the mounting holes on the bracket with the studs Use the Wall Plate 1 as a template to mark the mounting holes on the wall 3 Use 3 16 5mm drill bit to pre drill holes at least 2 5 inches 65mm deep at the marked locations 4 Use the Long Bolts A and Long Bolt Washers C to mount the Wall Plate 1 to the wall as shown in Fig 3 Do not use wall anchors in wood stud walls 5...

Страница 5: ... drill two holes at least 2 5 65mm deep at the marked locations 4 Use the Long Bolts A and Long Bolt Washers C to attach the Wall Plate 1 to the wall with the Concrete Anchors B as shown in Fig 4 5 Use a level to make sure the Wall Plate 1 is perfectly straight and securely tighten the Long Bolts A using a proper size wrench Make sure to tighten the top bolt first then re check the level before ti...

Страница 6: ... cut outs on the Wall Plate 1 as shown in Fig 5 Gently apply pressure unitil the Plastic Cover 2 snaps into position on the Wall Plate 1 2 6 Step 3 Install the Glass Shelf Suction Pads Insert the four Glass Shelf Suction Pads F into the holes on the Shelf Support 3 as shown in Fig 6 F Fig 6 3 ...

Страница 7: ...Wrench H as shown in Fig 7 Do not overtighten the bolts Fig 7 E H Step 5 Install the Glass Shelf Carefully place the Glass Shelf 4 on the Shelf Support 3 as shown in Fig 8 NOTE Make sure to align the hole near the rear of the Glass Shelf 4 with the hole in the Shelf Support 3 Hole in Shelf Hole in Shelf Support Fig 8 7 ...

Страница 8: ...e Glass Shelf 4 by inserting the Washer I and Shelf Security Bolt D into the hole in the Glass Shelf 4 as shown in Fig 9 Tighten the Shelf Security Bolt D using the Allen Wrench H Do not overtighten or the glass shelf will break D I Fig 9 8 ...

Страница 9: ...ment Clip G spaces 2 above 2 below each shelf to allow for easy cable management NOTE For best system performance route the AC power cords separately from the signal cables to keep the power and signal cables from being wrapped around each other Once your cables are in place twist the ends of the Cable Mangement Clips G to lock the ends of the clips CAUTION To avoid possible electrical shock use O...

Страница 10: ...This page is intentionally left blank ...

Страница 11: ...ribed in the parts list located in the Instruction Manual included with the product This warranty applies under conditions of normal use This warranty does not cover any product which has been subject to damage due to improper assembly or disassembly products which were not assembled installed used or maintained in accordance with the product assembly instructions warnings acts of nature misuse ne...

Страница 12: ...PN EXSS117 Rev 1 0 May 2017 Schoenfeld International Inc 2017 Schoenfeld International Inc and ETEC 5001 American Boulevard West Suite 275 Bloomington MN 55437 ...

Отзывы: