background image

4

P-TS7 User Manual

NetConnect

NetConnect uses Power over Ethernet (PoE 802.3af) communications to connect between the
touchscreen (P-TS7/P-TS7-PE) and the Paradigm Processor. Reference the related touchscreen
installation guide for details on hardware installation, wiring requirements, and power up
procedure.

LinkConnect

LinkConnect uses Echelon

®

LonTalk

®

with LinkPower to connect between the touchscreen

(P-TS7 model only) and the Paradigm Architectural Control Processor (P-ACP, Paradigm
Processor).

The P-TS7 wall-mount, when connected over LinkConnect, uses 3 watts of power at 24 VDC.
Reference the related touchscreen installation guide for details on hardware installation,
wiring requirements, and power up procedure.

Service Panel

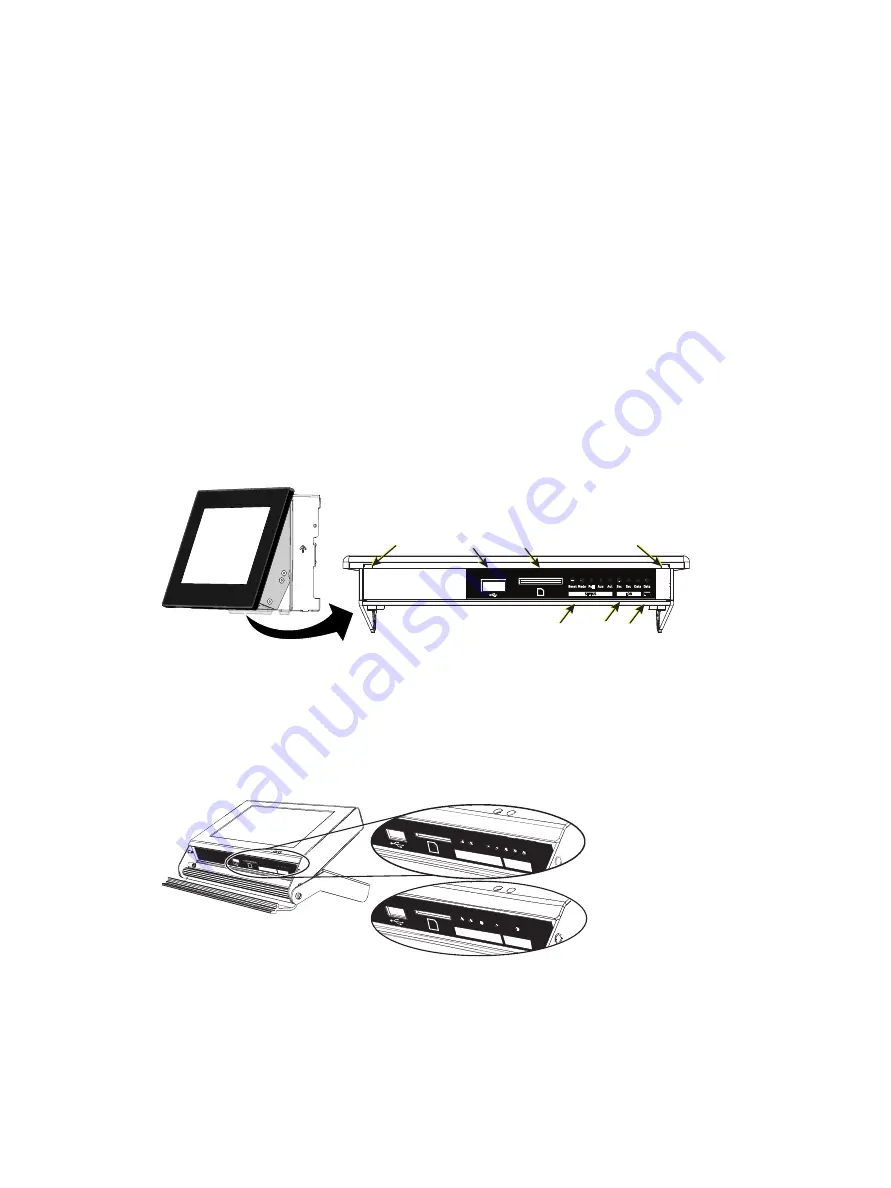
Each model of the touchscreen has a service panel that provides access to the USB port, SD
card slot, and a selection of indicators and service pins.

The wall-mount and rack-mount I/O panel is located on the bottom of the unit, viewable only
when the LCD is in its service position.

Pry Slot

USB Port

SD Port

LON

P-TS7 and 
P-TS7-P 
only 

STATUS

NET

Pry Slot

To move the touchscreen into a service position, gently insert a flat blade screwdriver into the
pry slot (indicated in the image above) and unsnap the touchscreen from the collar, then lift
the bottom upward slightly and rotate outward. Rest the touchscreen on the pins in the
mounting collar.

The portable touchscreen (P-TS7-P/PE) I/O panel is located behind an access door on the
bottom of the unit.

Rese

t Mod

e

Aux

Act

Svc

Svc 

Data

LON

Status

Reset Mod

e

Aux Ac

t Svc

Svc  Dat

a

LON

Status

Reset Mod

e PoE

Act

Data

NET

Status

Содержание Unison Paradigm P-TS7

Страница 1: ...Paradigm 7 Touchscreen P TS7 all models User Manual Part Number 7184M1220 Rev D Released 2022 09 ...

Страница 2: ...rked and not marked are the property of their respective owners ETC intends this document whether printed or electronic to be provided in its entirety All ETC documents are available for free download from our website etcconnect com Please email comments about this manual to TechComm etcconnect com ...

Страница 3: ...ections 3 NetConnect 4 LinkConnect 4 Service Panel 4 Ports 5 Buttons and Indicator LEDs 5 ControlDesigner Software 6 Setup 7 About 7 Screen 8 Test Touchscreen 9 Sound 10 Comms 10 Mobile App Settings 11 Config 13 Passcodes 14 Protected Pages and Features 15 Timed Events 16 Files 22 Saving and Loading Files 23 Network 24 IP Addressing 24 ...

Страница 4: ...System 25 Reload Firmware 25 Reset to Defaults 26 Event Log 26 Cleaning the Display 26 ii P TS7 User Manual ...

Страница 5: ...se with the Paradigm Architectural Control Processor P ACP Paradigm Processor and ControlDesigner software to provide intuitive graphics that integrate with your control system providing advanced lighting and control options 7 WVGA 24 bit color LDC touchscreen with 800x480 pixel resolution utilizing 24 bit color depth and a 10 6 aspect ratio Support for Hue Saturation and Brightness HSB color pick...

Страница 6: ...82 USA toll free 1 608 831 4116 service etcconnect com ETC GmbH Germany Austria Switzerland Eastern Europe and Russia Technical Services Department Ohmstrasse 3 83607 Holzkirchen Germany 49 80 24 47 00 0 techserv germany etcconnect com ETC Austin High End Systems Products Technical Services Department 2105 Gracy Farms Lane Austin TX 78758 USA 800 890 8989 USA toll free 1 512 836 2242 hesservice et...

Страница 7: ... data connection to the network LinkConnect Belden 8471 for LON data connection to the network 24 VDC Auxiliary Power 1 5 mm2 16 AWG typically a black and red wire pair for touchscreen power Paradigm portable touchscreens offer a flexible way to remotely control your Paradigm control system over either an Ethernet connection P TS7 PE or a LON connection P TS7 P The P TS7 PE is provided with a RJ45...

Страница 8: ...r up procedure Service Panel Each model of the touchscreen has a service panel that provides access to the USB port SD card slot and a selection of indicators and service pins The wall mount and rack mount I O panel is located on the bottom of the unit viewable only when the LCD is in its service position Pry Slot USB Port SD Port LON P TS7 and P TS7 P only STATUS NET Pry Slot To move the touchscr...

Страница 9: ... relate specifically to LinkConnect data use are labeled in the LON section and others that relate specifically to NetConnect data use are labeled in the NET section Note Availability of buttons and indicators vary according to the touchscreen model Status Reset when pressed resets the touchscreen software causing a reboot and service pin message to the connected processor Mode press once to acces...

Страница 10: ... or SD media On initial power up with no ControlDesigner configuration installed or when the touchscreen is not bound connected to a Paradigm Processor the touchscreen displays the default splash page which includes the ETC logo and two buttons Setup and Service Pin Pressing the Setup button accesses the Setup menu where setup options and technical information are displayed Pressing the Service Pi...

Страница 11: ...creen About The About page displays read only information pertaining to the touchscreen firmware and operation MAC Address a unique identifier assigned to the touchscreen by ETC for identification over the Paradigm network IP Address the current network IP address assigned to the touchscreen This number can be modified from the Network tab Neuron Id a station specific unique hardware address that ...

Страница 12: ... would suffer a crash or lockup Watchdog should be enabled unless instructed otherwise by ETC Technical Services Screen The Screen page provides user level settings for the touchscreen including Backlight Level a level bar is provided to set the relative brightness of the touchscreen backlight By default the level is set to full Note On touchscreen models with a light sensor the Backlight Level se...

Страница 13: ... its sleeping state and reset the backlight timeout and the station inactivity timer as set in ControlDesigner Note Be aware of stationary objects such as rack doors that remain within the sensing range as it may interfere with the function of the sensor In these applications it is best practice to disable the proximity sensor The proximity sensor is looking for reflected IR therefore any IR devic...

Страница 14: ...t in speaker Comms The Comms page provides read only information about the Paradigm Processor to which the touchscreen is connected bound to over the Paradigm control network This page also provides secured access to the touchscreen Mobile App Settings which allow connection and use of the Paradigm Touchscreen Remote App ...

Страница 15: ...aradigm Touchscreen Remote App interfaces with the Paradigm control system by connecting over Wi Fi to your lighting system and an Ethernet NetConnect connected P TS7 touchscreen Note Touchscreen Remote App connection is incompatible with LON and wireless connected touchscreens To configure a P TS7 Ethernet connected for use with the Paradigm Touchscreen Remote App select the Mobile App Settings b...

Страница 16: ...n Remote App On initial setup the P TS7 will automatically generate a random four digit code alternatively you can choose your own four digit code or leave the field blank to disable the passcode requirement Note A passcode may be required when connecting to the P TS7 using the Touchscreen Remote App Port UDP port The port defaults to 49044 Tip When the UDP port is not default 49044 you must speci...

Страница 17: ...ation if the configuration was generated in LightDesigner using a standard theme Project information can only be modified in ControlDesigner Access to Timed Events and the Passcodes is also available from this page Note Timed Events and Passcodes features have protected access You must enter the setup passcode to view the settings in those screens ...

Страница 18: ... passcode protected screens found in the P TS7 Setup menu By default the Setup passcode is 3031 Passcodes are created and assigned in the ControlDesigner configuration This page in the P TS7 menu displays all Setup Passcodes that have been created and associated to the configuration ...

Страница 19: ...omms page see page 11 Timed Events and Passcodes located on the Config page Files on page 22 Network on page 24 System on page 25 Timed Events on page 16 Passcodes on page 14 Mobile App Settings on page 11 Selecting any of the protected pages or selecting a button for a protected feature will display a keypad for passcode entry Note Enter your four digit passcode to access the protected pages Prot...

Страница 20: ...nt Setup page allows users to add edit and delete timed events All created timed events are shown Note ControlDesigner provides a page navigation action to reach a Timed Event configuration directly ETC recommends that you use this design feature to provide access for end users who wish to edit timed events directly on the touchscreen Adding a new event and editing an event are very similar in pro...

Страница 21: ...ected additional selection for a Start Time is required If Sunrise or Sunset are selected additional selection for an Offset is required An offset is specified as an additive press the button or negative press the button hour and minutes setting from the astronomical time 3 Specify the End Time The options for End Time are similar to the Start Time except Duration is now an option When Duration is...

Страница 22: ...ons Note For more information regarding overrides see the Paradigm LightDesigner online help system or contact ETC Technical Services 6 To synchronize this timed event when the P TS7 boots and connects to the Paradigm system set Sync at boot to True 7 To run this timed event on protected days configured in LightDesigner set the Allow on Protected Days setting to True ...

Страница 23: ...xt Recurrence settings display 9 To set the timed event recurrence according to a configured holiday select the holiday from the drop down 10 Set the recurrence type from the options available in the Recur drop down menu ...

Страница 24: ...epending on the selected recurrence type For example if Weekly is selected the following options display 11 Define the recurrence completely according to the type specified 12 Press Next and then set the Recurrence Range options 13 Press Next to set a Start Action ...

Страница 25: ...e options using the scroll bar on the right Depending on the selection more options may display for setting on the Start Action page Complete the options as required 15 Depending on your previous selections you will either press Ok to close the menu or press Next to define an End Action As needed complete the selections ...

Страница 26: ...m and Save To features to manage configuration and theme files transferring from and saving to removable media such as an SD card or USB Note If the P TS7 is already associated with a Paradigm Processor it will automatically begin retrieving its configuration file when powered Some standard ETC themes are loaded for you and will display beneath the Theme directory Themes can be alternatively loade...

Страница 27: ... From 3 Choose the removable media SD or USB you are transferring to from 4 Navigate the file structure of the removable media to select the directory To return to a previous directory in the removable media press the Up button Press Ok to set the directory location Note Multiple files can be selected for upload or download by simply touching to select each file When a file with the same name exis...

Страница 28: ...necessary Note When multiple touchscreens are installed into your system they must each have a unique IP address For example 10 101 15 101 10 101 15 102 etc Duplicate IP addresses will cause system communication problems In Automatic Mode the touchscreen is configured to obtain an IP address and other network settings automatically from a connected DCHP server The touchscreen displays the current ...

Страница 29: ...s Note The touchscreen firmware file is stored in the LightDesigner installation directory firmware folder filename PTS_fw_x y z ts7_tfw Save the file to the root directory of a USB or SD card for loading onto the P TS7 1 Insert the USB key or SD card with the firmware file into the touchscreen I O port 2 Press the Reload Firmware button located on the System page 3 Select the media USB or SD that...

Страница 30: ...ry defaults including the settings on the Comms Screen Sound and Network pages Event Log The Event Log is reserved for use when troubleshooting touchscreen issues with guidance from ETC Technical Services Cleaning the Display Use a dry microfiber or lint free cloth to clean any finger prints and oils from the display Do not use any chemical or water base solution as they will damage the display ...

Страница 31: ...Cleaning the Display 27 ...

Страница 32: ...rk NY Orlando FL Los Angeles CA Austin TX Web etcconnect com Support support etcconnect com Contact etcconnect com contactETC 2022 Electronic Theatre Controls Inc Trademark and patent info etcconnect com ip Product information and specifications subject to change ETC intends this document to be provided in its entirety 7184M1220 Rev D Released 2022 09 ...

Отзывы: