background image

Содержание Dryer

Страница 1: ...rouvant la date d achat ou d installafion Inscrivez es renseignements suivants au sujet de votre apparel m6nager pour mieux vous aider _ obtenir assistance ou service en cas de besoin Vous devrez connattre e num6ro de mod _le et e num6ro de s6rie au comp et Cette information est donn6e sur a plaque signal6tique indiquant es num6ros de mod _le et de s6rie situ6e dans e ogement de a porte _ int6rieu...

Страница 2: ... Before the dryer is removed from service or discarded remove the door to the drying compartment Do not reach into the dryer if the drum is moving Do not install or store the dryer where it will be exposed to the weather Do not tamper with controls Do not repair or replace any part of the dryer or attempt any servicing unless specifically recommended in this Use and Care Guide or in published user...

Страница 3: ...ell gas instructions i r i Along with heat dryers require good air flow to efficiently dry laundry Proper venting will reduce your drying times and improve your energy savings See Installation Instructions The venting system attached to the dryer plays a big role in good air flow Replace plastic or foil vent material with 4 102 mm diameter heavy rigid vent material Fire Hazard Use a heavy metal ve...

Страница 4: ... avoid wrinkling On some models WRINKLE PREVENT automatically starts at the end of the cycle Opening the door will stop this feature On other models you can set the WRINKI E PREVENT selector nob toON NOTE A signal will sound periodically when the WRINKLE PREVENT setting is selected but only if the End of Cycle signal is also selected Timed Dry On some models temperature is included in the cycle se...

Страница 5: ...press no iron items Less Dry Most loads Any This dryness level removes less moisture than the Energy Preferred cycle Seams of garment may feel slightly damp Use for loads you may want to complete drying on a hanger TIMED DRY Wi l run the dryei foi the SPeCified time 0n the Contiol Depending on model temperature may be Selected on cycle knob or be a separate control Timed Dry Heavy or bulky items C...

Страница 6: ...uctions Press the Start button or knob Stopping and Restarting You can stop your dryer anytime during a cycle To stop your dryer Open the dryer door or turn the Cycle Control knob to OFF NOTE The Cycle Control knob should point to an Off area when the dryer is not in use Fire Hazard No washer can completely remove oil Do not dry anything that has ever had any type of oil on it including cooking oi...

Страница 7: ...damaged blocked or missing Doing so can cause overheating and damage to both the dryer and fabrics If lint falls off the screen into the dryer during removal check the exhaust hood and remove the lint The exhaust hood is located where the dryer air exits your home Every Load Cleaning Style 1 1 The lint screen is located on top of the dryer Pull the lint screen toward you Roll lint off the screen w...

Страница 8: ...er only when you are at home If you will be on vacation or not using your dryer for an extended period of time you should 1 Unplug dryer or disconnect power 2 If you have a gas dryer close shutoff valve in gas supply line 3 Clean lint screen See Cleaning the I_int Screen For dlrect wlred dryers Electrical Shock Hazard Disconnect power before servicing Replace all parts and panels before operating ...

Страница 9: ...back and side to side The dryer may vibrate if not properly installed See the Installation Instructions Is the clothing knotted or balled up When balled up the load will bounce causing the dryer to vibrate Separate the load items and restart the dryer Timer does not noticeably advance Is the dryer set to Timed or Air Dry The timer moves slowly and continuously for the timed setting Is the dryer se...

Страница 10: ... cleaned before each load Stains on load or drum Was the dryer fabric softener properly used Add dryer fabric softener sheets at the beginning of the cycle Fabric softener sheets added to a partially dried load can stain your garments Drum stains are caused by dyes in clothing usually blue jeans This will not transfer to other clothing Loads are wrinkled Was the load removed from dryer at the end ...

Страница 11: ...an authorized Whirlpool servicer is not available 9 The removal and reinstallation of your major appliance if it is installed in an inaccessible location or is not installed in accordance with Whirlpool s published installation instructions 10 Replacement parts or repair labor on major appliances with original model serial numbers that have been removed altered or cannot be easily determined DISCL...

Страница 12: ...est le danger potentiel et vous disent comment r6duire le risque de blessure et ce qui peut se produire en cas de non respect des instructions AVERTISSEMENT Risque d incendie m m m L installation de la s_cheuse linge dolt _tre effectu_e par un installateur qualifi_ installer la s_cheuse conforrn_rnent aux instructions du fabricant et au codes Iocau Ne pas installer de s_cheuse linge avec des mat_r...

Страница 13: ...e dans le guide d utlilisation et d entretien ou publi6e dans les instructions de r6paration par I utilisateur que vous comprenez et pouvez ex6cuter avec comp6tence Ne pas utiliser un produit assouplissant de tissu ou des produits pour 61iminer la statique a moins qu ils ne soient recommand6s par le fabricant du produit assouplissant de tissu ou du produit Ne pas utiliser la chaleur pour faire s6c...

Страница 14: ...hone se trouvant sur les lieux Evacuer tousles gens de la piece de I _difice ou du quartier Appeler imm_diatement le fournisseur de gaz du t_l_phone d un voisin Suivre ses instructions A d_faut de joindre votre fournisseur de gaz appeler les pompiers L installation et I entretien doivent _tre effectu_s par un installateur qualifi_ une agence de service ou le fournisseur de gaz AVERTISSEMENT L odor...

Страница 15: ...causer un d_c _s ou un incendie Les visites de service dues _ un circuit d 6vacuafion non appropri_ ne sont pas couvertes par a garanfie et seront au frais du client que e que soit a personne qui a install6 a s6cheuse Pour ma nten r une bonne venti ation Nettoyer e fi tre _ charpie avant chaque charge Remp acer e conduit d 6vacuafion en p asfique ou a uminium par un conduit d 6vacuafion ourd et ri...

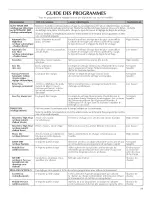
Страница 16: ...antifroissement se met en marche automatiquement a fin du programme I_ ouverture de a 3orte arr6te cette caract6ristique Sur d autres mod6les e bouton s6 ecteur WRINKI E PREVENT antifroissement peut 6tre r6g 6 _ ON marche REMARQUE Un signal est 6mis p6riodiquement orsque e r6g age WRINKI_E PREVENT antifroissement est s6 ectionn6 mais seu ement si e signal de fin de programme est 6ga ement s6 ectio...

Страница 17: ... e N iml orte aque e I_ow basse N importe aque e RI_GLAGES SPI_C AU Cos r6glages sont ajout6s _ la fin de Certains programmes pour r6duire le froissement Cool Down N importe qu elle charge C est a derni_re 6tape des programmes qui utilisent Absence de refroidissement a cha eur La charge est entement refroidie pour r6duire cha eur e froissement et en faci iter sa manipulation Wrinkle Prevent N impo...

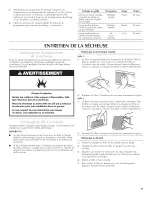
Страница 18: ...oivent 6tre enlevds de a sdcheuse aussit6t qu elle s arr6te e signal de fin de programme fair partie du bouton de mise en marche et peut tre sdlectionnd Tourner e bouton Start mise en marche _ ON marche ou OFF arr6t Le signal sera entendu seulement si e bouton sdlecteur est rdg16 _ ON 7 Ajouter une feui e d assoup issant de tissus si d6sir6 Suivre es instructions sur emba age 8 Appuyer sur a touch...

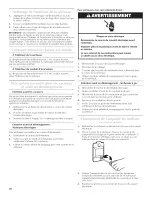
Страница 19: ...ec un filtre _ charpie ddplac6 endommag6 bloqu6 ou manquant Une telle action pout causer une surchauffe et des dommages _ a sdcheuse et aux tissus Si de a charpie tombe dans a sdcheuse au moment du retrait du filtre vdrifier e conduit d dvacuation et retirer a charpie I_e cla9et d dvacuation est situ6 h par o_ air de a sdcheuse sort de a maison Nettoyage avant chaque charge Style 1 1 Le fi tre _ c...

Страница 20: ...S6cheuses 6 ectriques Pour s6cheuses raccord6es _ un cordon d alimentation 1 D6brancher e cordon d alimentation 2 Veiller _ ce que los pieds de nivellement soient fix6s solidement _ la base de la s6cheuse 3 Utiliser du ruban adh6sif de masquage pour fixer a porte de a s6cheuse Pour s6cheuses avec raccordement direct Risque de choc 61ectrique D6connecter la source de courant 6lectrique avant I entr...

Страница 21: ... gaz I e ddclic du robinet de gaz est un bruit de fonctionnement normal Les quatre pieds sont ils install6s et a s6cheuse est elle d_apiomb de Pavant vers Parri_re et transversalement La s6cheuse peut vibrer si e e n est pas correctement insta 6e Voir es Instructions d insta ation Les v tements sont ils emm 16s ou en boule Une charge en boule rebondit ce qui fair vibrer a s6cheuse S6parer es artic...

Страница 22: ...u buter ibrement Odeurs Avez vous r_cemment empioy_ peinture teinture ou vemis darts a piece o_ est install_e votre s_cheuse Si c est e cas a6rer a piece Une fois los odeurs ou 6manafions disparues aver et s6cher _ nouveau los v6tements La s6cheuse est elle utilis6e pour a premibre lois e nouve 6 6ment de chauffage 6 ectrique pout 6mettre une odeur odeur disparattra aprbs e premier programme Charg...

Страница 23: ... reinstallation de votre gros appareil menager si celui ci est installe dans un endroit inaccessible ou n est pas installe conformement aux instructions d installation fournies par Whirlpool 10 Les pi_ces de rechange ou la main d oeuvre pour les gros appareils menagers dont les num os de s ie et de module originaux ont ete enleves modifies ou qui ne peuvent pas 6tre facilement identifies CLAUSE D ...

Страница 24: ...MI 49022 2692 Mississauga Ontario L5N 3A7 Please include a daytime phone number in your correspondence ASSISTANCEOU SERVICE Avant de faire un appel pour assistance ou service veuillez v ifier la section D6pannage ou consulter www whirlpool com help Cette v6rification peut vous faire 6conomiser le coot d une visite de r6paration Si vous avez encore besoin d aide suivre les instructions ci dessous L...

Отзывы: