background image

SpeedFace M1/M2


User Manual 

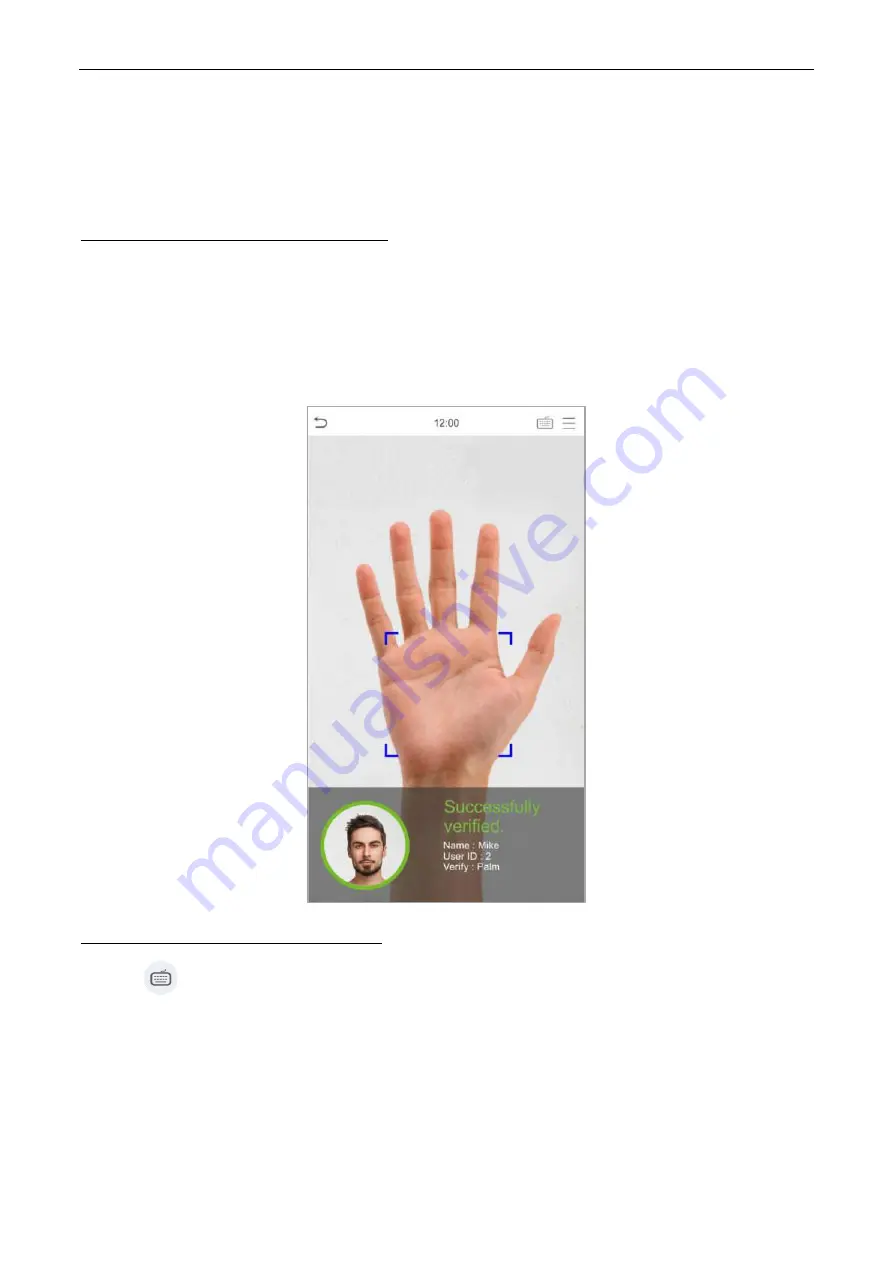
1:N (One to Many) Palm Verification mode 

This verification mode compares the palm image collected by the palm module with all the palm data 
template in the device. 

The device will automatically distinguish between the palm and face verification mode. Place the palm in 
the area that can be collected by the palm module, so that the device will automatically switch to palm 
verification mode. 


1:1 (One to  One ) Palm Verification mode 

Click the 

 button on the main screen to open the 1:1 (One to One) palm verification mode. 

1.


Input the user ID and press [OK]. 

P a g e

 | 13 


1.6.1


Palm Verification 

1.6


Verification Mode 

Содержание AiFace-Venus

Страница 1: ...User Manual AiFace Venus www esslsecurity com...

Страница 2: ...ICATION 25 2 MAIN MENU 26 3 USER MANAGEMENT 27 3 1 ADD USERS 27 3 2 SEARCH FOR USERS 31 3 3 EDIT USERS 32 3 4 DELETE USERS 32 4 USER ROLE 33 5 COMMUNICATION SETTINGS 35 5 1 NETWORK SETTINGS 35 5 2 PC...

Страница 3: ...SETUP 64 9 6 DURESS OPTIONS SETTINGS 65 10 ATTENDANCE SEARCH 66 11 AUTOTEST 68 12 SYSTEM INFORMATION 69 13 CONNECT TO ZKBIOACCESS MTD SOFTWARE 70 13 1 SET THE COMMUNICATION ADDRESS 70 13 2 ADD DEVICE...

Страница 4: ...istance between the device and a user whose height is within 1 55m 1 85m is recommended to be 0 3 to 2m Users may slightly move forwards and backwards to improve the quality of facial images captured...

Страница 5: ...multi mode collection area such that the palm is placed parallel to the device Make sure to keep space between your fingers P a g e 8 3 Make sure to keep space between your fingers 2 Place your palm...

Страница 6: ...the device screen time or may fail Be careful to not cover the eyes or eyebrows Do not wear hats masks sunglasses or eyeglasses Be careful to not display two faces on the screen Register only one per...

Страница 7: ...ce to enter the User ID 2 When there is no super administrator registered in the device click to enter the menu After 1 4 Standby Interface If a part of the face is covered with a hat a mask an eye pa...

Страница 8: ...hich is shown in green Please refer to 7 5 Shortcut Key Mappings below for the specific operation method P a g e 11 3 The switch of punch state can be done directly by using the screen shortcut keys C...

Страница 9: ...bers and symbols Click En to switch to the English keyboard Press 123 to switch to the numeric and special character keyboard and click ABC to return to the alphabetic keyboard Click the input box and...

Страница 10: ...ally distinguish between the palm and face verification mode Place the palm in the area that can be collected by the palm module so that the device will automatically switch to palm verification mode...

Страница 11: ...the user has registered the badge face and password in addition to palm and the verification method is set to Password Badge Face Palm the following screen will appear Select the palm icon to enter pa...

Страница 12: ...When the user enabled the Enable mask detection function the device will identify whether the user is wearing a mask or not The following is the popup of the comparison result prompt interface Note T...

Страница 13: ...ification This Verification mode compares the face captured by the camera with the facial template related to the entered user ID Press on the main interface and enter the 1 1 One to One facial verifi...

Страница 14: ...assword in addition to the face and the verification method is set to Password Badge Face Palm the following screen will appear Select the icon to enter the face verification mode After successful ver...

Страница 15: ...ase adjust your position 1 6 3 Badge Verification 1 N One to Many Badge Verification This verification mode compares the badge number in the badge induction area with all the badge number data registe...

Страница 16: ...the 1 1 One to One badge verification mode 1 Input the user ID and press OK If an employee registers palm face and password in addition to badge and the verification method is set to Password Badge F...

Страница 17: ...SpeedFace M1 M2 User Manual 2 Swipe the badge above the badge area the badge must be registered first P a g e 20...

Страница 18: ...SpeedFace M1 M2 User Manual Successful Verification Failed Verification P a g e 21...

Страница 19: ...d Click the button on the main screen to open the 1 1 One to One password verification mode 1 Input the user ID and press OK If an employee registers palm badge and face in addition to password and th...

Страница 20: ...SpeedFace M1 M2 User Manual 2 Input the password and press OK P a g e 23...

Страница 21: ...SpeedFace M1 M2 User Manual Successful Verification Failed Verification P a g e 24...

Страница 22: ...inations can be used as shown below Note mode otherwise the verification may fail For example if a user uses Face Registration but the verification mode is Face Password this user will never pass veri...

Страница 23: ...ndance Facial templates Palm templates Resetting to factory settings and Detection management Personalize This includes user Interface voice bell punch state options and shortcut key mappings settings...

Страница 24: ...ID and Name Notes P a g e 27 1 A username may contain 17 characters 2 The user ID may contain 1 to 9 digits by default 3 During the initial registration you can modify your ID which cannot be modifie...

Страница 25: ...custom role is set you can also select user defined role permissions for the user Click User Role to select Normal User or Super Admin Note If the selected user role is the Super Admin the user must p...

Страница 26: ...SpeedFace M1 M2 User Manual Register badge Press your badge above the badge area The badge number registration will be successful P a g e 29...

Страница 27: ...User interface after taking a photo Note While registering a face the system will automatically capture a picture as the user photo If you do not want to register a user photo the system will automati...

Страница 28: ...Manual Click the search bar on the user list and enter the retrieval keyword The keyword may be an ID surname or full name The system will search for the users related to the information P a g e 31 3...

Страница 29: ...ing a user except that the user ID cannot be modified when editing a user For further details refers 3 1 Add users Select a user from the list and click Delete to enter the delete user interface Selec...

Страница 30: ...to 3 roles and enroller that is the permission scope of the operation menu Click User Role on the main menu interface 1 Click any user role to set a defined role Toggle the Enable Defined Role button...

Страница 31: ...right You only need to select the features in sub menus If the device has a role enabled you may assign the roles you set to users by clicking User Mgt New User User Role If no super administrator is...

Страница 32: ...re that the device and the PC are connecting to the same network segment Click Ethernet on the Comm Settings interface Menu Description IP Address The factory default value is 192 168 1 201 Please set...

Страница 33: ...mprove the security of data please set a Comm Key for communication between the device and the PC If a Comm Key is set this connection password must be entered before the device can be connected to th...

Страница 34: ...nd establish a wireless network environment Wi Fi is enabled in the system by default If the Wi Fi network does not need to be used you can click the button to disable Wi Fi When Wi Fi is enabled clic...

Страница 35: ...ually Tap Page Down and Add Wi Fi Network Enter the parameters of Wi Fi network The added network must exist After adding find the added Wi Fi network in list and connect to the network in the above w...

Страница 36: ...the ADMS server Click Cloud Server Setting on the Comm Settings interface Menu Description Enable Domain Name Server Address When this function is enabled the domain name mode http will be used such a...

Страница 37: ...s 37 bits and 50 bits Wiegand Bits Number of bitsof Wiegand data Pulse Width us The value of the pulse width sent by Wiegand is 100 microseconds by default which can be adjusted within the range of 20...

Страница 38: ...d36 OFFFFFFFFFFFFFFFFCCCCCCCCCCCCCCCCMME Consists of 36 bits of binary code The 1st bit is the odd parity bit of the 2nd to 18th bits while the 36th bit is the even parity bit of the 19th to 35th bits...

Страница 39: ...rom being opened due to device removal Wiegand Format Values range from 26 bits 34 bits 36 bits 37 bits and 50 bits Wiegand output bits After choosing the Wiegand format you can select one of the corr...

Страница 40: ...ve 2 Click 24 Hour Time to enable or disable this format and select the date format When restoring the factory settings the time 24 hour and date format YYYY MM DD can be restored but the device date...

Страница 41: ...ser passes verification Access Logs Warning When the remaining record space reaches a preset value the device will automatically display a warning Users may disable the function or set a valid value b...

Страница 42: ...e The valid value ranges from 65 to 120 The higher the thresholds the lower the misjudgment rate the higher the rejection rate and vice versa The default value of 75 is recommended 1 1 One to One Matc...

Страница 43: ...he farther the person is the smaller the face is and the smaller face pixel will be obtained by the algorithm Therefore adjusting this parameter can adjust the farthest comparison distance of faces Wh...

Страница 44: ...e Please adjust the exposure parameter only under the guidance of the after sales service personnel of our company Click Palm on the System interface Menu Description Palm 1 1 One to One Matching Thre...

Страница 45: ...al This option restores the device such as communication settings and system settings to factory settings does not clear registered user data Click Reset on the System interface Click OK to reset P a...

Страница 46: ...to enter Allow unregistered people to access To enable or disable the unregistered people to access function When enabled as long as the person who passes the detection the device allows the personne...

Страница 47: ...lize on the main menu interface You can customize the display style of the main interface Click User Interface on the Personalize interface Menu Description Wallpaper To select the main screen wallpap...

Страница 48: ...rval switching different slide show pictures The function can be disabled or you may set the interval between 3 and 999 seconds Idle Time To Sleep m If you have activated the sleep mode when there is...

Страница 49: ...he duration of the internal bell Valid values range from 1 to 999 seconds 2 Back to the Bell Schedules interface click All Bell Schedules to view the newly added bell Edit a bell On the All Bell Sched...

Страница 50: ...key will be switched automatically Manual and Auto Mode Under this mode the main interface will display the auto switching punch state key meanwhile supports manually switching punch state key After t...

Страница 51: ...dance status or functional keys On the main interface when the shortcut keys are pressed the corresponding attendance status or function interface will quickly display Click Shortcut Key Mappings on t...

Страница 52: ...ta access records conditionally Delete Attendance Photo To delete the attendance photos of the designated personnel Delete Blocklist Photo To delete the photos taken during verifications those failed...

Страница 53: ...een Savers To delete the screen savers in the device Note When deleting the access records attendance photos or block listed photos you may select Delete All or Delete by Time Range If you select Dele...

Страница 54: ...nditions 1 The current door unlock time should be within any valid time zone of the user time period 2 The user s group must be in the door unlock combination when there are other groups in the same a...

Страница 55: ...disabling the function Door Sensor Delay s If the door is not closed and locked after opening for a certain duration Door Sensor Delay an alarm will be triggered The valid value of Door Sensor Delay...

Страница 56: ...the system will cancel the alarm from the local Reset Access Setting The restored access control parameters include door lock delay door sensor delay door sensor type verification mode door available...

Страница 57: ...SpeedFace M1 M2 User Manual 2 Click the date on which time zone settings are required Enter the starting and ending time and then press OK P a g e 60...

Страница 58: ...employees and the user will be able to open the door during the holidays Click Holidays on the Access Control interface Add a New Holiday Click Add Holiday on the Holidays interface and set the holida...

Страница 59: ...tion this holiday is no longer displayed on All Holidays interface Access groups are arranged into different door unlocking combinations to achieve multiple verifications and strengthen security In a...

Страница 60: ...ndicating that the unlocking combination 2 consists of 5 people the first two are from AC group 2 the next two are from AC group 4 and the last person is from AC group 7 The door unlocking combination...

Страница 61: ...Control interface Menu Name Description Anti passback direction No Anti passback Anti passback function is disabled which means successful verification through either master device or slave device ca...

Страница 62: ...Options on the Access Control interface Menu Description Alarm on Password When a user uses the password verification method an alarm signal will be generated otherwise there will be no alarm signal A...

Страница 63: ...rs to check their access records Click Attendance Search on the main menu interface The process of searching for attendance and blocklist photos is similar to that of searching for event logs The foll...

Страница 64: ...to search for records of all users click OK without entering any user ID 2 Select the time range in which the records you want to search for 3 The record search succeeds Click the record in green to...

Страница 65: ...screen by displaying full color pure white and pure black to check whether the screen displays the colors normally Test Voice To automatically test whether the audio files stored in the device are com...

Страница 66: ...city Displays the current device s user storage palm password and face storage administrators access records attendance and blocklist photos and user photos Device Info Displays the Device s name Seri...

Страница 67: ...to set the ADMS Service Port as shown in the figure below 13 Connect to ZKBioAccess Software 13 1 Set the Communication Address 1 Click COMM Ethernet in the main menu to set the IP address and Gatewa...

Страница 68: ...dd to add the specific device to the software 4 3 After searching the list and the total number of access controllers will be displayed 2 Click Search and it will prompt Searching 1 Click Access Contr...

Страница 69: ...SpeedFace M1 M2 User Manual 1 Click Personnel Person New 2 After setting all the parameters click OK 13 3 Add Personnel on the Software P a g e 72...

Страница 70: ...ad and do not cover your face and eyebrows with your hair 5 It is recommended to show a plain facial expression Smile is acceptable but do not close your eyes or incline your head to any orientation T...

Страница 71: ...ick eyeglasses frame it is recommended to capture two images one with eyeglasses and the other one without eyeglasses Face The image must have clear contour real scale evenly distributed light and no...

Страница 72: ...product please directly contact your dealer Our other law enforcement fingerprint devices or development tools can capture the original images of citizen s fingerprints As to whether or not this cons...

Страница 73: ...ce Element Lead Pb Mercury Hg Cadmiu m Cd Hexavalent chromium Cr6 Polybrominate d Biphenyls PBB Polybrominated Diphenyl Ethers PBDE Chip Resistor Chip Capacitor Chip Inductor Diode ESD component Buzze...

Страница 74: ...24 Shambavi Building 23rd Main Marenahalli JP Nagar 2nd Phase Bengaluru 560078 Phone 91 8026090500 Email sales esslsecurity com www esslsecurity com...

Отзывы: