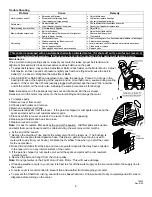
Trouble Shooting
Problem Cause
Remedy
Motor cycles on and off
•
Excessive belt tension
•
Blower shaft not spinning freely
•
Circuit breaker not large enough
•
Adjust belt tension
•
Lubricate or replace bearings
•
Consult a licensed electrician
Fails to start
•
No electrical power
•
Circuit breaker tripped or fuse blown
•
Check all electrical connections and cords
•
Reset circuit breaker or replace fuse
Water draining from overflow
•
Float improperly adjusted
•
Adjust float
Blower vibrates excessively
•
Belt or pulley loose
•
Blower wheel out of balance or out of alignment
•
Debris in blower housing
•
Adjust belt or tighten pulley
•
Replace the blower wheel
•
Clear debris
Not cooling
•
Blocked water lines
•
Windows opened too little or too much.
•
Uneven pad wetting
•
Pump clogged or failed
•
Pads plugged with dirt and water deposits
•
Clear incoming water line, float and water distributor of blockages.
•
Adjust window openings
•
Level water trays, check for blocked water slots in water trays
•
Clean pump or replace
•
Replace pads
This cooler is equipped with an automatic thermally protected motor. If it shuts off on its own for any reason, it
can restart without warning.
If this occurs, check into the problem before permanent damage occurs.
Maintenance
Once a month during cooling season, inspect your cooler for leaks, proper belt tension and
alignment, blocked water lines and excessive residue build-up on the pads.
•
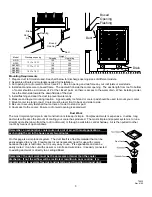
To adjust belt tension, loosen the 4 Adjustment Bolts (2 each side) on the Motor Mount. Adjust
belt tension so that 3 pounds of pressure (lightly push with one finger) will cause the belt to
deflect ¾”, as shown. Retighten the Adjustment Bolts.
•
Use SAE 20W or SAE 30W non-detergent oil to lube the bearings. Place 2 to 3 drops in the
bearing oil cups at the beginning of the season and no more than once a season during cooling
season. If the motor has oil holes (usually plugged with yellow caps that read “OIL” at either
end of the motor) oil the motor also, following the same procedure as for bearings.
3/4"
Note:
Excessive oil in the bearings may leak out and be drawn into the air stream.
Excessive oil in the motor may leak onto the motor windings and damage the motor.
•
To replace pads
1. Remove louver from cooler.
2. Unhook pad holders and remove.
3. Remove and discard old pad.
4. Clean water deposits from the louver. If the paint is chipped or rust spots occur sand the
spots and paint with a rust resistant exterior paint.
5. Place new filter in louver and tuck in to prevent hot air from bypassing.
6. Replace pad holders and hook into place.
7. Replace louver in cooler.
Note:
It is best to replace filter pads at the end of the season. Old filter pads soak up lime
and salts that can rust louvers and the cabinet during the wet, rainy winter months.
•
At the end of the season
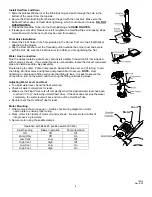
1. Remove the Overflow Tube and let the water drain from the reservoir. (The bushing is
threaded to accept a standard garden hose. If desired, a garden hose may be used to
route water away from your house.) Replace the Overflow Tube when you start the cooler
for the next season.
2. Rinse dirt and debris from the pan and clean any water deposits that may have collected
in the reservoir or on any interior surface of the cooler.
3. If the paint is chipped or rust spots occur sand the spots and paint with a rust resistant
exterior paint.
4. Remove the belt and hang it from the motor pulley.
Note:
Do not get water on the Fan Motor or Pump Motor. This will cause damage.
•
If freezing weather occurs in your area, it is best to shut off the water supply at the source and drain the supply line to
the cooler.
•
A cooler cover is recommended to prevent rain and weather from damaging your cooler.
•
To prevent the Shaft from rusting, coat with a wax based lubricant. Allow Lubricant to dry completely and all fumes to
disperse before turning on the cooler.
70932
Rev. 6/02
6


