background image


34

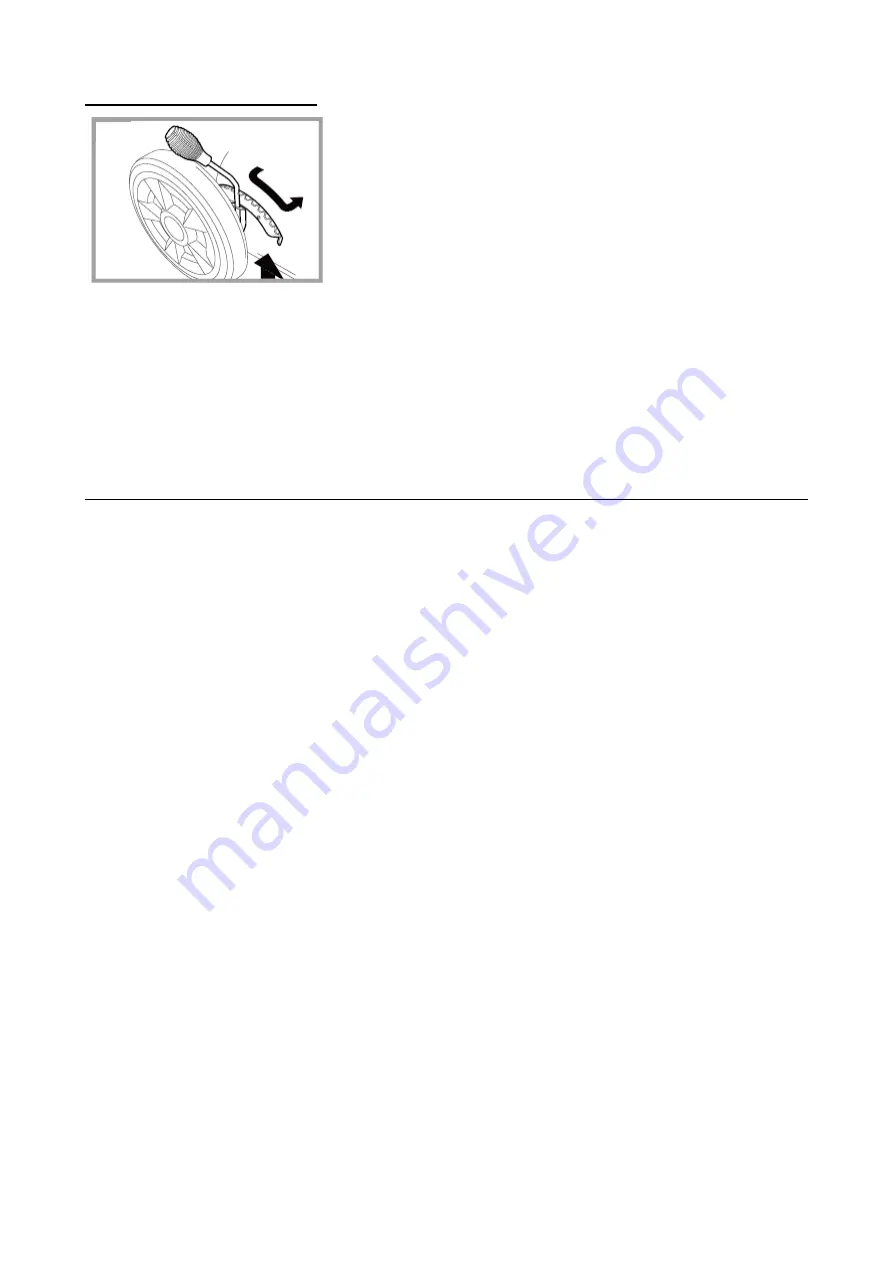
Cutting height adjustment 


Adjust the cutting height of your mower to suit the mowing conditions. Do not try to remove 
too much grass in one pass, mow rather the same area a few times. Adjustment of the cut-
ting height is made centrally. Turn off the machine and take the weight of the machine of the 
mower by lifting. Move the lever outwards and move it towards the front of the machine to 

increase the cutting height or towards the rear to reduce the cutting height. Return the lever 
to the appropriate notch to set the desired cutting height. Make sure the lever fits snugly 
and securely.


CLEANING AND STORAGE 


-


Cut grass is damp. Regular cleaning after each use will reduce the risk of corrosion or 
seizure. 

-


Before you start cleaning, turn off the engine and allow it to cool. 

-


Remove accumulated grass clippings from and around with a soft brush. 

-


Clean the grass collection bag annually with a brush or gentle spray of water. Let the 
bag dry. 

-


Clean underneath regurlarly. Disconnect the spark plug cap and tilt the mower to your 
right or back when standing behind it. Remove cut grass from the cutting system with a 
scraper and a brush.


-


Do not use a pressure washer or hot water to clean the mower. Dry off the machine be-
fore storing by leaving it running for a few minutes on a flat, clear surface to prevent 

corrosion or seizure. 

-


Store your mower in a dry, well-ventilated area away from flames, sparks or heat 
sources. Disconnect the spark plug cap before storing. Avoid storing beneath a tarpau-
lin or similar cover as it may cause condensation resulting in corrosion.


-


Winter storage:

 Thoroughly clean the mower. Run the engine outdoors until fuel tank 

is empty or empty fuel using a fuel suction pump. Dispose of discarded fuel according to 
the local regulation. Turn fuel tap to OFF. Remove the spark plug from the engine. Pour a 
tablespoon of engine oil into the cylinder. Gently pull the starter rope several times to 
distribute the oil to protect the cylinder over winter. Replace and tighten the spark plug.


-


Transporting your mower: 

Make sure that the fuel tank is empty. Allow the engine to 

cool and turn fuel tap to OFF position.


Содержание XTP101

Страница 1: ...58 0 20 1323 388 tuotepalaute ikh fi www ikh fi XTP101 Lue k ytt ohjeet huolellisesti ennen laitteen k ytt ja noudata kaikkia annettuja ohjeita S ilyt ohjeet my hemp tarvetta varten L s noggrant igeno...

Страница 2: ...stu l pikotaisin ohjaimiin ja niiden asianmukaiseen k ytt n Opettele miten laite pys ytet n nopeasti ja miten sen ohjaimet kytket n irti l yrit k ytt laitetta ennen kuin ymm rr t t ysin sen k yt n sek...

Страница 3: ...sineet kuten ty kalut kaukana paljaista j nnitteellisist osista ja kytkenn ist v ltt ksesi kipin innin tai valokaaren muodostuksen Ne voivat sytytt polttoaineh yryn tai kaasun tuleen Pys yt aina moott...

Страница 4: ......

Страница 5: ......

Страница 6: ...ien mukaisesti 1 Kiinnit alempi ty nt aisa mukana toimitettuja siipimuttereita pultteja aluslevyj ja ruuveja k ytt m ll 2 Lukitse ty nt aisa paikalleen k ytt m ll pikalukitusliitint 3 Siirr vaijerin k...

Страница 7: ......

Страница 8: ...valtuutettu huoltohenkil st saa huoltaa konetta alkuper isi varaosia k ytt en N in varmistetaan koneen turvallinen toiminta K yt konetta aina takaa l koskaan ohita konetta edest tai seiso sen edess k...

Страница 9: ...makkaasti l p st irti kahvasta vaan palauta se hallitusti takaisin alkuasentoon 5 Kun moottori on k ynyt noin 15 sekuntia tai kylm ll ilmalla pidemp n k nn kaa suvipu k yntiasentoon 6 Kun k ynnist t k...

Страница 10: ...sytytystulpan hattu ja kallista laitetta ta kaap in katsottuna oikealle tai taaksep in Poista ruohoj te terist kaapimalla ja har jaamalla l k yt laitteen puhdistamiseen painepesuria tai kuumaa vett Ru...

Страница 11: ......

Страница 12: ...a Puh dista patruunaa pienell m r ll l mmint vett sek muutamalla tipalla pesunestett kunnes patruuna on puhdas rasvaton ja p lyt n Huuhtele suodatinpatruuna puhtaalla ve dell ja t m n j lkeen purista...

Страница 13: ......

Страница 14: ...jliga risker med denna apparat Bekanta dig med kontrollerna och hur man korrekt anv nder dem L r dig hur man snabbt stannar apparaten och frikopplar kontrollerna F rs k inte anv nda apparaten innan d...

Страница 15: ...rig p br nsle inomhus H ll jordade ledande f rem l s som verktyg p avst nd fr n icke isolerade sp nningsf rande delar och anslutningar f r att undvika gnistbildning eller verslag S dana f rete elser k...

Страница 16: ......

Страница 17: ......

Страница 18: ...rna nedan 1 S tt fast den nedre dragst ngen med de medf ljande vingmuttrarna bultarna brickorna och skruvarna 2 L s dragst ngen med snabbl set 3 Flytta vajerh llaren fr n dragst ngens utsida till insi...

Страница 19: ......

Страница 20: ...ktoriserad underh llspersonal f r utf ra underh ll p maskinen och ska an v nda originalreservdelar P s s tt s kerst ller man att maskinen fungerar s kert Anv nd alltid maskinen bakifr n g och st aldri...

Страница 21: ...n kraftigt i starthandtaget Sl pp inte handtaget utan l t den kontrollerat g tillbaka till startl get 5 N r motorn har g tt i ca 15 sekunder eller l ngre i kallt v der vrider du gasspaken i driftl ge...

Страница 22: ...elbundet Ta loss t ndstiftshatten och luta apparaten till h ger eller bak t bakifr n sett Skrapa och borsta bort gr savfall fr n bladen Anv nd inte h gtryckstv tt eller hett vatten f r att reng ra app...

Страница 23: ......

Страница 24: ...tret minst var 25 e drifttimme Ta loss locket till luftfilterk pan och ta f rsiktigt loss filtrets skumpatron Reng r patronen med lite varmt vatten och n gra droppar diskmedel tills den r ren fettfri...

Страница 25: ......

Страница 26: ...chine and disengage the controls quickly Do not attempt to operate the machine until you fully understand how to properly operate and maintain the engine and how to avoid accidental injuries and or pr...

Страница 27: ...uch as tools away from exposed live electrical parts and connections to avoid sparking or arcing These events could ignite fumes or vapors Always stop the engine and allow it to cool before filling th...

Страница 28: ......

Страница 29: ......

Страница 30: ...the appliance according to the instructions below 1 Fit the lower handle with wing nuts bolts washers and screws 2 Lock the handle in position using quick release clamps 3 Fit the cable clamp from ou...

Страница 31: ......

Страница 32: ...ified repair personnel using only identical replace ment parts This will ensure that the safety of the machine maintained Always operate the machine from behind never pass or stand in front of the mac...

Страница 33: ...ad guide it carefully back to its original position 5 When the engine has been running for at least 15 seconds or longer on cold days ad just the throttle control lever to the RUN position 6 To re sta...

Страница 34: ...larly Disconnect the spark plug cap and tilt the mower to your right or back when standing behind it Remove cut grass from the cutting system with a scraper and a brush Do not use a pressure washer or...

Страница 35: ......

Страница 36: ...of grease and dust Rinse the filter cartridge in clean water and then squeeze gently to remove most of the water Let it air dry until it is completely dry Clean the cover and inside of the air box wit...

Страница 37: ......

Страница 38: ......

Страница 39: ......

Отзывы: