background image

PAGE 10

EWP-2000 V2 User’s Manual

CONNECTING TO YOUR WIRELESS NETWORK

Note: The EWP-2000 V2 connects and controls your FireBall server by using 
your existing wireless network. Any standard 802.11b WiFi network can be used. 
The setup and configuration of a wireless network is beyond the scope of this 
document and it is assumed that your network is properly configured. If you 
require assistance in configuring and setting up a wireless network, please contact 
your Escient dealer.

The Windows XPe zero configuration tool should automatically run the first 

time you turn on the EWP-2000 V2. You can also run the connection tool 

manually at any time. Follow these steps.to 

connect the EWP-2000 V2 to your existing 

wireless network.

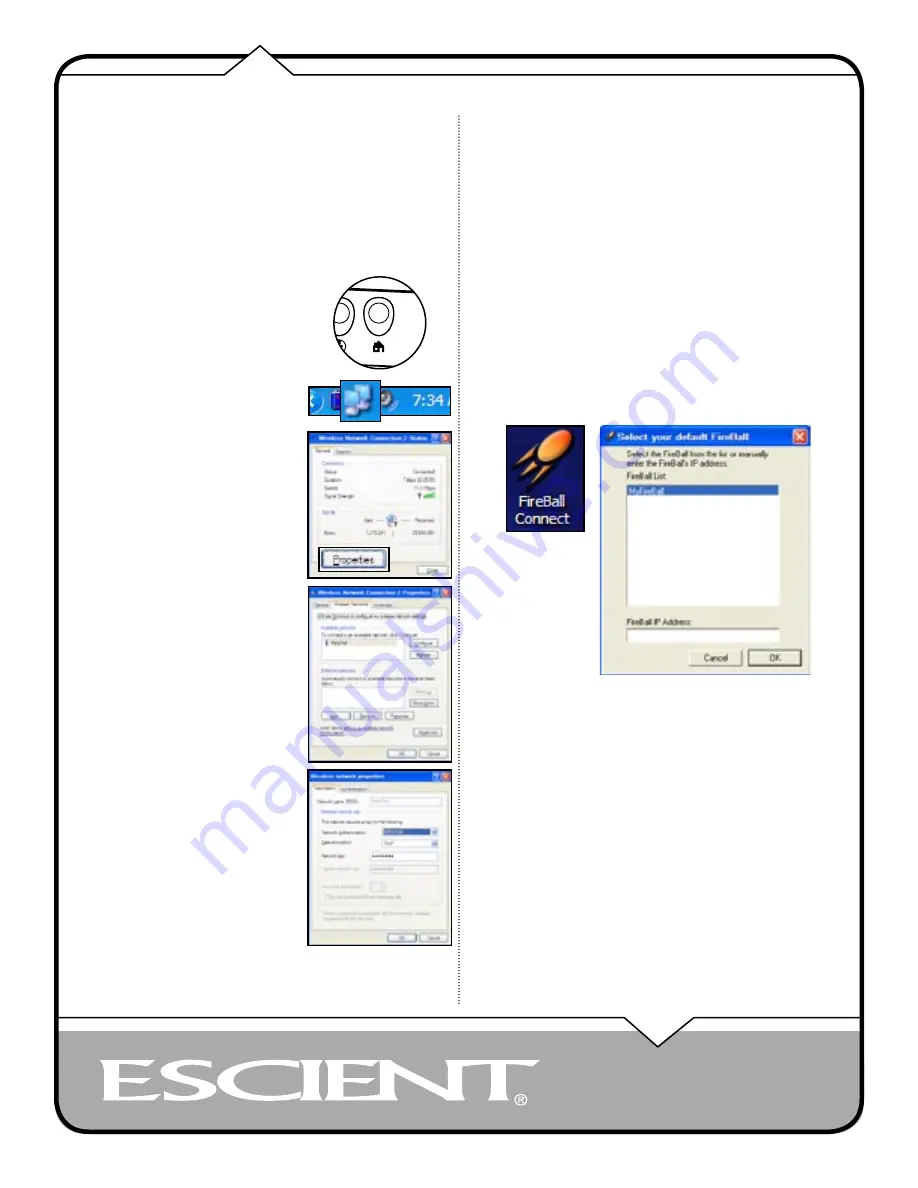
1.  Select the HOME button on the front 

panel of the EWP-2000 V2 to display 
the Windows XP3 Desktop. 

2.  Select Wireless LAN icon located on 

the System Tray to display the Wireless 
Network Connection Status dialog.

3.  Select the Properties button to display 

the Wireless Network Properties 
screen.

4.  Select the Wireless Networks tab.
5.  Select the Refresh button to update the 

list of available wireless access points 
which are within range of your web 
pad.

6.  Select the name of your wireless 

access point (which should appear in 
the list of Available Networks that are 
in range) and then select the Configure 
button to display the Wireless network 
properties dialog.

7.  Enter the SSID of the network.
8.  If your wireless network uses any 

kind of security (we suggest that you 
do use security), select the proper 
authentication and encryption type, 
and enter the Network key. Please refer 
to the documentation that came with 
your wireless access point for more 
information about setting up a secure 
wireless network.

9.  Select the OK button to save your 

settings on the Wireless network 
properties dialog.

10.  Select the OK button to save your 

settings on the Wireless Network 
Connection Properties dialog.

11.  The Wireless Network Connection 

Status  dialog should now be displayed 
and indicate that you are connected 
to the selected wireless network. If 
the status is not Connected, please 
make sure you are within range of your 
wireless access point and repeat these 
steps.

12.  Select the CLOSE button to close the Wireless Network Connection 

Status dialog.

CONNECTING TO YOUR FIREBALL

The FireBall E2 contains a built-in web server capable of serving web pages 

specifically designed to control almost every aspect of the FireBall from a 

standard web browser such as Microsoft’s Internet Explorer.

SELECTING YOUR FIREBALL SERVER

On the web pad, launch the “FireBall Connect” Application by pressing the 

FireBall button the front panel of the Web Pad. 

NOTE: You can also double-tap the FireBall Connect icon on the Desktop.

A list of the available FireBall servers is displayed. Select the server name 

you want to connect to and then select the OK button. After a few seconds, 

the EWP-2000 V2 will configure this server as the default server and load the 

Music Guide.

MANUALLY CONNECTING TO YOUR FIREBALL

In addition to using the FireBall Connect application, you can manually connect 

to your FireBall Server from Internet Explorer, if you know the “IP Address” of 

your FireBall.

Follow these steps to determine the IP Address:

1.  Select the SETUP button to display the Setup menu on your TV.
2.  Select the Utilities menu item.
3.  Select the System Information menu item.
4.  Write down the IP Address of your FireBall’s Ethernet connection. 

This number is located in the bottom right of the System Information 
screen and consists of four numbers separated by periods. Example: 
192.168.1.1

5.  Select the SETUP key again to exit Setup

Using your web pad’s Internet Explorer web browser (or any web browser 

connected to the same network as your FireBall) enter the IP address of your 

FireBall and then the RETURN command. Your FireBall Server’s Music Guide 

will appear in the web browser in a few seconds.

Connecting To Your FireBall

Setting Up The Web Pad

Содержание EWP-2000 V2

Страница 1: ...EWP 2000 V2 USER S MANUAL P N M21501 01A3 ...

Страница 2: ...G THE SCREEN 9 ADJUSTING THE BACKLIGHT LEVEL 9 CONNECTING TO YOUR WIRELESS NETWORK 10 CONNECTING TO YOUR FIREBALL 10 SELECTING YOUR FIREBALL SERVER 10 MANUALLY CONNECTING TO YOUR FIREBALL 10 FIREBALL WEB INTERFACE 11 Table of Contents LISTENING TO MUSIC 12 BROWSING YOUR MUSIC LIBRARY 12 SHOW AND HIDE TRACKS 12 PLAYING THE CURRENT TITLE 12 SELECTING A DIFFERENT SONG 13 CHANGING THE GUIDE VIEW 13 Vi...

Страница 3: ...Information about Your FireBall 43 Restarting the System 43 Updating the Software 43 ADDITIONAL INFORMATION 44 TROUBLESHOOTING 44 ESCIENT SUPPORT 44 SPECIFICATIONS 44 System 44 Web Access and Embedded Applications 44 Thin Client Server Computing 44 PC Companion 44 Wireless Network Support 44 Tethered Network Support 44 Dimensions Weight 44 Regulatory Environmental 44 Standard Package Accessories 4...

Страница 4: ... software updates REGULATORY NOTICES This device complies with Part 15 of the FCC Rules Operation is subject to the following two conditions 1 this device may not cause harmful interference and 2 this device must accept any interference received including interference that may cause undesired operation To identify this device refer to the part series or model number on the product FCC Class B Radi...

Страница 5: ...o follow these instructions may result in skin rash or significant eye damage Danger of explosion if battery is incorrectly replaced Replace only with the same type recommended by the manufacturer Dispose of used batteries according to the manufacturer s instructions Rechargeable Lithium ion battery disposal Unwanted lithium ion battery packs may be returned to the battery manufacturer for disposal...

Страница 6: ...sult of accident misuse abuse neglect fire water lightning or other acts of God or nature improper storage unauthorized modification or failure to follow instructions Any type of unauthorized repair or modifications made to the system resulting in damage to the product will not be covered under this warranty Damage caused to the product as a result of improper shipping or installation Any problems re...

Страница 7: ...n the screen until the Select key is pressed Info Text Area the portion of the guide screen used to display information about the highlighted title Playlist a collection of one or more music tracks or songs Title a collection of music tracks commonly referred to as a CD Album or Playlist Key refers to one of the buttons on your remote or keyboard MP3 a compressed digital audio format MP3 files are ...

Страница 8: ...out and the EWP 2000 V2 will reboot itself FRONT PANEL OVERVIEW 1 Antenna 7 Navigation 2 Record LED 8 Speakers 3 Network LED 9 Keyboard button 4 Battery LED 10 FireBall button 5 Microphone 11 Internet button 6 Stylus 12 Home button Note To increase and decrease the brightness of the display press and hold button 11 and then use button 7 to increase or decrease brightness level 1 2 3 4 5 6 9 10 11 ...

Страница 9: ... Up The Web Pad ENTERING TEXT WITH THE ON SCREEN KEYBOARD Pressing the left most button on the EWP 2000 V2 web pad will show and hide the Windows XPe popup keyboard When the keyboard is displayed tap on any character to enter text into the active area on the screen Press the button again to hide the keyboard WINDOWS SYSTEM KEY COMBINATIONS F1 Help CTRL ESC Open Start men ALT TAB Switch between ope...

Страница 10: ...Wireless Network Connection Properties dialog 11 The Wireless Network Connection Status dialog should now be displayed and indicate that you are connected to the selected wireless network If the status is not Connected please make sure you are within range of your wireless access point and repeat these steps 12 Select the CLOSE button to close the Wireless Network Connection Status dialog CONNECTI...

Страница 11: ... your FireBall just as you would from the original IR remote and TV The familiar FireBall Guide Player Options and Setup mode are all supported from the Web Interface You will notice that unlike the TV user interface there are buttons along the left and right edges of the web browser These buttons duplicate the features found on your remote control FireBall Web Interface MUSIC GUIDE SCREEN MUSIC P...

Страница 12: ... Select the Title again to collapse the current Title and hide the track names PLAYING THE CURRENT TITLE Playing the currently highlighted Title is the same as playing a CD in a conventional CD player Simply select the PLAY button and it begins to play from track 1 Note If you select a track name you will start playback from the selected Track You ll notice that a new screen appears with a list of...

Страница 13: ...our Music Library is by using the Music Views There are four Views that you can toggle through using the MENU VIEW button on the left edge of the screen View By Artist View By Title View By Song View By Cover View By Artist View By Artist is the default View and displays your Music Library alphabetically from A to Z using according to the Artist Name then the Album Name View By Title View By Title...

Страница 14: ...rent Play Mode select the PLAY MODE key on the left edge of the screen Each press of the PLAY MODE key will switch to the next Play Mode Stop pressing the PLAY MODE key when you see the desired Play Mode appear on the screen VIEWING BY GENRE In addition to the current Guide View the Music Guide automatically organizes your Music into default Genres also called Groups The Group Bar displays a horiz...

Страница 15: ...enre genre cover art and status about the current Internet Radio station stream FireBall will attempt to locate the station to make sure it is currently broadcasting over the Internet connect to it buffer some audio then begin playing the audio stream The status of all of this activity is indicated at the bottom left of the screen Playing Internet Radio requires a valid Internet connection Althoug...

Страница 16: ...the list PLAYING THE CURRENT MOVIE Playing the currently highlighted Movie is the same as playing a DVD in a conventional DVD player Simply select the PLAY button The appropriate DVD disc is located in your external changer loaded into the player and begins to play You ll notice that a new screen appears with a description of the movie a large cover image and DVD controls This is the Movies Player...

Страница 17: ...nt Guide View the Movies Guide automatically organizes your Movies into default Genres also called Groups The Group Bar displays a horizontal scrolling list of Genres corresponding to the Movies in your library Five Genres or Groups are visible at one time The All genre is the default which displays all DVDs in your Movie Library LEFT and RIGHT arrow buttons appear on the left and right edges of t...

Страница 18: ...nal equipment and is very fast as the internal CD drive can rip audio at several times the speed of normal playback This is known as fast ripping Follow these steps to record using the internal CD drive 1 Select the EJECT key on the front panel of your FireBall 2 Insert an audio CD label side up into the CD tray 3 Select the EJECT key again to close the CD tray 4 The CD cover and track names for t...

Страница 19: ...from an external changer is much slower than recording from the internal CD drive because each CD must be played and recorded in real time compared to the fast ripping speed of recording from the internal CD drive All changer based CDs are seamlessly integrated into the same easy to use Music Guide as your recorded CDs Please refer to the FireBall s User Manual for details on how to setup and reco...

Страница 20: ...en to advance to the Edit Playlist Select Guide The Edit Playlist Select Guide works just like the Music Guide Page up and down the list and select the OPEN or CLOSE button expand or collapse music titles 6 For each song you want to add to the Playlist select the box to the left of the song A checkmark appears in the box of each selected song indicating that it will be added to the Playlist Select...

Страница 21: ...o Group 2 Select the OPTIONS button to display the Options Menu 3 Select the New Group menu item 4 Using the popup keyboard enter a name for your Group 5 Select the CONTINUE button on screen to advance to the Edit Group Select Guide The Edit Group Select Guide works just like the Music or Radio Guide 6 For each Music Title or Radio Station you want to add to the Group select the box to the left of...

Страница 22: ...or information on WMA and Windows Media Player Assuming you have a valid URL for a station follow these steps to add your own Internet Radio Station to the Radio Guide 1 Make sure you are in the Radio source mode by selecting the RADIO source mode on the left edge of the screen 2 Select the OPTIONS button to display the Options Menu 3 Select the New Station menu item 4 Using the popup keyboard ent...

Страница 23: ... you may have added from your Radio Guide It WILL replace the Escient supplied stations with a fresh new list If you want to replace the current Internet Radio Stations with a new list of stations follow these steps 1 Select the Radio source button to make sure you are in the Radio source 2 Select the OPTIONS button to display the Options Menu 3 Select the Tune Stations menu item 4 Read the WARNIN...

Страница 24: ...display the Edit Music Information screen 4 Using the popup keyboard change the artist name album title label year of release or genre 5 Select the SAVE button to save your changes and return to the previous screen Edit Movie Info You can also edit DVD movie information for any using the Edit Movie Info screen Follow these steps to edit the DVD information for the current DVD Movie 1 Select the DV...

Страница 25: ...Select the Music or Movie Title you want to edit in the Music or Movies Guide 2 Select the OPTIONS button to display the Options Menu 3 Select the EDIT MUSIC or EDIT MOVIE menu item to display the Edit Information screen 4 Select the Lookup This Disc button The Get Info screen will be displayed as FireBall attempts to lookup the disc information for you 5 When the lookup is complete you will retur...

Страница 26: ...an change either one of these to modify the search Note that editing the Artist Name or Title WILL NOT change them in the Music Library These edits are ONLY used to search for a new cover 6 Select the SEARCH button to start the search 7 The Get Music Info screen will be displayed as FireBall attempts to search for the cover using the Artist Name and Title you entered 8 When the search is complete ...

Страница 27: ...the list of covers Notice that a preview of the selected cover appears on the right of the list as you highlight each name Note that it may take several minutes to display all the covers available on your FireBall 6 Select the SAVE button when you have located the cover of your choice and return to the previous screen Editing Track Names You can also manually edit the Track Song names of the curre...

Страница 28: ...o make sure you are in the Radio source 2 Select the OPTIONS button to display the Options Menu 3 Select the Edit Station menu item to display the Edit Station screen 4 Using the popup keyboard edit the information for the new station including station name location URL the bit rate of the stream the genre and the number of channels mono or stereo The cover art will be set according to which genre...

Страница 29: ...CONTINUE button on screen to keep the current name and advance to the Edit Playlist Select Guide 6 For each song you want to add to the Playlist select the box to the left of the song A checkmark appears in the box indicating that it will be added to the Playlist 7 For each song you want to remove from the Playlist select the box again and the checkmark will be removed indicating that the song sho...

Страница 30: ...ance to the Edit Group Select Guide 6 For each item you want to add to the Group select the white box to the left of the Title A checkmark appears on the box of each selected Title or Station indicating that it will be added to the Group Select the box again to remove the checkmark 7 When you have selected all of the Titles or Stations you want to include in the group select the SAVE button on the...

Страница 31: ...lete Music screen 4 For each Track you want to delete highlight the Track and select the SELECT key on the remote A checkmark appears to the right of each selected Track indicating that it will be deleted Select the SELECT key again to remove the checkmark Selecting the Toggle key on the remote when a Title is highlighted will toggle all or none of the Title s tracks for deletion 5 When you have s...

Страница 32: ...the SAVE button to permanently remove and delete the checked Playlists DELETING GROUPS Deleting Groups from the Group Bar is very similar to deleting Playlists The contents of the Group the Music Titles DVD Movies or Radio Stations are not deleted They are still available in any other Groups they may be assigned to and in the All Group Follow these steps to delete Groups 1 Select the OPTIONS key t...

Страница 33: ...ck device and the web pad is the controller When you set the Client Mode to Streaming Music Client Mode the Web Pad becomes the playback device This means that anytime you play pause stop or use any other transport control the Web Pad s playback system is affected This mode is useful because the Web Pad becomes another zone This means that someone in the main room where your FireBall is located ca...

Страница 34: ...of idle time that FireBall will wait before activating the screen saver from 1 to 60 minutes Warning Some televisions and plasma monitors are more susceptible to screen burn in than others therefore we recommend using a low activation time like 1 minute to reduce the risk of burn in Mode Select either the Normal mode or Product Demonstration mode The Normal mode displays the current title or stati...

Страница 35: ...n on the Setup Menus You must exit Setup and re enter setup to activate the password protection If a user password is specified you will be prompted for your password whenever you press the Setup key on the remote If the password entered matches the stored password full access is granted to the user until the next power off cycle If the password does not match the user will be asked 2 more times to...

Страница 36: ...ngs Ethernet is the preferred networking choice which provides you with the best network performance and allows your FireBall to act as a server to deliver your music collection throughout your home network using the optional FireBall MP150 Music Players Ethernet networks require that you configure each device on the network with a valid address These addresses are usually configured automatically b...

Страница 37: ...ou should enter 70 or any other code to temporarily disable it while using FireBall This prevents a Call Waiting call from interrupting any FireBall Internet functions that may be in progress such as updating 9 Finally select which Provider you are using AOL CompuServe or Other SETTING THE FIREBALL SERVER NAME Your FireBall can act as a server delivering audio to optional remote FireBall clients o...

Страница 38: ...ng allowing you to store more songs on your FireBall FLAC audio will always take up approximately 50 of the original WAV AIFF file size The FLAC compression level has been optimized to FireBall s processor speed and is not user adjustable Creating a mix CD using FLAC audio files creates a CD which is identical to the original thus it is referred to as CD Quality SETTING THE DISC INSERT PREFERENCES Y...

Страница 39: ...each CD and compared to the local music database or the Gracenote CDDB using your Internet connection as FireBall builds your Music Library As each disc is accessed and looked up the Quick Lookup screen is updated to display the disc s information and cover art When all of the discs are looked up the Music Guide will be displayed You can manually run Quick Lookup at any time by following these ste...

Страница 40: ... FROM EXTERNAL CHANGERS If you want to lookup the disc information for a specific range of slots in a changer you can use the Lookup Range feature Follow these steps to lookup a range of changer slots 1 Select the SETUP button to display the Setup menu 2 Select the Lookup Discs menu item under Changer Management 3 Select the Lookup Range menu item 4 Enter a valid range of slots to lookup If you hav...

Страница 41: ...o connections from your changers connected to FireBall FireBall will use the digital inputs first but if there is digital copy protection on a CD FireBall will then attempt to use the analog audio inputs to record the protected CD Automatically Recording CDs You can easily record changer based CDs to your FireBall s internal hard drive using the Quick Record feature Quick Record will record all tra...

Страница 42: ...anger select which changer you want to use 5 Select the RECORD RANGE button 6 The Record Range screen displays the recording progress for each disc in the selected range Recording All CDs If you want to record all discs in all changers you can use the Record All feature Follow these steps to record each disc in all changers 1 Select the SETUP button to display the Setup menu 2 Select the Record Di...

Страница 43: ...andby mode FireBall is ready to use 4 Select and release the Power button to turn on FireBall Follow these steps to restart the system using Utilities menu 1 Select the SETUP button to display the Setup menu 2 Select the Restart System menu item under Utilities 3 Confirm that you want to restart the system and select the RESTART button 4 When the blue LED on the front panel glows solid blue standby...

Страница 44: ... Packs Battery Charging Cradle and AC DC Adapter Protective Jacket with Shoulder Strap Optional Wall Desktop Vehicle mount Docking Cradle Optional External Battery Charger Optional Automobile DC Adapter Kit Optional Accessories External Battery Pack Li Ion 20W External snap on hot swappable battery pack more than doubles duration of mobile operation External Battery Charger Kit with AC Adapter Pow...

Отзывы: