background image

- 67 -

ES

Variantes de equipamiento adicionales

Batería

Si ha adquirido vario DIGITAL 22 FHD Advanced con batería, lea detenidamente esta sección:


X

Solo el fabricante o su servicio postventa están autorizados a desmontar o cambiar la 

batería.


X

La carga completa de la batería dura 4 horas y ofrece una autonomía de uso de 

2,5 horas.

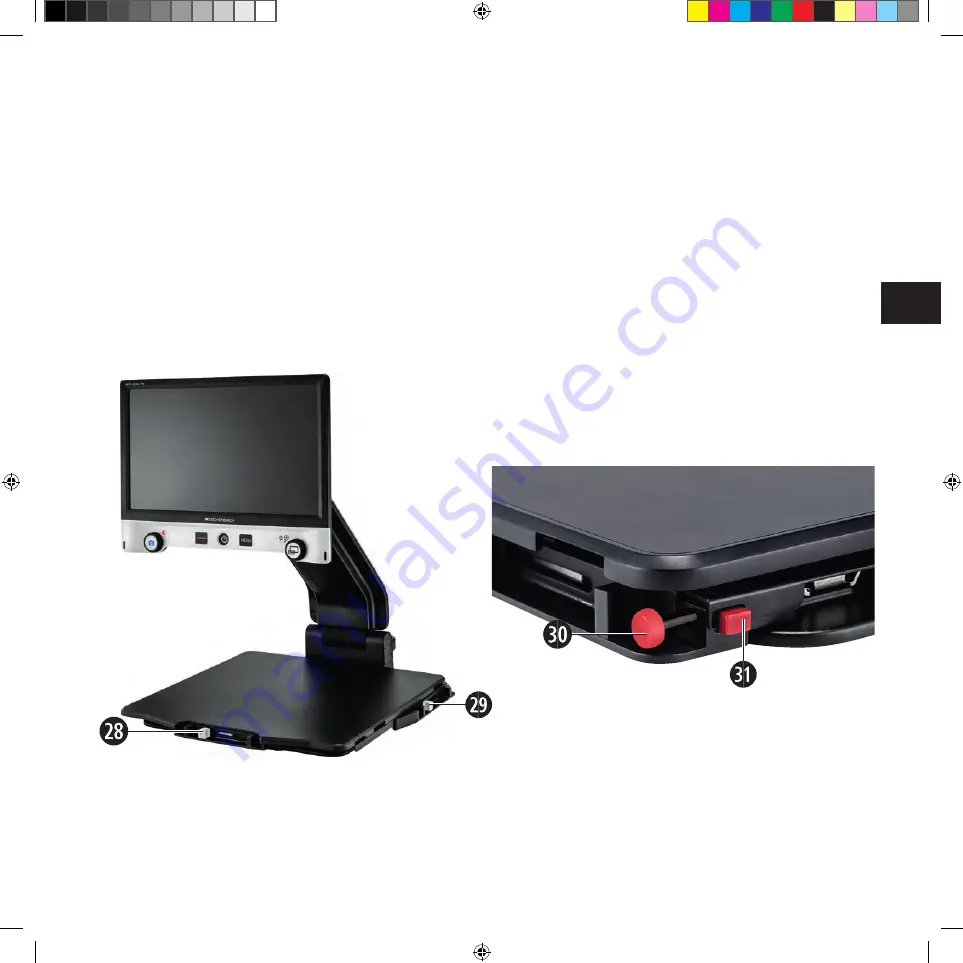
Mesa XY

Si ha adquirido vario DIGITAL 22 FHD Advanced con la mesa XY, lea detenidamente esta 

sección:

28. Freno horizontal (no frenado)

29. Freno vertical (no frenado)

30. Botón para bloquear la mesa XY

31. Botón para soltar el bloqueo

BDA_vario DIGITAL 22 FHD_ADV_Single_Book.indd   67

19.08.2021   14:00:13

Содержание 16592

Страница 1: ...cations and errors reserved 1659 22 1659 221 1659 222 1659 223 Bedienungsanleitung Operating instructions Mode d emploi Istruzioni d uso Manual de instrucciones EN FR IT ES DE Cover_vario DIGITAL 22 FHD Advanced_Single_book_CMYK_BBP conform indd 1 3 19 08 2021 17 43 37 ...

Страница 2: ...Deutsch 1 English 15 Français 29 Italiano 43 Español 57 A1 A2 Cover_vario DIGITAL 22 FHD Advanced_Single_book_CMYK_BBP conform indd 4 6 19 08 2021 17 43 41 ...

Страница 3: ...15 Français 29 Italiano 43 Español 57 Nederlands 71 A1 Dansk 85 Svenska 99 Norsk 113 Suomi 127 Polski 141 Česki 155 日本語 169 A2 Cover_vario DIGITAL 22 FHD Advanced_Single_book_CMYK_BBP conform indd 4 6 19 08 2021 17 43 41 ...

Страница 4: ...15 Français 29 Italiano 43 Español 57 Nederlands 71 A1 Dansk 85 Svenska 99 Norsk 113 Suomi 127 Polski 141 Česki 155 日本語 169 A2 Cover_vario DIGITAL 22 FHD Advanced_Single_book_CMYK_BBP conform indd 4 6 19 08 2021 17 43 41 ...

Страница 5: ...n zu gewährleisten muss das Bildschirmlesegerät wie in der Aufbauanleitung beschrieben aufgestellt werden Es handelt sich hierbei um ein Produkt welches in häuslicher Umgebung schließt eben falls Pflegeheime Arbeitsplätze Schulen und andere Lehrstätten ein betrieben wird Vor der ersten Inbetriebnahme Bitte lesen Sie diese Anleitung vor der ersten Inbetriebnahme aufmerksam durch Nur so können Sie a...

Страница 6: ...rät mit Sorgfalt X X Setzen Sie das Gerät niemals Feuchtigkeit oder Nässe aus X X Schützen Sie das Gerät vor übermäßiger Wärme und offener Flamme Legen Sie das Gerät nie auf Heizkörper oder in direktes Sonnenlicht X X Lagern Sie das Gerät nicht an Orten mit übermäßiger Hitze wie zum Beispiel in einem geparkten Auto X X Nutzen Sie nur den mitgelieferten Netzadapter und länderspezifischen Netz steck...

Страница 7: ...aben dann darf dieser nur vom Hersteller oder seinem Kundendienst entfernt oder getauscht werden X X VORSICHT Explosionsgefahr Ersetzen Sie den Akku niemals durch einen falschen Typ Entsorgen Sie einen Akku niemals im Feuer Quetschen oder schneiden Sie niemals einen Akku Lassen Sie einen Akku niemals in einer Umgebung mit ext rem hohen Temperaturen liegen da dies zu einer Explosion oder zum Austre...

Страница 8: ...aste am Basisarm 10 SD Karte Einsetzen der Karte wie dargestellt 11 SD Karteneinschub 12 USB Anschluss 13 RESET Taste zum Zurücksetzen des Geräts 14 Monitorarm 15 Taste zum Bewegen im Menü nach rechts 16 Taste zum Bewegen im Menü nach links 17 Taste zum Bewegen im Menü nach oben 18 Taste zum Bewegen im Menü nach unten 19 Klappbare Kameraabdeckung in Abb aufgeklappt 20 Kamera 21 Bodenplatte 22 Entr...

Страница 9: ...m das Gerät einzuklappen befolgen Sie die Aufbauanleitung welche sich in der Pro duktverpackung befindet Sie können die Höhe und den Winkel direkt am Monitor einstellen der an einer Schiene aufgehängt ist Der Winkel des Arms ist immer gleich aufgrund der Verriegelung Ein Ausschalten Drücken Sie die Ein Aus Taste Nach wenigen Sekunden erscheint das Kamerabild auf dem Display Symbole zeigen kurz den...

Страница 10: ...hilfe des Drehknopfes den Zoomfaktor anpassen Mit den Tasten h j k und l ist es dann möglich den angezeigten Ausschnitt horizon tal oder vertikal zu verschieben ohne dabei das Lesegut selbst verschieben zu müssen Mit der Pfeiltaste d kann der Bildausschnitt nach oben mit der Pfeiltaste f nach unten mit der Pfeiltaste j nach rechts und mit der Pfeiltaste k nach links verschoben werden Drücken Sie z...

Страница 11: ...rücken Sie die Taste r erneut um die Linie wieder auszublenden Sonderfunktionen der Tasten X X Halten Sie die Taste e gedrückt um das DLS zu aktivieren deaktivieren siehe Kapitel Dynamic Line Scrolling DLS auf Seite 6 X X Halten Sie die Taste u gedrückt um die Autofokus Funktion auszuschalten siehe auch Kapitel Autofokus deaktivieren aktivieren auf Seite 8 X X Halten Sie die Leselinientaste r gedr...

Страница 12: ...r Autofokus wieder aktiviert Wird das Gerät ausgeschaltet wird der Autofokus wieder aktiviert Fernbedienung Die Fernbedienung kann sowohl in der Hand als auch auf dem Tisch liegend verwendet werden Die Anti Rutsch Leis ten sorgen dafür dass die Fernbedienung guten Halt auf dem Tisch hat Die Fernbedienung funktioniert nur wenn zwischen ihr und dem IR Sensor unterhalb des Displays eine Sichtverbindu...

Страница 13: ...1 6 Bei nochmaligem Betätigen der Taste C wird die zuvor eingestellte Vergrößerung wieder ausgewählt Falschfarbdarstellung Um die Falschfarben zu ändern drücken Sie bitte Taste D bis die gewünschte Falschfarbe angezeigt wird Kanäle Im Batteriegehäuse befindet sich ein Schalter zum Umschalten des Kanals Dies ist aller dings nur erforderlich wenn zwei Geräte nebeneinander betrieben werden Der jeweil...

Страница 14: ...Sekunden lang gedrückt Um wieder auf das HDMI Signal zu wechseln halten Sie wieder die MENU Taste y 3 Se kunden lang gedrückt Wird die Verbindung zum HDMI Gerät unterbrochen schaltet das Gerät automatisch auf das Kamerabild um Diese Funktion ist abhängig vom Ausgabegerät Der Camcorder oder die Fotokamera muss über einen HDMI Ausgang sowie über HDMI Live verfügen Sollten Sie keinen Ton benötigen da...

Страница 15: ... werden X X Das vollständige Aufladen des Akkus dauert ca 4 Stunden und bietet eine Betriebs dauer von ca 2 5 Stunden XY Tisch Sollten Sie vario DIGITAL 22 FHD Advanced mit XY Tisch besitzen lesen Sie sich diesen Absatz bitte aufmerksam durch 28 Horizontale Bremse ungebremst 30 Knopf zum Arretieren des XY Tisches 29 Vertikale Bremse ungebremst 31 Knopf zum Lösen der Arretierung BDA_vario DIGITAL 2...

Страница 16: ...n Sie nur die Bremse 2 nach rechts schieben lässt sich der XY Tisch nur vertikal bewegen Wenn Sie nur die Bremse 2 nach oben schieben lässt sich der XY Tisch nur horizontal bewegen Für den Transport tragen Sie das Gerät nur im zusammengeklapp ten Zustand am vorgesehenen Tragegriff 2 Befestigen Sie beide Bremsen 2 und 2 und betätigen Sie den Knopf zum Arretieren des XY Tisches 3 BDA_vario DIGITAL 2...

Страница 17: ...gang HDMI 1 4 abhängig vom Ausgabegerät Betriebstemperaturbereich 10 C 40 C 50 F 104 F Luftfeuchtigkeit 80 Lagertemperaturbereich 0 C 60 C 32 F 140 F Luftfeuchtigkeit 80 Abmessungen 520 150 500 mm B H T Abmessungen mit XY Tisch 520 180 530 mm B H T Gewicht ohne XY Tisch 8 9 kg mit XY Tisch 11 6 kg Beleuchtung LED Stromverbrauch 30 W Bilder pro Sek 60 fps Kontrastverhältnis 1000 1 Diese Anleitung i...

Страница 18: ... WEEE Richtlinie über Elektro und Elektronik Altgeräte in ihrer jeweils aktuell gültigen Fassung Entsorgen Sie Ihr Altgerät nicht mit dem Hausmüll sondern über einen zugelassenen Entsor gungsbetrieb oder über Ihre kommunale Entsorgungseinrichtung Beachten Sie dabei die in Ihrem Land geltenden Vorschriften Setzen Sie sich im Zweifelsfall mit Ihrer Entsorgungseinrichtung in Verbindung Führen Sie all...

Страница 19: ...he screen reader must be set up as described in the Setup guide The product is operated in a domestic environment also includes nursing homes work places schools and other educational facilities Before first use Please read these operating instructions thoroughly before using the device for the first time This is the only way to get to know all the features available for the device Package content...

Страница 20: ...th care X X Never subject the device to humidity or moisture X X Protect the device from excessive heat and open flames Never place the device on radiators or in direct sunlight X X Do not store the device in locations with excessive heat for example in a parked car X X Use only the supplied power adapter and country specific power plug adapter X X Check the device the power adapter and its cable ...

Страница 21: ...e removed or exchanged by the manufacturer or its customer service department X X CAUTION risk of explosion Never replace the battery with the wrong type Nev er dispose of a battery in a fire Never crush or cut a battery Never leave a bat tery laying around in an environment with extremely high temperatures as this can result in an explosion or cause flammable liquids or gases to escape Never subj...

Страница 22: ... the base arm 10 SD card insert card as shown 11 SD card slot 12 USB port 13 RESET button for resetting the device 14 Monitor arm 15 Button to move right in the menu 16 Button to move left in the menu 17 Button to move up in the menu 18 Button to move down in the menu 19 Foldable camera cover flipped open in illustration 20 Camera 21 Base plate 22 Release button on the monitor arm 23 Base arm for ...

Страница 23: ...can be found in the product packaging You can adjust the height and angle directly on the monitor which is suspended from a rail Due to the locking mechanism the angle of the arm is always the same Turning on off Press the On Off button The camera image will appear on the screen after a few seconds Symbols briefly show the current status for example magnification factor and brightness setting To t...

Страница 24: ...ob With buttons h j k and l you can move the displayed section horizontally or vertically without having to move the reading material itself The image selection can be moved upward with arrow key d downward with arrow key f to the right with arrow key j and to the left with the arrow key k If you press one of the arrow keys twice in rapid succession the screen section is moved to the respective en...

Страница 25: ...vating activating autofocus on page 22 X X Press and hold the reading line button r to change the reading material brightness see Adjusting the reading material brightness False color display To display the camera image in false colors for increased contrast turn rotary knob w until the required false color rendering is displayed By default the false colors are preset as black white and white blac...

Страница 26: ...or use One battery terminal is insulated against the contact area with a plastic strip to avoid self discharge To remove it open the battery compartment cover on the underside of the re mote control and pull the strip out Adapting the zoom To zoom in press A To zoom out press B The currently selected zoom factor is shown briefly in the display Dynamic Line Scrolling To use Dynamic Line Scrolling p...

Страница 27: ...nu can be found under Quick Guide the first menu item on the device Press the MENU button y to open the menu Connections USB port You can use the supplied USB cable to connect the device to the USB port on a computer using the device USB port d The SD card inserted in the device will then be displayed on the computer as the ESCHENBACH drive for file operations HDMI You can use the enclosed HDMI ca...

Страница 28: ...due to a malfunction which you can eliminate yourself by resetting the device Then press the RESET button f Additional equipment variants Battery If you own the vario DIGITAL 22 FHD Advanced with a battery please read this paragraph carefully X X The battery may only be removed or exchanged by the manufacturer or his customer service X X It takes 4 hours to completely charge the battery and this a...

Страница 29: ... lock 3 Then move the brakes 2 and 2 to the shown position You can now move the X Y table horizontally and vertically If you only move brake 2 right the X Y table can only be moved vertically If you only move brake 2 up the X Y table can only be moved horizontally For transport only ever carry the device on the intended carrying handle 2 when it is folded together Fasten both brakes 2 and 2 and pr...

Страница 30: ...residential installation This equipment generates uses and can radiate radio frequency energy and if not installed and used in accordance with the instructions may cause harmful interference to radio communications However there is no guarantee that interference will not occur in a particular installation If this equipment does cause harmful interference to radio or television recep tion which can...

Страница 31: ... 4 depending on output device Operating temperature range 10 C 40 C 50 F 104 F humidity 80 Storage temperature range 0 C 60 C 32 F 140 F humidity 80 Dimensions 520 150 500 mm 20 5 5 9 19 7 W H D Dimensions with X Y table 520 180 530 mm 20 5 7 1 20 9 W H D Weight w o X Y table 8 9 kg incl X Y table 11 6 kg Lighting LED Power consumption 30 W Images per second 60 fps Contrast ratio 1000 1 These inst...

Страница 32: ...rical and electronic devices in its currently applicable version Never dispose of your old device in normal domestic waste Instead dispose of it through an approved disposal facility or your municipal waste facility Observe the regulations applicable in your country In case of doubt contact your waste dis posal facility Dispose of all packaging materials in an environmentally friendly manner Warra...

Страница 33: ...e lecture d écran doit être placé comme cela est décrit dans la notice de montage Il s agit d un produit qui est utilisé dans un environnement privé qui englobe également les résidences pour personnes âgées les postes de travail les écoles et d autres établisse ments d enseignement Avant la première mise en service Veuillez lire avec attention cette notice avant la première mise en service Ce n es...

Страница 34: ... l humidité X X Protégez l appareil contre une chaleur excessive et les flammes ouvertes Ne placez jamais l appareil sur des radiateurs ou à la lumière directe du soleil X X Ne stockez pas l appareil à des endroits exposés à une chaleur excessive comme par exemple dans une voiture en stationnement X X Utilisez uniquement l adaptateur secteur livré et les adaptateurs pour fiche secteur spécifiques ...

Страница 35: ...té l article avec une batterie celle ci ne doit être retirée ou remplacée que par le fabricant ou son service après vente X X PRUDENCE Risque d explosion Ne remplacez jamais la batterie par une batterie de type différent Ne jetez jamais une batterie dans le feu N écrasez ni ne décou pez jamais une batterie Ne placez jamais une batterie dans un environnement soumis à de fortes températures Cela peu...

Страница 36: ...te SD insertion de la carte comme illustré 11 Logement pour carte SD 12 Prise USB 13 Touche RESET pour réinitialiser l appareil 14 Bras du moniteur 15 Touche de déplacement dans le menu vers la droite 16 Touche de déplacement dans le menu vers la gauche 17 Touche de déplacement dans le menu vers le haut 18 Touche de déplacement dans le menu vers le bas 19 Cache de caméra pliable déplié sur la fig ...

Страница 37: ...allage du produit Vous pouvez régler la hauteur et l angle directement sur le moniteur suspendu à un rail En raison du verrouillage l angle du bras est toujours le même Allumer éteindre Appuyez sur la touche Marche Arrêt Au bout de quelques secondes l image de la caméra apparait à l écran Les symboles indiquent brièvement le statut actuel par ex le facteur de grossissement et le réglage de luminos...

Страница 38: ... maintenant adapter le facteur de zoom à l aide du bouton rotatif Les touches h j k et l permettent de déplacer le cadrage affiché horizontalement ou verticalement sans devoir décaler le texte à lire La touche fléchée d permet de déplacer le cadrage vers le haut la touche fléchée f vers le bas la touche fléchée j à droite et la touche fléchée k à gauche Si vous appuyez rapidement deux fois de suit...

Страница 39: ...à nouveau sur la touche pour désactiver la ligne Fonctions spéciales des touches X X Maintenez la touche e appuyée pour activer désactiver le DLS voir chapitre Dynamic Line Scrolling DLS à la page 34 X X Maintenez la touche u appuyée pour désactiver la fonction d autofocus voir également le chapitre Activer désactiver l autofocus en page 36 X X Maintenez la touche de ligne de lecture r appuyée pou...

Страница 40: ...Si vous appuyez à nouveau sur la touche l autofocus es réactivé Si l appareil est éteint l autofocus est réactivé Télécommande La télécommande peut aussi bien être utilisée dans la main qu à plat sur la table Les barres antidérapantes veillent à ce que la télécommande ait une bonne prise sur la table La télécommande fonctionne uniquement lorsqu il existe une liaison visuelle entre elle et le capte...

Страница 41: ...ossissement réglé auparavant est à nouveau sélectionné Représentation de fausse couleur Pour modifier les fausses couleurs veuillez appuyer sur la touche D jusqu à ce que la fausse couleur souhaitée s affiche Canaux Un interrupteur pour commuter le canal se trouve dans le compartiment de la batterie Ceci est cependant uniquement nécessaire lorsque deux appareils doivent être utilisés l un à côté d...

Страница 42: ...ée pendant 3 secondes Pour revenir au signal HDMI maintenez à nouveau la touche MENU y appuyée pendant 3 secondes Si la connexion avec l appareil HDMI est interrompue l appareil passe automatiquement à l image de la caméra Cette fonction dépend de l appareil de lecture Le camescope ou l appareil photo doit disposer d une sortie HDMI ainsi que de HDMI Live Si vous n avez pas besoin du son vous pouv...

Страница 43: ...service après vente X X La recharge intégrale de la batterie dure 4 heures et permet une durée d utilisation de 2 5 heures Table XY Si vous êtes en possession du vario DIGITAL 22 FHD Advanced avec table XY veuillez lire cette section avec attention 28 Frein horizontal non bloqué 30 Bouton d arrêt de la table XY 29 Frein vertical non bloqué 31 Bouton de déverrouillage de l arrêt BDA_vario DIGITAL 2...

Страница 44: ...uement le frein 2 vers la droite la table XY peut être déplacée seule ment verticalement Si vous poussez uniquement le frein 2 vers le haut la table XY peut être déplacée seulement horizontalement Pour le transport portez l appareil uniquement par la poignée de transport 2 prévue à cet effet et lorsqu il est plié Fixez les deux freins 2 et 2 et actionnez le bouton d arrêt de la table XY 3 BDA_vari...

Страница 45: ...mission des données Entrée HDMI HDMI 1 4 en fonction de l appareil de lecture Plage de températures de service 10 C 40 C 50 F 104 F humiditédel air 80 Plage de températures de stockage 0 C 60 C 32 F 140 F humidité de l air 80 Dimensions 520 150 500 mm L H P Dimensions avec table XY 520 180 530 mm L H P Poids 8 9 kg sans table XY 11 6 kg table XY comprise Éclairage LED Consommation électrique 30 W ...

Страница 46: ...ts électriques et électroniques dans sa version actuellement en vigueur Ne jetez pas votre appareil usé avec les ordures ménagères mais par l intermédiaire d une entreprise de traitement des déchets agréée ou du ser vice de recyclage de votre commune Observez pour cela les prescriptions en vigueur dans votre pays En cas de doute veuillez contacter votre centre de recyclage Élimi nez l ensemble des...

Страница 47: ...il corretto funzionamento il videoingranditore deve essere installato come descritto nelle istruzioni di installazione Il presente prodotto è destinato all uso in ambienti domestici incluse le case di cura i luoghi di lavoro le scuole e altri istituti didattici Azioni preliminari per la messa in funzione Prima della prima messa in funzione leggere con attenzione il presente manuale Solo così potrà...

Страница 48: ...in quanto si potrebbe danneggiare il display X X Proteggere l apparecchio dagli urti e dai colpi Maneggiare l apparecchio con cura X X Non esporre mai l apparecchio all umidità o al bagnato X X Proteggere l apparecchio dal calore eccessivo e dalle fiamme libere Non collocare mai l apparecchio su termosifoni e non esporlo mai alla luce solare diretta X X Non conservare l apparecchio in luoghi surri...

Страница 49: ... il rispetto delle diret tive specifiche del paese X X Qualora si fosse acquistato l apparecchio comprensivo di batteria quest ultima può essere rimossa o sostituita solo dal produttore o dal suo servizio clienti X X ATTENZIONE Pericolo di esplosione Non sostituire mai la batteria con una di tipo sbagliato Non smaltire mai una batteria gettandola nel fuoco Non schiac ciare o tagliare mai una batte...

Страница 50: ...e illustrato 11 Slot per schede SD 12 Attacco USB 13 Tasto RESET per resettare l apparecchio 14 Braccio monitor 15 Tasto per spostarsi verso destra nel menu 16 Tasto per spostarsi verso sinistra nel menu 17 Tasto per spostarsi in alto nel menu 18 Tasto per spostarsi in basso nel menu 19 Copertura ribaltabile della telecamera raffigurata aperta 20 Telecamera 21 Piano d appoggio 22 Tasto di sblocco ...

Страница 51: ...re l apparecchio seguire le istruzioni di installazione contenute nella confezione del prodotto L altezza e l angolo possono essere regolati direttamente sul monitor che è agganciato a una guida L angolo del braccio è sempre uguale a causa del blocco Accensione spegnimento Premere il tasto on off Dopo pochi secondi compare sul display l immagine della telecamera I simboli mostrano brevemente lo st...

Страница 52: ... adattare il fattore zoom per mezzo della manopola Con i tasti h j k e l si potrà poi spostare la sezione mostrata in senso orizzontale o verticale senza dover spostare il testo da leggere in sé Con il tasto freccia d si può spo stare il campo inquadrato verso l alto con il tasto freccia f verso il basso con il tasto freccia j verso destra e con il tasto freccia k verso sinistra Se si preme due vo...

Страница 53: ...ttura Per fare di nuovo scomparire la linea di lettura premere nuovamente il tasto Funzioni speciali dei tasti X X Mantenere premuto il tasto e per attivare disattivare il DLS vedere capitolo Dynamic Line Scrolling DLS a pagina 48 X X Tenere premuto il tasto u per disattivare la funzione di messa a fuoco automatica ve dere capitolo Attivazione disattivazione della messa a fuoco automatica a pagina...

Страница 54: ...he la messa a fuoco resti sull oggetto della lettura Premendo nuovamente il tasto si riattiva la messa a fuoco automatica La messa a fuoco automatica si riattiva quando si spegne l apparecchio Telecomando Il telecomando si può usare sia tenendolo in mano che poggiandolo sul tavolo I listelli antiscivolo assicurano che il telecomando abbia una buona presa sul tavolo Il telecoman do funziona solo se...

Страница 55: ...vamente il tasto C si seleziona di nuovo l ingrandimento impostato in precedenza Rappresentazione in falso colore contrasto Per modificare i colori falsi premere il tasto D finché non viene mostrato il colore falso desiderato Canali Nel vano pile si trova un interruttore per alternare tra i canali Tuttavia ciò è necessario solo se si usano due apparecchi uno vicino all altro Il rispettivo canale p...

Страница 56: ...emuto il tasto MENU y per 3 secondi Per ritornare al segnale HDMI tenere nuovamente premuto il tasto MENU y per 3 secondi Se il collega mento con l apparecchio HDMI viene interrotto l apparecchio passa automaticamente all immagine della fotocamera Questa funzione dipende dall apparecchio riproduttore Il camcoder o la fotocamera deve disporre di un uscita HDMI e di HDMI Live Se non si ha bisogno de...

Страница 57: ...vizio clienti X X Il caricamento completo dellabatteria dura 4 ore e offre una durata di funzionamento di 2 5 ore Tavola XY Se si possiede vario DIGITAL 22 FHD Advanced con tavola XY si prega di leggere con at tenzione questo paragrafo 28 Freno orizzontale non azionato 29 Freno verticale non azionato 30 Pulsante per bloccare la tavola XY 31 Pulsante per sbloccare la tavola BDA_vario DIGITAL 22 FHD...

Страница 58: ...icale Se si sposta solo il freno 2 verso destra la tavola XY può essere traslata solo in verticale Se si sposta solo il freno 2 verso l alto la tavola XY può essere traslata solo in orizzontale Per spostare l apparecchio trasportarlo tenendolo dall apposita maniglia 2 solo quando è chiuso Fissare entrambi i freni 2 e 2 e azionare il pulsante per sbloccare la tavola XY 3 BDA_vario DIGITAL 22 FHD_AD...

Страница 59: ...issione dati Ingresso HDMI HDMI 1 4 a seconda dell apparecchio di riproduzione Intervallo temperatura di esercizio 10 C 40 C 50 F 104 F umidità dell aria 80 Intervallo temperatura di stoccaggio 0 C 60 C 32 F 140 F umidità dell aria 80 Dimensioni 520 150 500 mm L A P Dimensioni con tavola XY 520 180 530 L A P Peso senza tavolo XY 8 9 kg con tavolo XY 11 6 kg Illuminazione LED Consumo energetico 30 ...

Страница 60: ...tto alla relativa versione vigente della Direttiva euro pea RAEE sui rifiuti di apparecchiature elettriche ed elettroniche Non smaltire l apparecchio con i normali rifiuti domestici bensì presso un azienda di smalti mento autorizzata o mediante l ente di smaltimento comunale Attenersi alle vi genti norme nazionali In caso di dubbi mettersi in contatto con l ente di smaltimento competente Smaltire ...

Страница 61: ...lla de la manera descrita en las instrucciones de montaje Este producto está previsto para su uso en un entorno doméstico donde también se incluyen las residencias para la tercera edad los puestos de trabajo las escuelas y otras instituciones académicas Antes de la primera puesta en funcionamiento Antes de la primera puesta en funcionamiento lea detenidamente estas instrucciones Solo así podrá con...

Страница 62: ...ad ni lo moje X X Proteja el aparato frente a un calor excesivo y a las llamas abiertas No coloque nunca el aparato sobre radiadores ni lo exponga a la radiación solar directa X X No almacene el aparato en lugares expuestos a un calor excesivo como por ejemplo un vehículo estacionado X X Utilice exclusivamente el adaptador de red suministrado y el adaptador para el enchufe del país que corresponda...

Страница 63: ...da X X Si ha adquirido el aparato con batería incluida solo el fabricante o su servicio postventa están autorizados a desmontarla o cambiarla X X CUIDADO Peligro de explosión Sustituya siempre la batería por otra del mismo tipo Nunca tire la batería al fuego Nunca aplaste o corte una batería Nunca deje una batería en un ambiente con temperaturas extremadamente altas ya que esto podría provocar una...

Страница 64: ...serción de la tarjeta de la manera indicada 11 Ranura para tarjetas SD 12 Conexión USB 13 Botón RESET para restablecer el aparato 14 Brazo del monitor 15 Botón para desplazarse hacia la derecha en el menú 16 Botón para desplazarse hacia la izquierda en el menú 17 Botón para desplazarse hacia arriba en el menú 18 Botón para desplazarse hacia abajo en el menú 19 Cubierta plegable de la cámara desple...

Страница 65: ...ones de montaje incluidas en el embalaje del producto La altura y el ángulo pueden ajustarse directamente en el monitor que está colgado de un carril El ángulo del brazo permanece siempre igual debido al dispositivo de bloqueo Encendido y apagado Pulse el botón de encendido apagado Tras unos segundos aparece la imagen de la cámara en la pantalla Los símbolos muestran brevemente el estado de funcio...

Страница 66: ...botón giratorio Una vez hecho esto los botones h j k y l permiten mover el encuadre mostrado en dirección horizontal o vertical sin tener que desplazar el propio material de lectura Con el botón de flecha d puede desplazarse el encuadre hacia arriba con el botón de flecha f hacia abajo con el botón de flecha j hacia la derecha y con el botón de flecha k hacia la izquierda Si pulsa uno de los boton...

Страница 67: ...r la línea de lectura Vuelva a pulsar el botón para que desaparezca de nuevo la línea de lectura Funciones especiales de los botones X X Mantenga pulsado el botón e para activar desactivar la función DLS consulte el capítulo DLS Dynamic Line Scrolling de la página 62 X X Mantenga pulsado el botón u para apagar la función de enfoque automático consulte también el capítulo Activación y desactivación...

Страница 68: ...l material de lectura Vuelva a pulsar el botón para reactivar el enfoque automático Al apagar el aparato vuelve a activarse el enfoque automático Mando a distancia El mando a distancia puede utilizarse tanto en la mano como posado sobre la mesa Sus elementos antideslizantes pro curan que el mando a distancia no se resbale por la mesa El mando a distancia solo funciona si está dentro de la línea de...

Страница 69: ... 1 6 Si vuelve a pulsar el botón C vuelve a seleccionarse el aumento previamente ajustado Imagen en falso color Para modificar el falso color pulse el botón D hasta que aparezca la combinación deseada de falso color Canales En el compartimento de las pilas hay un interruptor para cambiar de canal Este paso solo es necesario si se ponen en funcionamiento dos aparatos en paralelo El canal correspond...

Страница 70: ...sado el botón MENU y durante 3 segundos Para volver a cam biar a la señal HDMI vuelva a mantener pulsado el botón MENU y durante 3 segundos Si se interrumpe la conexión con el dispositivo HDMI el aparato cambia automáticamen te a la imagen de la cámara Esta función depende del dispositivo de salida La cámara de vídeo o de fotos debe contar con una salida HDMI y con HDMI Live Si no necesita ningún ...

Страница 71: ...montar o cambiar la batería X X La carga completa de la batería dura 4 horas y ofrece una autonomía de uso de 2 5 horas Mesa XY Si ha adquirido vario DIGITAL 22 FHD Advanced con la mesa XY lea detenidamente esta sección 28 Freno horizontal no frenado 29 Freno vertical no frenado 30 Botón para bloquear la mesa XY 31 Botón para soltar el bloqueo BDA_vario DIGITAL 22 FHD_ADV_Single_Book indd 67 19 08...

Страница 72: ... Si desliza los frenos 2 hacia la derecha la mesa XY solo se puede mover verticalmente Si desliza los frenos 2 hacia arriba la mesa XY solo se puede mover horizontalmente Para el transporte lleve el aparato exclusivamente plegado y por el asa de transporte 2 pre vista para ello Fije los dos frenos 2 y 2 y pulse el botón para bloquear la mesa XY 3 BDA_vario DIGITAL 22 FHD_ADV_Single_Book indd 68 19...

Страница 73: ...n de datos Entrada HDMI HDMI 1 4 según el dispositivo de salida Rango de la temperatura de funcionamiento 10 40 C 50 104 F humedad atmosférica 80 Rango de la temperatura de almacenamiento 0 60 C 32 140 F humedad atmosférica 80 Dimensiones an al pr 520 150 500 mm mm an al pr Dimensiones con la mesa XY 520 180 530 mm an al pr Peso Sin mesa XY 8 9 kg Con mesa XY 11 6 kg Iluminación led Consumo de pot...

Страница 74: ...jeto a la Directiva RAEE sobre residuos de aparatos eléctri cos y electrónicos en la versión actual aplicable No deseche el producto usado con la basura doméstica sino a través de una empresa de eliminación de resi duos autorizada o del servicio municipal de eliminación de residuos Para ello observe las disposiciones locales aplicables En caso de duda póngase en contacto con su empresa de eliminac...

Страница 75: ...Istruzioni d uso Manual de instrucciones Gebruiksaanwijzing Betjeningsvejledning Bruksanvisning Bruksanvisning Käyttöopas Instrukcja obsługi Návod k obsluze EN FR IT ES NL DK SE NO FI PL CZ JP DE Cover_vario DIGITAL 22 FHD Advanced_Single_book_CMYK_BBP conform indd 1 3 19 08 2021 17 43 37 ...

Страница 76: ...1659222 1659223 Bedienungsanleitung Operating instructions Mode d emploi Istruzioni d uso Manual de instrucciones Gebruiksaanwijzing Betjeningsvejledning Bruksanvisning Bruksanvisning Käyttöopas Instrukcja obsługi Návod k obsluze EN FR IT ES NL DK SE NO FI PL CZ JP DE Cover_vario DIGITAL 22 FHD Advanced_Single_book_CMYK_BBP conform indd 1 3 19 08 2021 17 43 37 ...

Отзывы: