background image

Page 45/233

MasterScope - Instructions for Use

Version 03.00 • Date 19FEB2020

Third

, new users can be registered if none of previous registered users are 

available. For doing this, follow the steps below:
1.  Go to the login screen and click on the “

Temporary Password

” tab.

2.  User Name: “

Enroll

”.

3.  Call Customer Care and explain the situation why to receive a one-time   
  password. Follow Customer Care instructions.
4.  Enter the password provided by Customer Care.
5.  Click <

Log In

> to continue.

6.  Follow the steps for registering new users as described in the respective chapter  
  of the Instructions for Use manual. 

Follow the steps below to register a new site user on the system:
1.  Select the <

Tools

> icon from the Utilities bar.

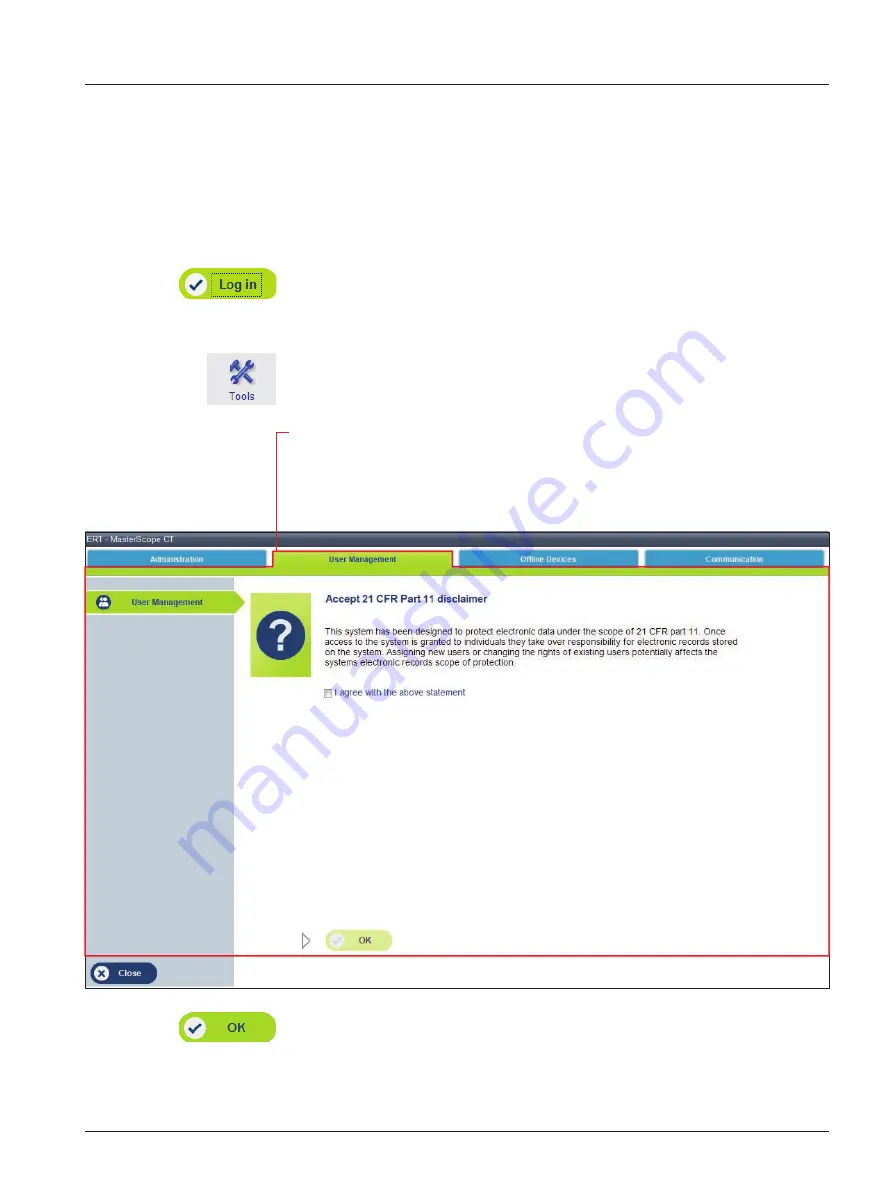
2.  Select the <

User Management

> tab and the following screen will appear.

Assigning new users or changing the rights of existing users potentially affects the 
system’s electronic records scope of protection. Therefore it is necessary to confirm 
the statement shown on the screen.

Check the box <

I agree with the above statement

> and confirm with <

OK

>. 

Otherwise it is not possible to create a new user.

Содержание MasterScope WSCS01

Страница 1: ...782126 WSSU Version 03 00 Instructions for Use MasterScope Spirometry ECG ...

Страница 2: ...r services are trademarks of their respective companies All rights including those of translations are reserved Written permission of eResearchTechnology ERT shall be obtained for the reproduction of this manual or any excerpt thereof by any means including printing photo static duplication microfilms or any other processes eResearchTechnology GmbH Sieboldstrasse 3 97230 Estenfeld Germany Tel 49 9...

Страница 3: ... Wireless Spirometry Sensor Unit 52 3 3 Switch on the Wireless Spirometry Sensor Unit 54 3 4 Prepare Wireless Spirometry Sensor Unit for a Measurement Insert and Remove ERT PT 54 3 5 Device Management Wireless Spirometry Sensor Unit 55 4 Subject Proficiency and Training Mode 59 4 1 Subject Mode 59 4 2 Proficiency Mode 59 4 3 Training Mode 59 4 4 Subject Mode Activation 60 5 Program Access 62 5 1 F...

Страница 4: ...ting ECG 123 10 1 Information on ECG Recording 125 10 1 1 The Waveform 125 10 1 2 ECG Leads 126 10 1 3 Chest ECG 126 10 1 4 Limb ECG 127 10 1 5 Basic Conditions for ECG Recording 129 10 1 6 Preparing for the Measurement 129 10 2 Performing an ECG Recording 130 10 2 1 Electrode Test 130 10 2 2 ECG Recording 132 10 2 3 ECG Evaluation 133 10 3 Recording Quality ECGs 136 10 4 Hygiene ECG 137 10 5 Addi...

Страница 5: ...Regulations 211 18 2 How often should Contaminated Parts be Exchanged 211 18 3 Surface Cleaning and Disinfection 212 18 4 Precleaning and Disinfection 212 18 5 Disposal of Single Use Items Damaged Reusable Items 213 19 General Safety Precautions 214 19 1 Graphical Symbols 219 19 2 Safety Precautions for Lithium Ion Rechargeable Batteries 221 Notes on EMC according to EN60601 1 2 223 Return of Good...

Страница 6: ...It can be used by physicians in the office or hospital This document contains copyright information All rights are reserved It is not allowed to copy duplicate or translate this manual in any other language without obtaining written approval from ERT ERT reserves the right to alter the information included in this document without notice Names of persons mentioned in the context of this manual are...

Страница 7: ...720 9891 ERT Helpdesk Toll Free where available numbers can be found on the ERT s website www ert com contact contact customer care Contact us via ERT Portal Click in the ERT Portal on Contact Customer Care and follow the instructions on the screen to submit a helpdesk ticket Please note that the ERT Customer Care phone system logs the caller ID phone number of incoming phone calls The numbers are...

Страница 8: ...l the ERT Helpdesk for immediate assistance using the telephone number for your country above International Germany eResearchTechnology GmbH Sieboldstrasse 3 97230 Estenfeld Germany CustomerCare ert com International US eResearchTechnology 1818 Market Street Suite 1000 Philadelphia PA 19103 3638 CustomerCare ert com Please have the following information available when you call Study name Site numb...

Страница 9: ...ituation which if not avoided will result in death or serious injury This signal word is to be limited to the most extreme situations X WARNING indicates a potentially hazardous situation which if not avoided could result in death or serious injury X X CAUTION indicates a potentially hazardous situation which if not avoided may result in minor or moderate injury It may also be used to alert agains...

Страница 10: ...hat is MasterScope MasterScope is your comprehensive solution for conducting clinical trials Our customized software allows for protocol driven workflows and can be tailored for use in multi center studies MasterScope provides automated and secure data transmission for global data collection and analysis including review of protocol compliance test acceptability and overall quality monitoring Mast...

Страница 11: ...he external power supply to the wall socket Insert the parallel printer cable into the back of the printer and connect the other end to the MasterScope Press the power button to turn the printer on Printer Prior printing with the MasterScope the delivered printer has to be prepared and connected to the MasterScope Remove the protection seal from the cartridges Do NOT touch or remove the copper str...

Страница 12: ...ures above are just examples in regards to the cartridge number Power button On Off Lights and keys Battery LED Power LED On Off Power LED lightning Printer is turned on Power LED dark Printer is turned off Battery LED Not used with ERT configuration Ensure that the printer power cable is always connected to use the printer battery is not provided with the printer Printer HP 200 Use the keys to na...

Страница 13: ...ase ensure to plug in the power cord insert paper and cartridges connect it to the MasterScope switch it on and the printer is ready to use ERT is not providing the battery for the printer It works only if the power cable is plugged in Ensure first to plug the delivered Power Adapter into the printer and then plug in the power cable Power Adapter Power Adapter connected to printer ...

Страница 14: ...ages positively 1 4 Slide the release button in the direction of the arrow 2 5 Keep the foil package for the return of the equipment Battery must be charged permanently to avoid complete battery failure 1 The MasterScope Setup Fujitsu E756 1 1 Installing the Battery in the Notebook Due to regulatory safety for Lithium Ion batteries transportation it is necessary to remove the battery from the note...

Страница 15: ... button in the direction of the arrow 1 2 Slide the release button in direction of the arrow 2 and hold it in place 3 Remove the battery from the battery compartment 3 4 Place the battery in the foil package next to the notebook in the MasterScope shipping box 1 3 Faulty Damaged Batteries It is prohibited to ship faulty damaged Lithium Ion batteries Please recycle those according to your local rec...

Страница 16: ... Fingerprint Sensor USB3 Equipment Bag USB2 Spirometry Handle Wireless Spirometry Sensor Unit WSSU or For USB ports with multiple device connections please always ensure to connect the right device properly before starting the workflow action e g if the next workflow action is a backup on the USB stick then unplug the currently connected device at the particular USB port and connect the USB stick ...

Страница 17: ...t use the notebook without connecting it to the power supply since it could lead to loss of data Never do a measurement without connection to the power supply The MasterScope should be shut down at the end of each visit day while keeping it connected to the power supply The MasterScope must be connected to the power supply and turned on at least once a month for a minimum of 24 hours This is to ke...

Страница 18: ... connection first WiFi or LAN Step 4 Download the study specific software with your MyStudyPortal account and the SQF PIN Step 5 Install software Step 6 Register all site users Here is the detail description for each online setup step Step 1 Complete Site Qualification Form SQF SQF needs to be completed on any internet PC laptop SQF is not possible via MasterScope before the online setup can be pe...

Страница 19: ...tinue with offline setup and go to the respective chapter Step 2 Connect peripherals and turn on MasterScope Connect all peripherals as described in chapter 1 4 and turn on MasterScope Enter the power on password received during the training and the configuration wizard will appear Click Next for online setup and continue with the next step ...

Страница 20: ...t connection before the protocol specific software can be downloaded and finished Select the preferred internet connection WiFi or LAN according to your local IT settings and click Next to continue For more detailed information about the MasterScope internet settings click on Admin Guide This might be useful for your IT System Administrator in case of connectivity issues ...

Страница 21: ...net settings Please refer to the data transfer setings chapter for more detailed information The green indicator Internet available indicates if an internet connection has been established It will be red if there is no internet connection available If so ensure the settings are correct according to your local IT environment ...

Страница 22: ...your e mail address as registered for ERT s My Study Portal Password Enter your password as registered for ERT s My Study Portal The SQF PIN is case sensitive Ensure that it is entered correctly If the login will not work please ensure that SQF PIN is correct E mail address correctly entered and it is the one used for My Study Portal registration The password is correct In case you forgot your pas...

Страница 23: ...oftware which will be installed is correct If not please verify the SQF PIN used and correct it by clicking on the Back button If the software matches the protocol which shall be installed click Next to start the software download If the wrong protocol is setup on the system it is necessary to ship the device back to ERT and receive a new system ...

Страница 24: ...19FEB2020 Step 5 Download and Install Software Please wait until the download is complete Do not shut down switch off the MasterScope or disconnect the internet connection during this process This can take several minutes depending on your internet connection speed ...

Страница 25: ...2020 After the successful download the installation will start automatically Once completed the system will restart automatically Please wait until the installation is complete Do not shut down switch off the MasterScope during this process This can take several minutes ...

Страница 26: ...0 Date 19FEB2020 Step 6 Site Configuration After the successful software installation and reboot of the system the MasterScope configuration wizard will appear Now the site specific information will be setup Click Next to start the site configuration process ...

Страница 27: ...red for which you used at step 4 is automatically displayed in the drop down Select it and click Next to continue If the My Study Portal account has access to multiple sites e g CRA then in the drop down all sites will be listed according to the user s access rights Then select the site the system should be configured for ...

Страница 28: ...e 28 233 MasterScope Instructions for Use Version 03 00 Date 19FEB2020 Review the site information and correct where necessary with clicking on Edit If all information is correct click Install to continue ...

Страница 29: ...ser manually on the MasterScope After the installation was successful the user login screen will appear It will be prefilled with your username which was automatically created from your first and last name Password You need to enter your My Study Portal password and click Log In to continue If you accept the 21 CFR part 11 disclaimer click OK In case proficiency PIN is necessary to access the subj...

Страница 30: ...ersion 03 00 Date 19FEB2020 Then register your fingerprint by selecting a finger Put the respective finger 4 times on the fingerprint sensor It is recommended to register a second finger Click Save when the fingers have been registered successfully ...

Страница 31: ... screen will show the User Information Click on Change to amend any information All user information were downloaded from ERT s My Study Portal account Any changes which will be done on the MasterScope to the User Information will not be synchronized with ERT s My Study Portal account ...

Страница 32: ...is complete 2 2 2 MasterScope Offline Setup For installing the MasterScope software offline the following steps need to be completed Step 1 Ensure the setup medium with the most current protocol specific software version has been received from ERT Step 2 Connect all necessary peripherals to the MasterScope see Chapter 1 4 and turn on the MasterScope Step 3 Insert the setup medium into the MasterSc...

Страница 33: ...ick Next to start the site configuration process Step 2 Connect peripherals and turn on MasterScope Connect all peripherals as described in Chapter 1 4 and turn on the MasterScope Enter the power on password received during the training and the configuration wizard will appear ...

Страница 34: ... 00 Date 19FEB2020 Ensure that the update medium is inserted in the MasterScope and click Use Update medium to continue with the offline setup Step 3 Install the software Insert the setup medium into the MasterScope laptop computer and install the software ...

Страница 35: ...00 Date 19FEB2020 Make sure that the protocol information listed is the correct protocol which the system must be setup for and click on Next If the wrong protocol is setup on the system it is necessary to ship the device back to ERT and receive a new system ...

Страница 36: ...Page 36 233 MasterScope Instructions for Use Version 03 00 Date 19FEB2020 ...

Страница 37: ...020 After the successful preparation the installation will start automatically Once completed the system will restart automatically Please wait until the installation is complete Do not shut down switch off the MasterScope during this process This can take several minutes ...

Страница 38: ...0 Date 19FEB2020 Step 4 Site Configuration After the successful software installation and reboot of the system the MasterScope configuration wizard will appear Now the site specific information will be setup Click Next to start the site configuration process ...

Страница 39: ...Page 39 233 MasterScope Instructions for Use Version 03 00 Date 19FEB2020 Enter all site information and click Next ...

Страница 40: ...age 40 233 MasterScope Instructions for Use Version 03 00 Date 19FEB2020 Select the time zone date and time of your site location Please check if your country uses daylight saving time and click on Next ...

Страница 41: ...e Version 03 00 Date 19FEB2020 There are only languages listed which are available for the particular protocol setup If your preferred language is not available please use English language Select your preferred system language and click on Next ...

Страница 42: ...ngs click on Install In order to change some of the above data click Edit and repeat data entry The MasterScope setup starts automatically This procedure may take a few minutes During the setting up the system Make sure that the laptop computer is not running on battery power Do not switch off the laptop computer Do not remove the setup medium ...

Страница 43: ...hen the setup of the system was successful the SQF PIN Validation screen will appear In order to start registering users for the system you need to enter the SQF PIN Site Qualification Form PIN which you have received by e mail Then click OK The SQF PIN entry is case sensitive ...

Страница 44: ...ly registered To login with My Study Portal account follow the steps 1 to 4 below 1 User Name First letter of first name last name automatically filled in after the successful online setup 2 Enter the password of your My Study Portal account see online setup chapter 3 Select either Subject Mode Proficiency Mode or Training Mode 4 Click Log In to continue Second new users can be registered more eas...

Страница 45: ... Click Log In to continue 6 Follow the steps for registering new users as described in the respective chapter of the Instructions for Use manual Follow the steps below to register a new site user on the system 1 Select the Tools icon from the Utilities bar 2 Select the User Management tab and the following screen will appear Assigning new users or changing the rights of existing users potentially ...

Страница 46: ...03 00 Date 19FEB2020 Prior to creating a new user the enrolled user has to verify again To create a new user click the Create new user button The following screen appears 2 The MasterScope User Registration main screen shows the previously enrolled users ...

Страница 47: ...er Registration will not accept identical initials Check if portal access is needed For portal access it is necessary to enter the email address 3 Enter the new user name maximum of 8 characters and fill in the other fields Fields marked with an asterisk are mandatory Monitor or Site Administrator rights are only to be granted to CRAs Site Administrators involved in the study This allows them to r...

Страница 48: ...o the biometric fingerprint sensor flat to the surface with moderate pressure This has to be repeated 3 times for capturing 3 more fingerprints of the same finger Please ensure that the user understands that his her fingers must be dry prior to the fingerprint registration Select a finger by clicking on the respective box above ...

Страница 49: ...essfully scanned four times the Save button becomes available It is possible to register a second fingerprint In order to do that select another finger by clicking on the respective box above and continue as described on the previous page It is recommended to register two fingers the same finger on both hands ...

Страница 50: ...Page 50 233 MasterScope Instructions for Use Version 03 00 Date 19FEB2020 Click Cancel to return to the MasterScope User Registration main screen Click Save Following screen appears ...

Страница 51: ...Sensor Unit must not be exposed to direct sunlight nor positioned immediately near heating elements Ensure the Wireless Spirometry Sensor Unit is permanently charged if not in use Insert the sensor into the charging station and plug in the power cord to the wall socket for charging The power plug includes various country specific adapters Select the right one and click it into the plug Now connect...

Страница 52: ...ging the Wireless Spirometry Sensor Unit Put the wireless spirometry sensor unit into the slot of the charging station as shown below Connect the other end of the power cable mini USB connector on the backside into the charging station Wireless Spirometry Sensor Unit Charging station ...

Страница 53: ...rt check in MasterScope Device Management if sensor is connected properly and reconnect if necessary Blue LED on Wireless Spirometry Sensor Unit is transferring data to MasterScope Blue LED off Wireless Spirometry Sensor Unit in sleep mode or turned off Press the power on button on the Wireless Spirometry Sensor Unit to turn it on or in case the battery is discharged put the sensor in the Charging...

Страница 54: ...f cross contamination Do not remove the mouthpiece from the ERT PT Only use the ERT PT with connected mouthpiece The maximum surface temperature of the Wireless Spirometry Sensor Unit can get up to 47 C during charging Rail with sensor holes Insert an ERT PT into the wireless spirometry sensor unit and attach a mouthpiece Ensure that the rail with the sensor holes of the PT tube with the grooved e...

Страница 55: ...isplays the version of the flow correction table Battery charge level Status of Wireless Spirometry Sensor Unit only available if sensor is currently turned on and connected Last used Date time when Wireless Spirometry Sensor Unit was last used Possible Functions Identify Click Identify to identify the sensor to be used in case multiple ones are available in your clinic The Wireless Spirometry Sen...

Страница 56: ...ructions for Use Version 03 00 Date 19FEB2020 Ensure the charging station is power plugged in Ensure to turn on the Wireless Spirometry Sensor Unit and place it into the charging station Click Continue to start the pairing process ...

Страница 57: ...EB2020 Paring is only possible for 90 seconds after the Wireless Spirometry Sensor Unit is placed into the charging station Sensor visible via bluetooth If the sensor cannot be discovered remove the sensor from the charging station and reinsert it Then repeat the steps ...

Отзывы: