background image

Basic Setup 


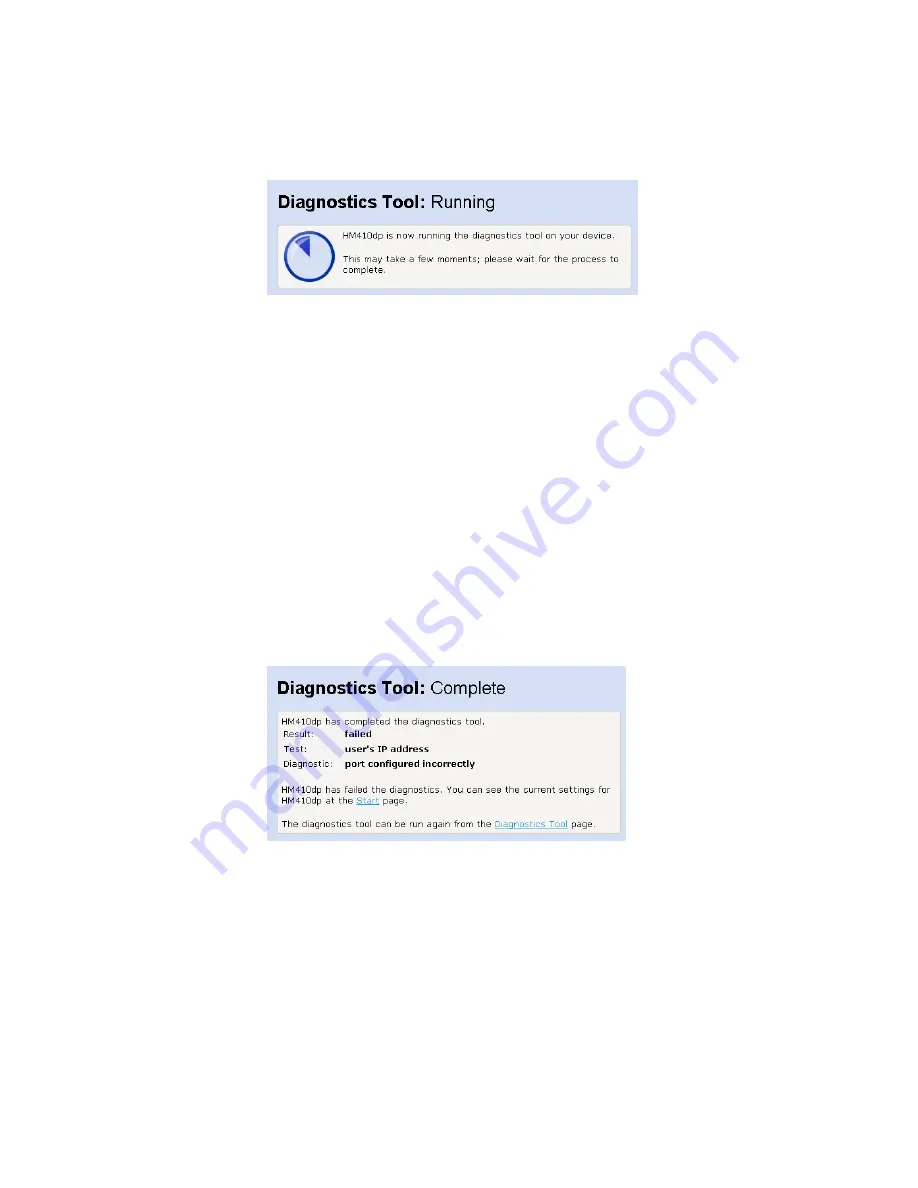
The test may take up to three minutes to complete. 

Once the test has finished running, the 

Diagnostics Tool: Complete


page is displayed. The most important details displayed on this page 
are the Result, Test and Diagnostic information: 

− 

Result;

 tells you the overall result of the test. 

− 

Test

; if the test fails, this tells you which part of the test that caused 

the failure. The first test that fails stops the test completely – no 
other tests are run after the first failed test. If the test is 
successfully completed, “Diagnostics Tool complete” is displayed. 

− 

Diagnostic

; if the test fails, this provides technical information 

about the likely cause of a failure. If a failure occurs, you will need 
to give this information to your ISP’s support team. If the test is 
successfully completed, no diagnostic information is displayed. 

The following shows an example when the result has failed: 


The diagnostic information displays details about the failure that you 
can pass on to your ISP support team. 

This page also contains a link to the 

Start

 page (including current 

configuration information) where it may be worth checking the settings 
if the test failed. 
 
If you want to run the health check again, click on the 

Diagnostics 

Tool

 link at the bottom of the page, or from the left-hand 

Basic Setup


menu, click on 

Diagnostics Tool

28


1553-ZAT 759 94 Uen B – July 2005 

Содержание HM410dp

Страница 1: ...ADSL2 Home Gateway HM410dp User Guide...

Страница 2: ...ued progress in methodology design and manufacturing Ericsson shall have no liability for any error or damages of any kind resulting from the use of this document Abstract This document describes conf...

Страница 3: ...2 2 1 Front Panel and LED Indicators 4 2 2 2 Back Panel and Connectors 5 2 3 Placement of the HM410dp 6 2 4 Installation 7 3 Configuration Wizard 8 3 1 Introduction 8 3 2 Access the Configuration Wiz...

Страница 4: ...42 5 4 5 Configure Internet Applications 44 5 4 6 Configure Custom Applications 46 5 4 7 Application Level Gateways ALGs 49 5 5 DHCP Server 51 5 5 1 Enable Disable the DHCP Server 51 5 5 2 Change Set...

Страница 5: ...Contents 6 2 Configure Ethernet PCs 65 6 2 1 Obtain Internet Information Automatically 65 6 2 2 Assign Static Internet Information 69 Glossary 71 1553 ZAT 759 94 Uen B July 2005 v...

Страница 6: ......

Страница 7: ...ss the built in Configuration tool and run the Configuration Wizard in order to perform the initial configuration Chapter 4 Basic Setup provides detailed information about how to perform configuration...

Страница 8: ...y of Service QoS is a key aspect of running successful Triple Play services The Ericsson QoS solution is a multi PVC solution based on ATM Quality of Service that makes extensive use of well known and...

Страница 9: ...ADSL2 Home Gateway HM410dp Power Supply adapter Ethernet cable ADSL Line cable Table stand Quick Installation Guide Note Your HM410dp package may also include other materials provided by your service...

Страница 10: ...evice each LEDs general purpose is described in the table below from top to bottom Table 1 General Description of LEDs Label Color Description ADSL Green On ADSL connection is established Blinking Dat...

Страница 11: ...scription ADSL ADSL socket for connection to a splitter filter of phone outlet Ethernet Four Ethernet ports for connection to a PC IP telephone set top box and or switch hub Reset Reset button tiny ho...

Страница 12: ...prevent the product from over heating Do not block or cover the slots and openings on the device which are intended for ventilation and proper operation Figure 3 Alternative Placement for the HM410dp...

Страница 13: ...ervice port splitter filter or phone outlet 2 Connect Ethernet device s Attach the provided Ethernet cable to one of the ports marked Ethernet on the HM410dp Connect the other end to an Ethernet port...

Страница 14: ...you can just select an Internet Access mode that fits your needs according to information from your ISP The HM410dp still offers the possibility for advanced users to set up special network scenarios...

Страница 15: ...n in both the User name and Password fields and click OK 4 The welcome page of the Configuration tool is displayed 5 Click on the Configuration Wizard button to display the start page of the wizard 15...

Страница 16: ...usly operates as a router to the LAN side This access type is Always On meaning that you are automatically connected to your ISP whenever you use your Internet connection The HM410dp automatically act...

Страница 17: ...0dp operates as a bridge to the WAN side while simultaneously operates as a router to the LAN side This access type is Always On meaning that you are automatically connected to your ISP whenever you u...

Страница 18: ...ithout saving any settings 3 2 3 DHCP Bridged By using the DHCP Bridged mode the HM410dp will act as a bridge meaning that the routing functionality Firewall NAT UPnP etc will be disabled This access...

Страница 19: ...ick the Next button The Confirm page for Internet access appears 3 Click the Confirm Changes button to proceed or click Cancel to exit the Wizard without saving any settings 3 2 4 PPPoE The PPPoE or d...

Страница 20: ...ternal DHCP server that will assign private IP addresses to the PCs on the LAN Note If you already have PPPoE client software installed on your computer s you must uninstall it This can be done after...

Страница 21: ...fault values for VPI 8 and VCI 35 are displayed but you can change them if you have received other information from your ISP Then click the Next button to display the Confirm page for Internet access...

Страница 22: ...dp automatically activates the NAT service that will route the traffic to from the WAN and its internal DHCP server that will assign private IP addresses to the PCs on the LAN Note If you already have...

Страница 23: ...efault or Specify manually depending on information from your ISP If you choose Specify manually the following page appears 5 The default values for VPI 0 and VCI 35 are displayed but you can change t...

Страница 24: ...esses and your ISP must provide you with correct values if this mode is selected The HM490dp automatically activates the NAT service that will route the traffic to from the WAN and its internal DHCP s...

Страница 25: ...I Setup page appears 4 Select either Use Default or Specify manually depending on information from your ISP If you choose Specify manually the following page appears 5 The default values for VPI 0 and...

Страница 26: ...ltiple access methods that can be used simultaneously on different PVCs Note Only use this mode if you have DSL experience To configure the HM410dp for Advanced access mode follow the steps below 1 Fr...

Страница 27: ...ing operator specific settings Note If you chose this mode you will not be able to access the Advanced Internet Access page in the Configuration tool To configure the HM410dp for Operator Defined acce...

Страница 28: ...zard without saving any settings 3 3 Access the Internet Your Internet Service Provider ISP may have provided you additional instructions in the package or separately about account setup additional so...

Страница 29: ...dvanced users to set up special network scenarios themselves or to modify the existing ones Follow the steps in section 3 2 Access the Configuration Wizard to display the start page of the configurati...

Страница 30: ...out the current configuration of your device First Time Settings This is the start point for the Configuration Wizard that leads you through the most important settings for your local Internet connect...

Страница 31: ...rmware file and update the HM410dp follow the steps below 1 Download the new firmware file to your local PC 2 Click the Browse button to locate the file 3 Once you have selected the file to be install...

Страница 32: ...t ensures that any new features provided by the firmware update become available to you 7 When the restart is complete you will automatically be redirected to the Start page Note Installing a firmware...

Страница 33: ...ss If you need to contact your ISP they may ask you to run the Diagnostics Tool and describe the results to them This page also provides you with a link to the DSL status page which displays detailed...

Страница 34: ...e test fails this provides technical information about the likely cause of a failure If a failure occurs you will need to give this information to your ISP s support team If the test is successfully c...

Страница 35: ...erational mode the current connected mode Possible values displayed are Inactive not connected Unknown unrecognized mode Name of the standard compliance used by the connection for example G dmt BisPlu...

Страница 36: ...ny web page in order to display further information about a specific topic on a specific page However you may prefer to display the Help text index in order to navigate through Help topics more easily...

Страница 37: ...e of the help pages the left hand menu is replaced by the following To go back to the Help index page and display the menus for the setup pages either click on the Back link provided or click the Back...

Страница 38: ...offers the possibility for advanced users to set up special network scenarios themselves or to modify the existing ones Follow the steps in section 3 2 Access the Configuration Wizard to display the s...

Страница 39: ...ut modification or contact your ISP for assistance Note Before you modify any settings we strongly recommend that you contact your ISP prior to changing the default configuration Table 3 Default Confi...

Страница 40: ...and password set are as follows Username admin Password admin The password page displays the current status of password protection To change your password settings follow the steps below 1 Click on t...

Страница 41: ...20 characters The default setting uses admin for both the username and password We recommend that you do not set the same character combination for both username and password Click the Next button and...

Страница 42: ...Advanced Setup 6 Enter your new Username and or password and click the OK button 36 1553 ZAT 759 94 Uen B July 2005...

Страница 43: ...tion if you wish to do one or both of the following Allow Internet users to browse the user pages on your local network for example by providing an FTP or HTTP server Play certain games which require...

Страница 44: ...our network From the Advanced Setup menu click on Security The Security State part displays information about the security settings To change the state of the Firewall select Enabled and click the Cha...

Страница 45: ...Whichever type of filter rule you use you must also determine which direction packets should be allowed to travel in In permitted traffic is transported from the outside interface to the inside inter...

Страница 46: ...ding port numbers that identify the service that you want to filter e g web service is on port 80 and FTP on port 21 Direction From the drop down lists choose whether to filter the packets that are in...

Страница 47: ...on your LAN The table below displays the default application configuration Table 4 Default Security Application configuration details Application TCP port number UDP port number Trigger required E ma...

Страница 48: ...Applications If you want to allow access to an application that is not included in the above list of common applications you can create and enable a custom application For more information see section...

Страница 49: ...gful name in the PC name text box then type the IP address of the PC that you want to assign this name to Click on the Next button to display the confirmation page 4 If you are happy with the name tha...

Страница 50: ...access to applications as described in the following sections 5 4 5 Configure Internet Applications This section assumes that you have already assigned names to the PCs on your network as described in...

Страница 51: ...wing The common applications that your device knows about Any custom applications that you have manually configured 5 Select the application and the PC that you want to enable access to and click the...

Страница 52: ...plications If you want to enable access to an application that does not appear on your device s default list you can create a custom application In order to create a custom application you must know T...

Страница 53: ...eft hand Advanced Setup menu click on Security 2 Click on the Define custom applications link to display the following page 3 This page displays details of previously created custom applications Click...

Страница 54: ...in section 5 4 3 Configure Security 6 Select the address translation type NONE TCP UDP or TCP and UDP from the drop down list This controls the translation of binary IP addresses in the payload of a p...

Страница 55: ...in difficult applications that NAT and Firewall configurations cannot manage In many cases Application Level Gateways ALGs are needed to translate and transport packets correctly An ALG provides a ser...

Страница 56: ...To enable disable an ALG follow the steps below 1 From the Advanced Setup menu click on Security At the bottom of the page the ALG State part is displayed 2 Select the appropriate mode Enabled Disabl...

Страница 57: ...t the DHCP server is enabled on the private LAN interface but if you already have a DHCP server on your network you should disable this function 5 5 1 Enable Disable the DHCP Server The current status...

Страница 58: ...ayed The upper part Edit Address of the window allows you to change the default LAN IP address and subnet mask of the HM410dp If you want to do so click the Change Address link to display the followin...

Страница 59: ...browser you will be disconnected You must open a new connection by entering your new LAN IP address as the URL In the lower part Edit DHCP Server Subnet of the window you can change the settings for...

Страница 60: ...ault gateway option information The HM410dp always uses local host as default gateway When you have entered the details for the DHCP Server Subnet configuration click the Confirm Changes button Use th...

Страница 61: ...the dynamic address Click the OK button to confirm your settings You will now return to the DHCP Server page where your fixed mapping is displayed in the lower part of the window To change any of the...

Страница 62: ...Wizard are normally enough and you should only make changes on these pages if your ISP instructs you to 5 6 1 Access Connections For each Internet access mode there are one or many max 8 connections p...

Страница 63: ...nP works with wired or wireless networks and can be supported on any operating system When UPnP is enabled it will help your programs to pass the NAT and it will also appear as a UPnP device on your n...

Страница 64: ...iately and be saved to non volatile memory In case a manual save is necessary this is noted in the graphical user interface as the following example Notice After action use Save Config to save it perm...

Страница 65: ...he configuration file contains a default factory configuration If you do make changes to the default configuration but then wish to revert back to the original factory configuration you can do so by r...

Страница 66: ...reviously changed the username and password the Connect to or Enter Current Password login box will be displayed Once you have entered the default settings admin admin and clicked OK the Start page is...

Страница 67: ...ave a backup file of your current configuration proceed as follows 1 Click on the Backup button and the following page is displayed 2 In the Save as window select a folder to save your configuration f...

Страница 68: ...selected the file to be installed click Open The file s directory path is displayed in the Configuration File field 3 Click on the Restore button and the following window is displayed 4 When the resto...

Страница 69: ...age displays an error log The most recent errors are listed at the bottom of the list and the When column shows the time in seconds since the last reboot of the HM410dp Click the Clear Log button to c...

Страница 70: ...Advanced Setup 64 1553 ZAT 759 94 Uen B July 2005...

Страница 71: ...thernet to the HM410dp follow the instructions that correspond to the operating system installed on your PC in the following sub sections 6 2 Configure Ethernet PCs 6 2 1 Obtain Internet Information A...

Страница 72: ...nnection Properties dialog box is displayed with a list of currently installed network components If the list includes Internet Protocol TCP IP then the protocol has already been enabled Skip to step...

Страница 73: ...alog box is displayed with a list of currently installed network components If the list includes Internet Protocol TCP IP then the protocol has already been enabled Skip to step 11 4 If Internet Proto...

Страница 74: ...nstalled component click the Add button The Select Network Component Type dialog box displays 4 Select Protocol and then click the Add button The Select Network Protocol dialog box displays 5 Click on...

Страница 75: ...uter as a public web server You maintain different subnets on your LAN Before you begin be sure to have the following information on hand or contact your ISP if you do not know it The IP address and s...

Страница 76: ...the same subnet as the HM410dp LAN port If you manually assign IP information to all your LAN PCs you can follow the instructions in section 5 5 2 Change Settings to the DHCP Server Subnet to change t...

Страница 77: ...main names into IP addresses DNS information is distributed hierarchically throughout the Internet among computers called DNS servers When you start to access a web site a DNS server looks up the requ...

Страница 78: ...T Network Address Translation A service performed by many routers that translates your network s publicly known IP address into a private IP address for each computer on your LAN Only your router and...

Страница 79: ...ork and excludes all others The subnet s computers remain physically connected to the rest of the parent network but they are treated as though they were on a separate network Subnet mask A mask that...

Страница 80: ...ted to running the server software Instead of requiring a separate computer for each server dozens of virtual servers can co reside on the same computer VPI and VCI A VPI Virtual Path Identifier is an...

Страница 81: ...Glossary 1553 ZAT 759 94 Uen B June 2005 75...

Страница 82: ...Ericsson AB Ericsson AB 2005 All Rights Reserved www ericsson com 1553 ZAT 759 94 Uen B July 2005...

Отзывы: