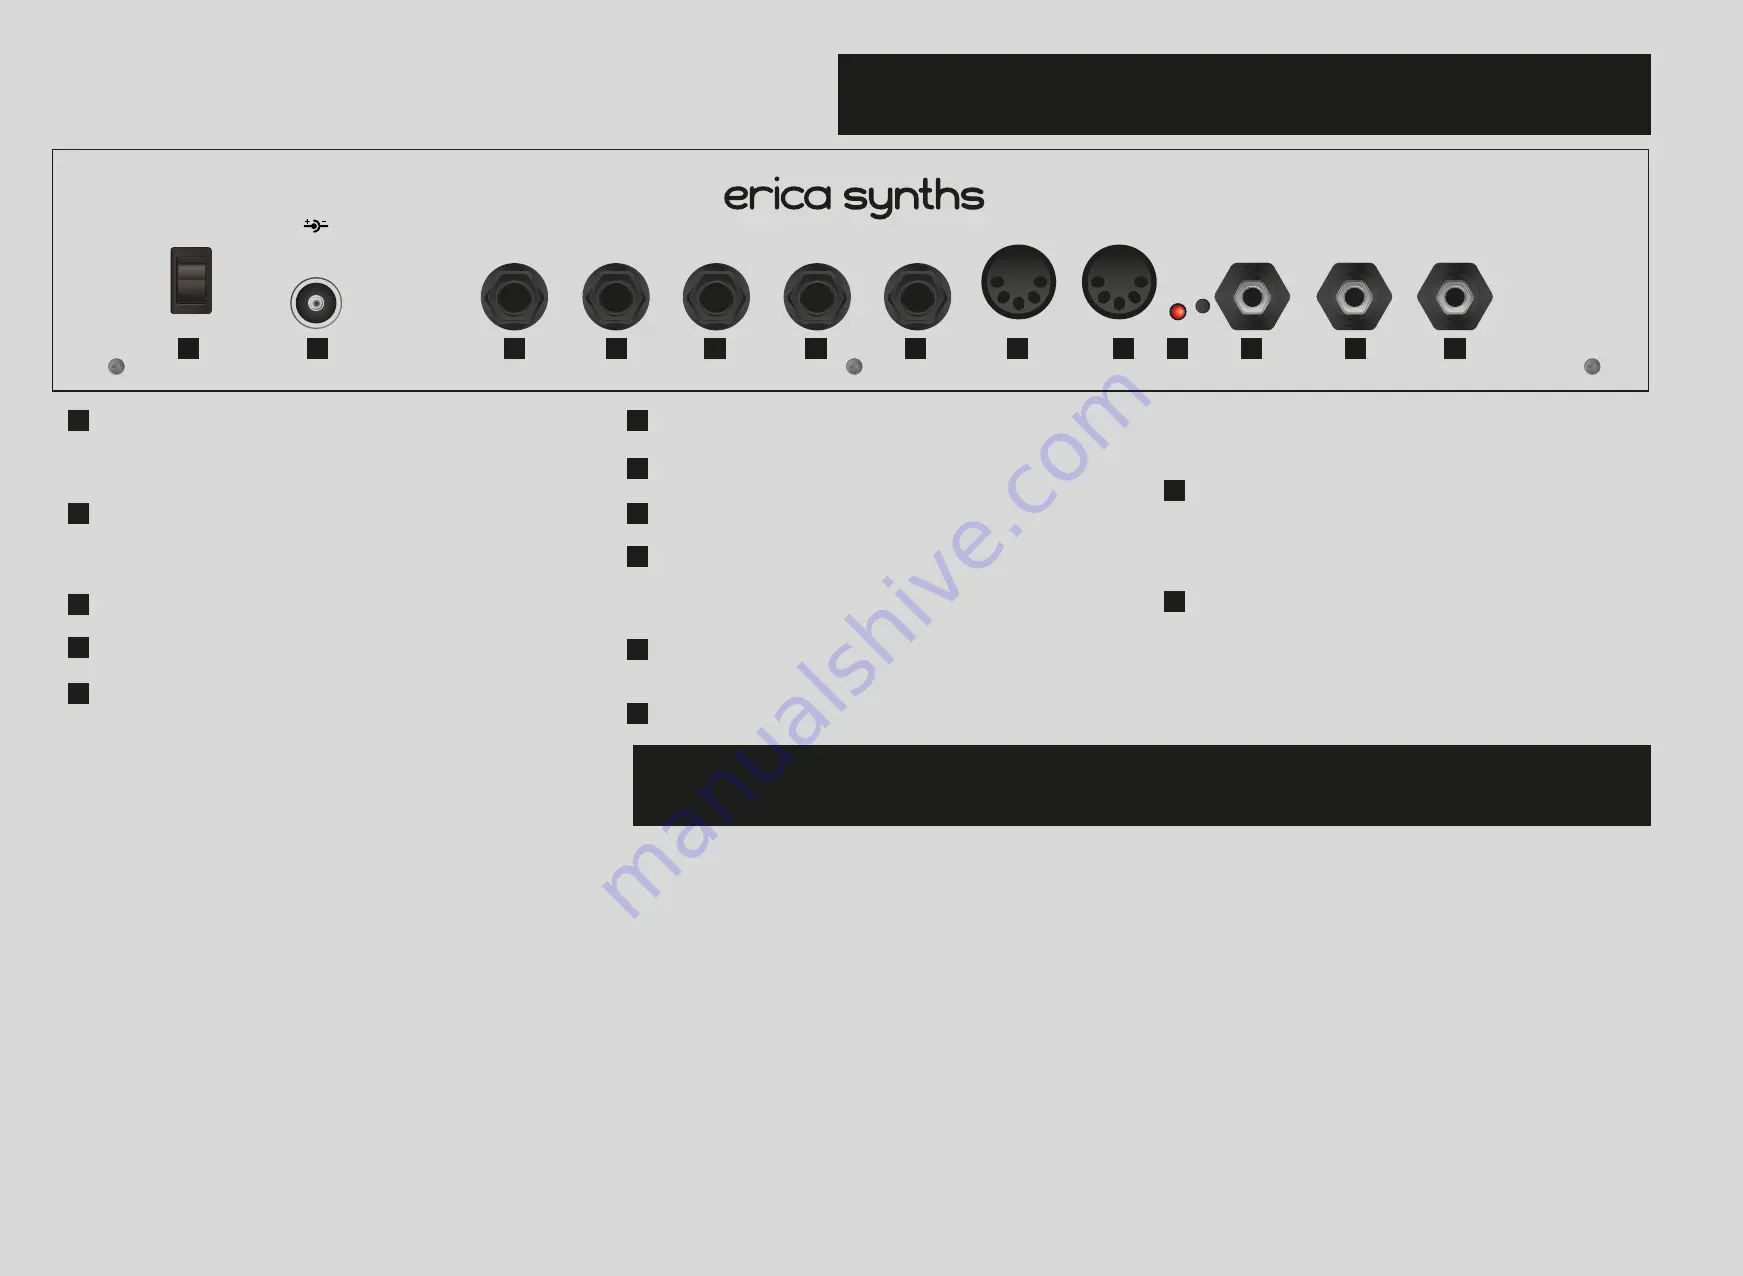
CONNECTIONS
MIDI IMPLEMENTATION AND CONFIGURATION
Flip the switch to turn the SYNTRX on. The SYNTRX is full
analogue synthesizer, therefore, when switched on, it takes
some 5-10 minutes to “warm up” before VCOs are in tune.
Connect the external power supply here! Use only the power
supplied with the unit, otherwise you risk permanently dam-
aging the SYNTRX.
Connect monitoring headphones here.
This is the line level Output2. Connect it to the mixer.
This is the line level Output1. Connect it to the mixer. Depend-
ing on the patch, nice stereo panning is achievable.
This is the external audio Input2.
This is the external audio Input1.
This is the MIDI thru output.
This is the MIDI input. The SYNTHI receives MIDI note, note on,
mod wheel and pitch wheel messages, as well as two config-
urable CC messages – refer to the MIDI configuration page.
The LED signals MIDI activity. The small pushbutton is used
for MIDI configuration. Refer to the MIDI configuration page.
This is the Gate input. It initiates the envelope generator
(Trapezoid). Ensure that the Trapezoid is in the manual,
non-looping, mode.
This is the second control voltage input. If the CV is
connected here, it takes over control of the Oscilla-
tor 2 from the CV1 IN, so you can design para-
phonic patches.
This is the first main control voltage input. Connect
any 1V/octave CV source (a keyboard, sequencer,
ribbon controller, etc.) and the CV is routed to all
three Oscillators, unless the CV2 for Oscillator 2 is
connected. The CV from MIDI note messages is
added to CV1.
1
7
12
13
8
9
10
2
3
4
5
6
11
ON
12V DC
MIDI IN
MIDI THRU
CV1 IN
CV2 IN
GATE IN
INPUT1
INPUT2
OUTPUT1
OUTPUT2
HEADPHONES
|
0
1
2
3
4
5
6
7
8
9
10
11
12
13
The SYNTRX has basic MIDI implementation – you can select a
midi channel on which SYNTRX receives MIDI note, note on
(gate), pitch wheel, modulation wheel (assigned to the VCF cutoff)
messages, as well as two configurable CC messages and note
velocity message that is assigned to the VCF cutoff. The SYNTRX
receives only one MIDI note at time, and it’s higher note priority.
If no external CV is patched in the relevant inputs, MIDI note
messages control pitch of the VCOs, if the external CV is used,
MIDI notes are added to the external analogue CV, so you can
use the MIDI keyboard or sequencer to transpose the pitch of the
VCOs.
MIDI CC messages are added to the joystick X and Y control
voltage correspondingly, so you can address them via same
patch matrix connection points as the joystick.
MIDI CONFIGURATION.
Connect the MIDI keyboard to the MIDI IN. MIDI configuration is
performed via small button next to the MIDI connectors on the
rear panel of the SYNTRX.
Pushing the button promptly sends the MIDI panic message.
In order to configure MIDI settings push and hold the button for 2”.
This will initiate configuration sequence:
The MIDI LED will flash once and you can select MIDI channel 1-12
simply pushing any key on the MIDI keyboard. C on any octave
corresponds to MIDI channel 1, C# - channel 2, D – channel 3, etc.
Once happy, push the button to advance to the next step.
The MIDI LED will flash twice and you can assign the MIDI CC
message 1. Simply move/rotate the relevant MIDI controller you
wish to assign, and it is automatically assigned to generate con-
trol voltages that are added to the joystick X movement. Once
happy, push the button to advance to the next step.
The MIDI LED will flash three times and you can assign the MIDI
CC message 2. Simply move/rotate the relevant MIDI controller
you wish to assign, and it is automatically assigned to generate
control voltages that are added to the joystick Y movement. Once
happy, push the button to advance to the next step.
The MIDI LED will flash four times and now you can
toggle on or off the VCF cutoff control via keyboard
velocity. Simply push any key on the keyboard to activate
or deactivate a velocity control. The keyboard velocity is
added to the cutoff knob setting. Once happy, push the
button to exit MIDI configuration.
You can skip one of configuration steps by simply push-
ing the button repeatedly.
The MIDI CV converter is highly accurate and comes
calibrated from the factory, but if you feel, you need to
recalibrate it, please, contact the Erica Synths Support.
If needed, it’s possible to update the firmware of the
patch matrix and the MIDI converter, please, follow the
Erica Synths announcements or contact the Erica Synths
Support.


