4 of 13
888-24-257-G-00 rev. D • 06/19
1
2
a
b
1x
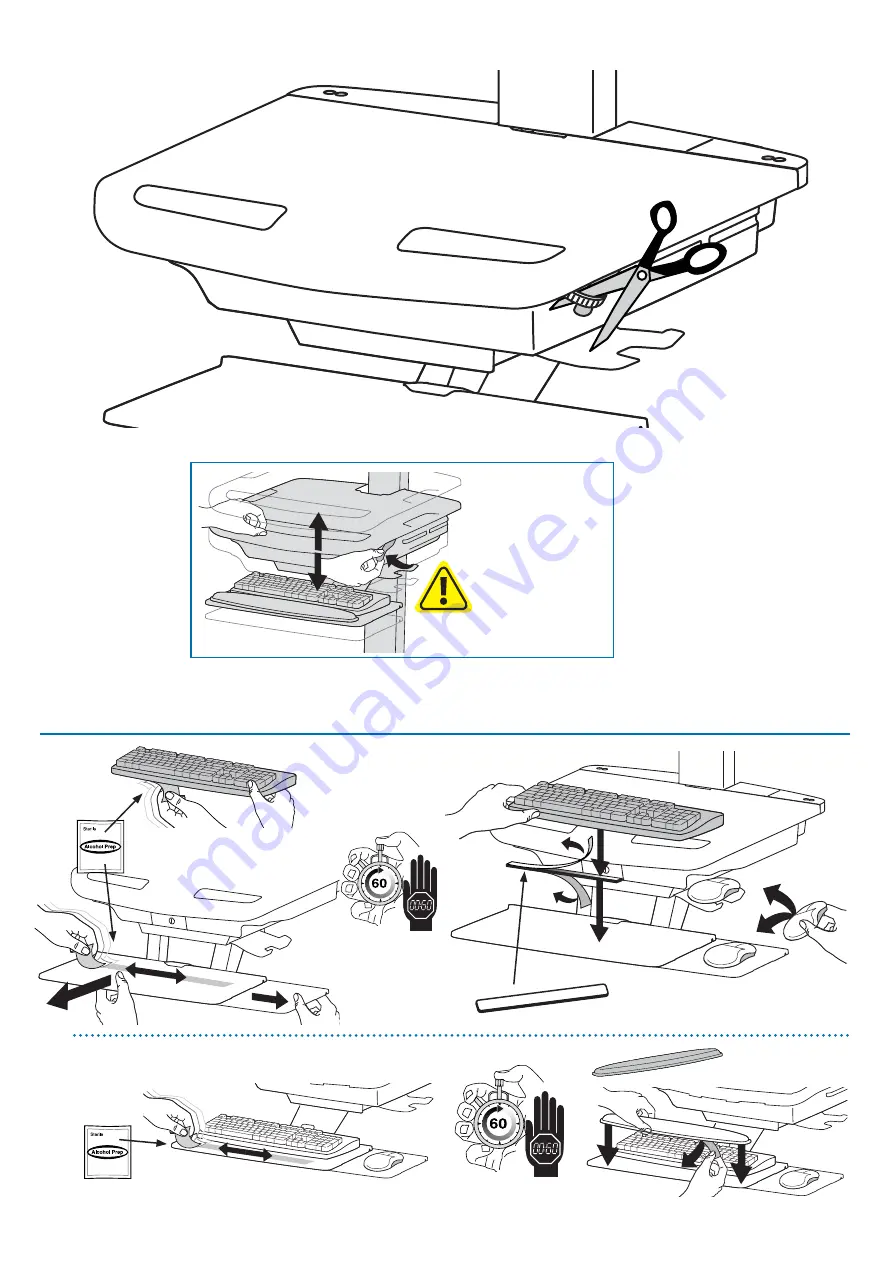
Set-up
Release Brake to move
riser.
Страница 1: ... English Español Français Deutsch Nederlands Italiano Svenska 日本語 汉语 StyleView SV40 Electronic Medical Records EMR Cart with LCD Mount English Features Specifications 3 Set up 4 8 Adjustment 9 10 Ergonomics 11 Maintenance Safety 11 12 Dimensions 13 For the latest User Installation Guide and StyleLink Software Download please visit www ergotron com ...
Страница 2: ...13 888 24 257 G 00 rev D 06 19 A B C D E 1 2 3 4 4x M4 x 5mm 1x 1x 4x M4 x 10mm M4 x 10mm 4x 2x 4x 2x 1x 2x 10x 2x 1x 1x 1x 1x 1x M4 x 8mm M5 x 12mm 1x 2x 1x 1x M4 x 8mm 14mm 9 16 10mm 1x Tools Needed Set up ...
Страница 3: ...torage Weight Capacity WithIndependentLCDLift 14 lbs 6 4 kg Without Independent LCD Lift 20 lbs 9 kg See HowToEliminateIndependentLCD Lift section CAUTION If the combined LCD and CPU weight is greater than 27 lbs 12 2 kg then the CPU must be mounted to the rear of the cart using the Universal CPU Holder accessory ordered separately Combined LCD and CPU Compartment weight 27 lbs 12 2 kg WARNING IMP...
Страница 4: ...4 of 13 888 24 257 G 00 rev D 06 19 1 2a b 1x 1x 1x 1x Set up Release Brake to move riser ...
Страница 5: ... x 5mm 1x 0 75x75mm 100x100mm M4 x 10mm 4x Set up WARNING Impact Hazard Moving Parts can Crush and Cut Raise monitor to top of vertical adjustment BEFORE removing Failure to heed this warning may result in serious personal injury or property damage 822 310 ...
Страница 6: ...6 4x 2x a a b b 4x 1x 4x M4 x 10mm 1x Set up WARNING Power brick should be stored under the storage area Failure to follow these instructions may cause over heating and result in product damage Place computer in compartment Do not place power bricks in compartment ...
Страница 7: ... Set up Route power cable down along tower WARNING DO NOT OPERATEWITHOUT GUARD IN PLACE Only remove guard when routing a cable with a large connector through the bottom of the compartment Replace guard imediately after routing cable Failure to replace guard my result in equipment damage and or personal injury ...
Страница 8: ...OT OBSTRUCT AIR VENTS Computer Fan must face the carts ventilation openings on either side of the compartment If your computer does NOT have a fan remove the 2 side covers and leave them off to increase airflow If your computer has a fan removing the 2 side covers for increased airflow is optional If computer with cables is too wide then follow these instructions ...
Страница 9: ...oad you should repeat these adjustment steps to ensure safe and optimum operation Adjustments should move smoothly and easily through the full range of motion and stay where you set it If adjustments are difficult and do not stay in the desired position follow the instructions to loosen or tighten the tension to create a smooth easy adjustment motion Depending on your product and the adjustment it...
Страница 10: ...9 kg Pan Side to Side RaisemonitortotopofverticaladjustmentBEFOREremoving DONOTremoveStopScrewwithoutmonitorattached Doingsowill causemonitorpivottoshootuprapidlyandmaycausepersonalinjury 822 055 1 2 3 Élevezl écranauplushautdel ajustementverticalAVANTdeleretirer NEretirezPASlavisd arrêtavantquel écransoitfixé Dansuntelcas lepivotd écranserelèveraitrapidementetcelapourrait engendrerdesblessures WA...
Страница 11: ...minimize muscle strain 5 Don t run out Before moving make sure cord is unplugged from outlet and hooked to basket for safe travel Remember charge battery fully 100 every day Maintenance Safety Hazard Symbols Review The Meaning of Symbols appearing in this Guide on the Cart or on the Power System These symbols alert you to a safety condition that demands your attention You should be able to recogni...
Страница 12: ...ings Cautions appear in this reference guide or on the cart NOTE Failure to adhere to these guidelines may result in equipment damage or personal injury CAUTION The lift brake helps stablilize the worksurface and keyboard tray during normal use but it DOES NOT increase load capacity DO NOT load riser with equipment totaling more than the maximum weight capacity specified by Ergotron Ensure optimum...
Страница 13: ... 330 mm 2 75 70 mm 2 3 58 mm 4 25 108 mm 7 75 197 mm 8 203 mm 2 75 70 mm 4 102 mm 1 38 35 mm Side View Top View Front View 8 5 216 mm 2013 Ergotron Inc All rights reserved www ergotron com USA 1 800 888 8458 Europe 31 0 33 45 45 600 China 400 120 3051 Japan japansupport ergotron com Dimensions When figuring dimensions include mounted accessories protruding cables and port replicators or docking st...