background image


OPERATION 

Preheating 

To preheat the convection oven, select the desired temperature by rotating the thermostat knob 
clockwise to the desired temperature setting and then turn the timer knob, that also acts as 
an ON/OFF switch, clockwise to the maximum setting (120 minutes), or counterclockwise to 
the constant on position.  The FC-60 G has a third knob for mode selection, convection mode 
for normal cooking, quartz infrared top heaters for salamander type operations or fan only for 
cool-down mode.  Both indicator lights (green and orange) will be lit. The orange light will stay 
on until the oven reaches the desired temperature, and then cycle on and off.  The green light 
will stay on until the timer expires. Allow about 20 minutes for the preheating process. 

Cooking 

After the preheat process is completed, select the desired temperature (unless it is already 
set) and turn the timer knob to select the time setting. When the set time is elapsed, the 
heating element and the blower fan will be switched off and the indicator lights  will go out.  
The timer bell will chime repetitively, announcing the end of the cycle, until the timer button is 
pressed in to silence it.  To use the oven  in continuous mode, turn the timer  knob 
counterclockwise to the position marked by the hand pictograph. 

The SODIR convection ovens can be used for a wide variety of foods. Cooking times will vary 
depending on food products, temperature settings and desired results. 

Cleaning 

WARNING: Disconnect (unplug) electrical power supply before cleaning 

Cleaning is very important in maintaining a safe and well working machine.  Allow the oven to 
cool before cleaning.    Remove the baking racks and clean them separately using a damp 
cloth or sponge and mild liquid soap.  Use a cloth dampened slightly with a soap and water 
mixture to clean all exterior and interior stainless steel surfaces.  Use a clean lint-free cloth to 
remove the excess water or soap.  Make sure no water enters the unit through ventilation 
holes. 

DO NOT


use an abrasive sponge on exterior or interior surfaces  

DO NOT wash the oven under running water 
 
DO NOT spray the exterior motor housing with any liquid 
 
DO NOT allow water to drip into the motor housing or onto electrical 
components 

Содержание Sodir FC-60

Страница 1: ...Operation Manual For Sodir Size Convection Oven FC 60 FC 60G 765 Westminster Street Providence Rhode Island 02903 U S A Tel 401 273 3300 Fax 401 273 3328 www equipex com e mail service equipex com ...

Страница 2: ...liance with a damaged cord or plug or if appliance should sustain damage or malfunction in any way In this event return appliance to the nearest authorized service facility for examination repair or adjustment 7 The use of accessories and or attachments not recommended by the appliance manufacturer may cause injury or damage to the appliance and may void your warranty 8 Do not use outdoors 9 Do no...

Страница 3: ...o 1 3 size cafeteria pans Specifications Model Electrical Plug Configuration FC 60 208 240V 1 PH 3 3KW 13 15A NEMA 6 20P FC 60 1 120V 1PH 1 7KW 14A NEMA 5 15P FC 60 G 208 240V 1PH 3 3KW 13 15A NEMA 6 20P FC 60 G 1 120V 1PH 1 7KW 14A NEMA 5 15P INSTALLATION The SODIR convection oven needs to be connected to a grounded outlet of proper voltage 208 240V or 120V depending on the model DO NOT place the...

Страница 4: ...indicator lights will go out The timer bell will chime repetitively announcing the end of the cycle until the timer button is pressed in to silence it To use the oven in continuous mode turn the timer knob counterclockwise to the position marked by the hand pictograph The SODIR convection ovens can be used for a wide variety of foods Cooking times will vary depending on food products temperature s...

Страница 5: ...side and on the outside To install the door reverse the procedure Insure that the bottom of the hinge cutout fits into the notch on the bottom of the hinge Move the hinge lock to the down position to restore proper hinge operation DO NOT leave the hinge lock in UP position at the end of installation Maintenance You should inspect all parts on a regular basis to ensure that all is in proper working...

Страница 6: ...Spare Parts FC 60 and FC60 1 ...

Страница 7: ... 4 Leg 15 15017G010 1 Bottom Panel 16 A08009 1 Green Pilot Light 220 V 16 A08007 1 Green Pilot Light 120 V 17 A08003 1 Orange Pilot Light 220 V 17 A08004 1 Orange Pilot Light 120 V 18 A06042 1 Regulating Thermostat 19 B09007 2 Hinge support 20 A06035 1 1 Hi limit thermostat 21 15016 308GA 1 Left Side Panel 22 D02034 1 Heating element 220V 22 D02041 1 Heating element 120V 23 A03001 1 Motor 220V 23 ...

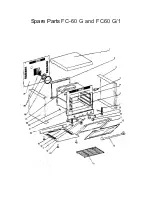
Страница 8: ...Spare Parts FC 60 G and FC60 G 1 ...

Страница 9: ...1 Green Pilot Light 220 V 17 A08007 1 Green Pilot Light 120 V 18 19 A08003 1 Orange Pilot Light 220 V 18 19 A08004 1 Orange Pilot Light 120 V 20 A06042 1 Regulating Thermostat 21 B09007 2 Hinge support 22 A06035 1 1 Hi limit thermostat 23 15016 308GA 1 Left Side Panel 24 D04016 3 Quartz Tube 25 D02034 1 Heating element 220V 25 D02041 1 Heating element 120V 26 A03001 1 Motor 220V 26 A03003 1 Motor ...

Страница 10: ...omer failure to follow assembly operation cleaning user maintenance or storage instructions 2 Labor to replace inoperative parts such as bulbs plugs or racks due to normal wear and tear or abuse 3 Materials or labor to repair scratched stained chipped pitted dented or discolored surfaces attachments or accessories 4 Transportation charges to or from a service agency for repair of your machine If y...

Отзывы: