background image

EQD

®

                                                                   11                                                      EQ2288F

Operation

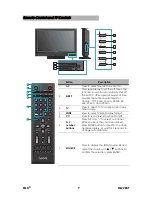
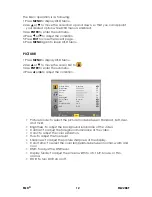
Turning the TV On and Off

Press the 

POWER

 button on the remote control.

You can also use the Power button on the front of the 

panel.

Changing Channels

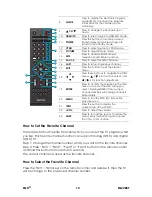
1. Using Channel Buttons
Press 


CH


 button to change channels, and the TV 

changes channels in sequence. You will see all channels 

that have been memorized. Channels erased or not 

memorized will not be shown.
2. Using Number Buttons
Using the remote control buttons 0-9, select channel for NTSC/ATSC/CATV.
To select 1, 2 or 3-digt channel number (e.g., Channel 110)
Press 1   1   0.
To select 4-digit channel number (e.g. Channel 23-1)
Press 2   3   -   1.

Adjusting the Volume

Press 

VOL

 +/- to adjust volume.

To turn off the volume, press 

MUTE

.

To restore volume, press 

MUTE

 again, or press 

VOL +

/

directly.

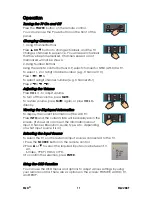
Viewing the Displayed Information

To display the current information of the LCD TV:
Press 

INFO

, and the current state will be displayed on the 

screen. (It shows all or some of the information about 

Input, Channel, Resolution, Audio Type, etc., depending 

on what input source it is in)

Selecting the Input Source

To select the TV or other external input sources connected to the TV.
1.Press the 

SOURCE

 button on the remote control.

2.Press 

 or 

 to select the required input source between TV, 

AV, 

S-Video, YPbPr, HDMI, or PC.

3.To confirm the selection, press 

ENTER

.

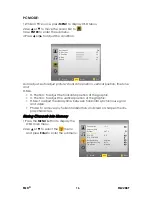
Using the OSD Function

You can use the OSD menus and options to adjust various settings by using 

your remote control. There are six options on the screen: PICTURE, AUDIO, TV, 

and SETUP.

YPbPr

HDMI/PC

AV

TV

ALEEP

POWER

CH

INFO

MUTE

VOL

CH

INFO

MUTE

VOL

CH

INFO

MUTE

VOL

SOURCE

TV

AV

S-Video

YPbPr

HDMI

PC

Содержание Auria EQ2288F

Страница 1: ...22 LCD FHDTV User Guide MODEL EQ2288F...

Страница 2: ...ude to constitute a risk of electric shock to persons This symbol is intended to alert the user that improper use of the prod uct may result in product malfunction The user should pay attention to avo...

Страница 3: ...ation This equipment generates uses and can radiate radio frequency energy and if not installed and used in accordance with the instructions may cause harmful interference to radio communications Howe...

Страница 4: ...cury in compact fluorescent lamps not exceeding 5 mg per lamp and in other lamps not specifically mentioned in the Annex of RoHS Directive 2 Lead in glass of cathode ray tubes electronic components fl...

Страница 5: ...Mounting Auria LCD TV to the wall 3 Front View of the product 5 Rear View of the Product 6 Connecting the LCD TV 7 Remote Control and TV Controls 8 Inserting Remote Control Batteries 8 Remote Control...

Страница 6: ...13 Unplug this apparatus when it will be unused for a long period of time 14 Refer all servicing to qualified service personnel Servicing is required when the appara tus has been damaged in any way su...

Страница 7: ...and result in a fire Cleaning the screen surface cabinet of the TV set When cleaning this TV unplug the AC power cord If not it may result in electric shock Use a dry soft cloth to clean the cabinet o...

Страница 8: ...uct to the wall please consider the following guidelines Read the Important Safety Instructions at the start of this manual Do not install in a moist or wet environment This equipment is intended for...

Страница 9: ...ser Guide as you will need the serial number to request service should there be a service need Install the wall mount plate to the LCD TV using screws NO LONGER than 10mm as longer screws found in uni...

Страница 10: ...mode 3 Remote Control Receiver Receives IR signals from the remote control 4 SOURCE Select input source 5 MENU Turn OSD menu ON OFF 6 Volume Up Increase sound volume or select a control while in OSD...

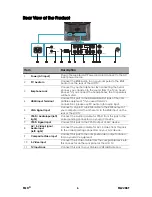
Страница 11: ...to the RGB output of your computer and the other end to the RGB input on the rear of the LCD TV 6 YPbPr Audio Input left right Connect the Audio in cable for YPbPr from this jack to the corresponding...

Страница 12: ...IO IN YPbPr L R L CVBS S VIDEO TV IN R VHF UHF CABLE DVD Player VCD Player Game System Personal Computer Personal Computer DVD Player Audio System Digital Cable box DVD Player VCD Player Game System D...

Страница 13: ...ified AAA batteries Do not mix new and old batteries This may result in creaking or leakage which may pose a risk of fire or lead to personal injury Insert batteries according to and markings Insertin...

Страница 14: ...any other source 4 WIDE Press to select Video Display format 5 CC Press to turn Closed Caption On Off 6 0 9 number buttons Press 0 9 and to select a channel After you input the channel numbers press E...

Страница 15: ...rom standby mode Press it again to return to the standby mode 12 YPbPr Press to select source to YPbPr mode 13 PICTURE Press to adjust Picture mode 14 MTS Press to activate Multichannel Television Sou...

Страница 16: ...e volume press MUTE again or press VOL directly Viewing the Displayed Information To display the current information of the LCD TV Press INFO and the current state will be displayed on the screen It s...

Страница 17: ...dition Picture Mode To select the picture mode between Standard Soft User and Vivid Brightness To adjust the background luminance of the video Contrast To adjust the foreground luminance of the video...

Страница 18: ...o sub menu Step 3 Enter the audio page Step 4 Use key to select the Audio Only function and enter this func tion Action The video and the panel backlight will be turned off and only audio can be outpu...

Страница 19: ...tal Rating Def AudioLang Adjust the deaf audio language to English French or Spanish DayLight Saving Adjust the Day light saving time setting Time Zone Change to DTV ATSC channel program Press the INF...

Страница 20: ...set a time that will elapse before the TV turns off Options are OFF 5 15 30 60 90 120 minutes Parental Control Access the Parental Control menu See Storing Chan nels into Memory on page 16 for more de...

Страница 21: ...f the graphic H Size To adjust the delay time between horizontal synchronous signal and video Phase To remove any horizontal distortion and clear or sharpen the dis play characters Storing Channels in...

Страница 22: ...the menu and press Enter to enter the submenu 3 Use or to select Parental Control from the submenu 4 Input your password 5 Select Change Password to enter the Change Password setting 6 Input your new...

Страница 23: ...e cursor bar to different ratings and use or to adjust the conditions 7 Select to lock or to unlock the programs The following ratings are available Y all children Y7 older children G general audience...

Страница 24: ...o one under 17 years of age X adult audience only MPAA NR Not rated CA English C children C8 children eight years and older G general programming suitable for all audiences PG parental guidance 14 vie...

Страница 25: ...your audio connections are properly connected refer ring to the user guide The MUTE button may have been pressed try pressing this but ton again Check your audio settings your TV audio may be set to...

Страница 26: ...commended and supported AV S Video Mode NTSC Recommended and supported YPbPr HDMI Mode 480i 60Hz 1080i 60Hz 480p 60Hz 1080p 60Hz 720p 60 Hz Speaker Output 3W x 2 THD 10 Audio Output 1 Headphone jack P...

Страница 27: ......
Отзывы: