CAUTION!
This UPS utilizes voltages that may be hazardous. Do not attempt to disassemble the unit. The unit contains
no user replaceable parts. Only authorized service personnel may perform repairs.
CAUTION!
Do not attach a power strip or surge suppressor with >1,5m wire to the UPS
CAUTION!
Do not stick fingers into sockets.
CAUTION!
The UPS cannot be transported by plane because it contains lead acid batteries.
Please follow the instructions to correctly position your UPS:
1. The UPS must be placed on a horizontal surface.
2. This UPS is projected for indoor use.
3. The UPS must not be exposed to direct sunlight or any heat source.
4. The air temperature must be between 0°C and 40°C (25°C is the ideal temperature).
5. Ambient humidity must be less than 90%.
6. The UPS must not be placed on dusty environments.
7. The UPS must be placed at least 15 cm. far from walls to ensure enough ventilation.
8. Do not obstruct or pour any liquid on ventilation holes.
9. Do not cover the UPS with any object.
10. Keep away liquids, flammable gases or corrosive substances.
INSTALLING YOUR UPS SYSTEM
UNPACKING
The box should contain the following: UPS unit x1, USB cable x1, IEC cable x1.
HARDWARE INSTALLATION GUIDE
1. Your new UPS may be used immediately upon receipt. However, recharging the battery for at least 8 hours is
recommended to ensure that the battery's maximum charge capacity is achieved. Charge loss may occur during
shipping and storage. To recharge the battery, simply leave the unit plugged into an AC outlet. The unit will charge
in both the ON and OFF position.
2. With the UPS unit off and unplugged, connect the computer, monitor, and any externally powered data storage
device (Zip drive, Jazz drive, Tape drive, etc.) into the battery power supplied outlets. DO NOT plug a laser printer,
copier, space heater, vacuum, paper shredder or other large electrical device into the battery power supplied outlets.
The power demands of these devices will overload and possibly damage the unit.
3. Plug the UPS into a 2 pole, 3 wire grounded receptacle (wall outlet). Make sure the wall branch outlet is protected
by a fuse or circuit breaker and does not service equipment with large electrical demands (e.g. air conditioner,
refrigerator, copier, etc). Avoid using extension cords.
4. Press the power switch to turn the unit on. The power on indicator light will illuminate and the unit will "beep".
5. If an overload is detected, an audible alarm will sound and the unit will emit one long beep. To correct this, turn the
UPS off and unplug at least one piece of equipment from the battery power supplied outlets. Wait 10 seconds. Make
sure the circuit breaker is depressed and then turn the UPS on.
6. To maintain optimal battery charge, leave the UPS plugged into an AC outlet at all times, in compliance with all
safety conditions.
7. To store your UPS for an extended period, cover it and store with the battery fully charged. Recharge the battery
every three months to ensure battery life.
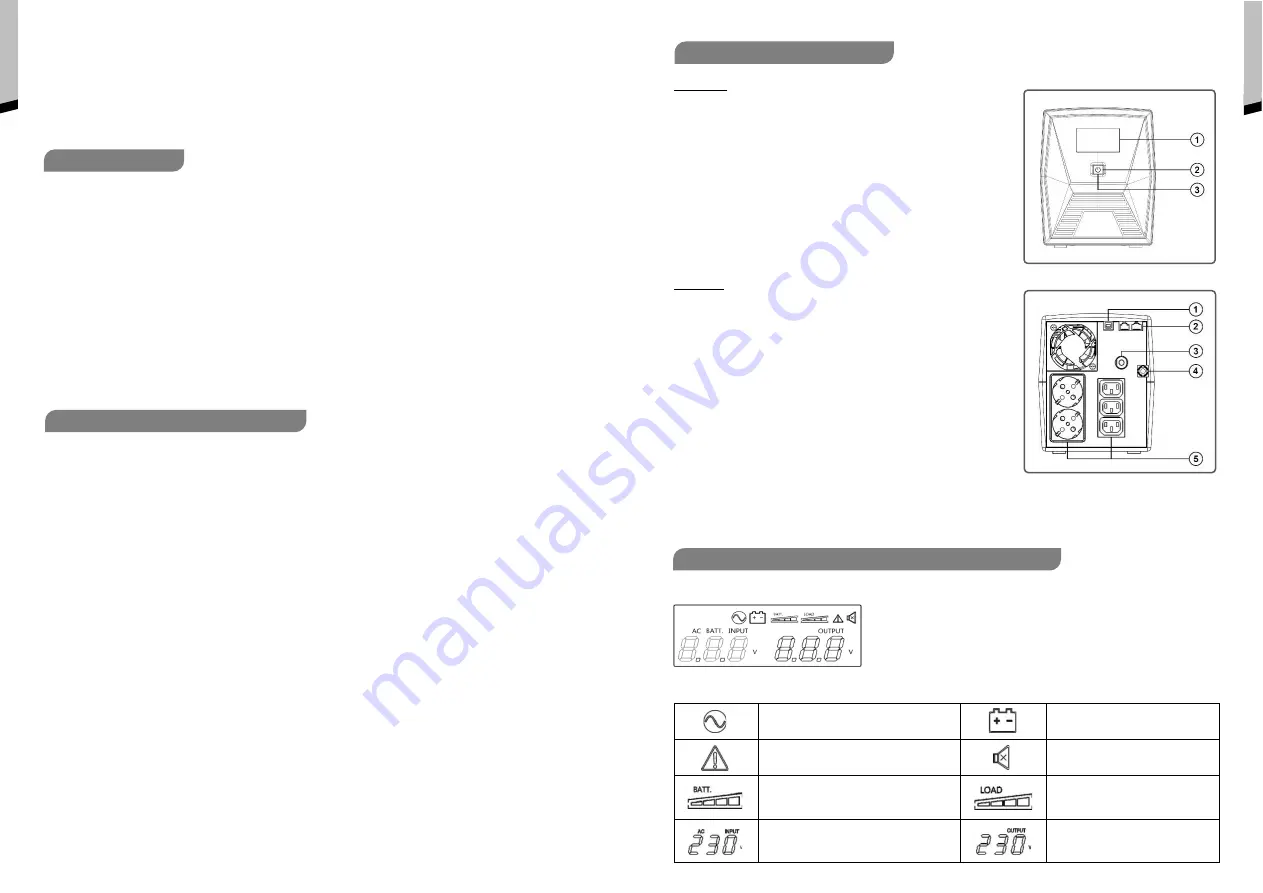
Front panel
1. LCD Display
The LCD will display the UPS status including input voltage, output voltage,
percentage of load
and battery…etc.
2. On/Off Button
To turn ON/OFF the UPS keep pressed the button for 2 seconds. Release
the button after you hear an acoustic signal and a “click”. A white light
around the button will confirm you that the UPS is switched ON.
Sound disable:
the audible alarm can be turned OFF or ON by quickly
pressing the power switch twice. The default setting is for the Alarm On.
3. Led Indicator
This LED is illuminated when the UPS is working.
Rear panel
1. USB COMM. Port
This port allows connection to the USB port on the computer, so to get
access to remote monitoring and shutdown operations through the UPS
management software.
2. RJ45/11 Communication Protection Ports
Provide surge protection for any standard modem, fax, telephone line, or
network cable. Using ports brings a 100 Mb/s speed limitation.
3. Input Circuit Breaker
The circuit breaker provides optimal overload protection.
4. Input power cord
Connect to utility power.
5. Battery Backup & Surge Protected Outlets
The UPS provides outlets for connected equipment to insure temporary
uninterrupted operation during a power failure and against surges and
spikes.
LCD Display layout
Indicators definition
Line mode
Battery mode
Fault/Alarm
Sound disabled
Battery mode
- Battery capacity
Line mode
- Battery charging (cycle lighting)
- Battery fully charghed (lighting)
Load capacity
AC Input voltage
Output voltage
POSITIONING
INSTALLING YOUR UPS SYSTEM
E
N
GLI
S
H
DEFINITIONS FOR ILLUMINATED LED INDICATORS
BASIC FUNCTIONALITIES
E
N
GLI
S
H


