background image

061715-JA 

www.EPVscreens.com


(4)


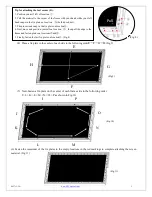
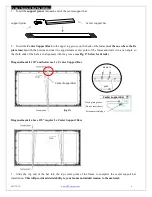
Place a fix plate in the center of each side in the following order

E

F

G

H.

(Fig.9)


(5)


Next, fasten a fix plate on the center of each frame side in the following order   

I

J

K

L

M

N

O

P as shown in Fig.10. 


(6) Fasten the remainder of the fix plates in the empty locations in the red markings to complete attaching the screen 
material. (Fig.11) 


(Fig.9) 

(Fig.11) 

Tip for attaching the last corner (D): 

1. Position yourself left of location 

2. Pull the material to the corner of the frame with your hand while your left 
hand snaps in the fix plate on location 

(the third red dot). 

3. Then insert and snap in the fix plate on location

4. Next,move and position yourself on location 

③,

then pull the edge to the 

frame and fasten plates on locations

and

5. Finally, fasten the last fix plate on location

. (Fig.8) 

(Fig.10) 


⑤ 


Pull 

(Fig. 8) 

Содержание Peregrine HD 2 series

Страница 1: ...ed frame projection the screen Correct usage and maintenance will ensure a long Dust dirt and scratches on the projection surface will affect the picture quality the points below to prevent that from...

Страница 2: ...Note a 2 long frames should be assembled for a screen b Do not tighten the screws completely until all frame pieces have been assembled correctly 3 Insert both elbow joint connectors into the long ho...

Страница 3: ...l frame and align the four corners so that they meet at perfect right angles 4 Join all four frame parts together following the steps shown below Fig 2 Note When assembled please push simultaneously t...

Страница 4: ...edge in the groove of the frame While one hand holds the material in place the other hand snaps in the push plate Fig 4 Fig 5 2 Begin by securing the four corners in the following sequence A B C D Fig...

Страница 5: ...ete attaching the screen material Fig 11 E G H F Fig 9 Fig 11 I J K L M N O P Tip for attaching the last corner D 1 Position yourself left of location 2 Pull the material to the corner of the frame wi...

Страница 6: ...e androtate it in at an angle so that both ends of the bar are in alignment with the groove see Fig 17 below for details Diagonal models 135 and below use 1 x Center Support Bar Diagonal models above...

Страница 7: ...allows the frame to slide over them through its sides as it allows your screen to be properly centered Using both hands finish the installation by pushing the lower portion of the fixed frame screen...

Отзывы: