Epson WF-M1561 Скачать руководство пользователя страница 17

Basic Troubleshooting

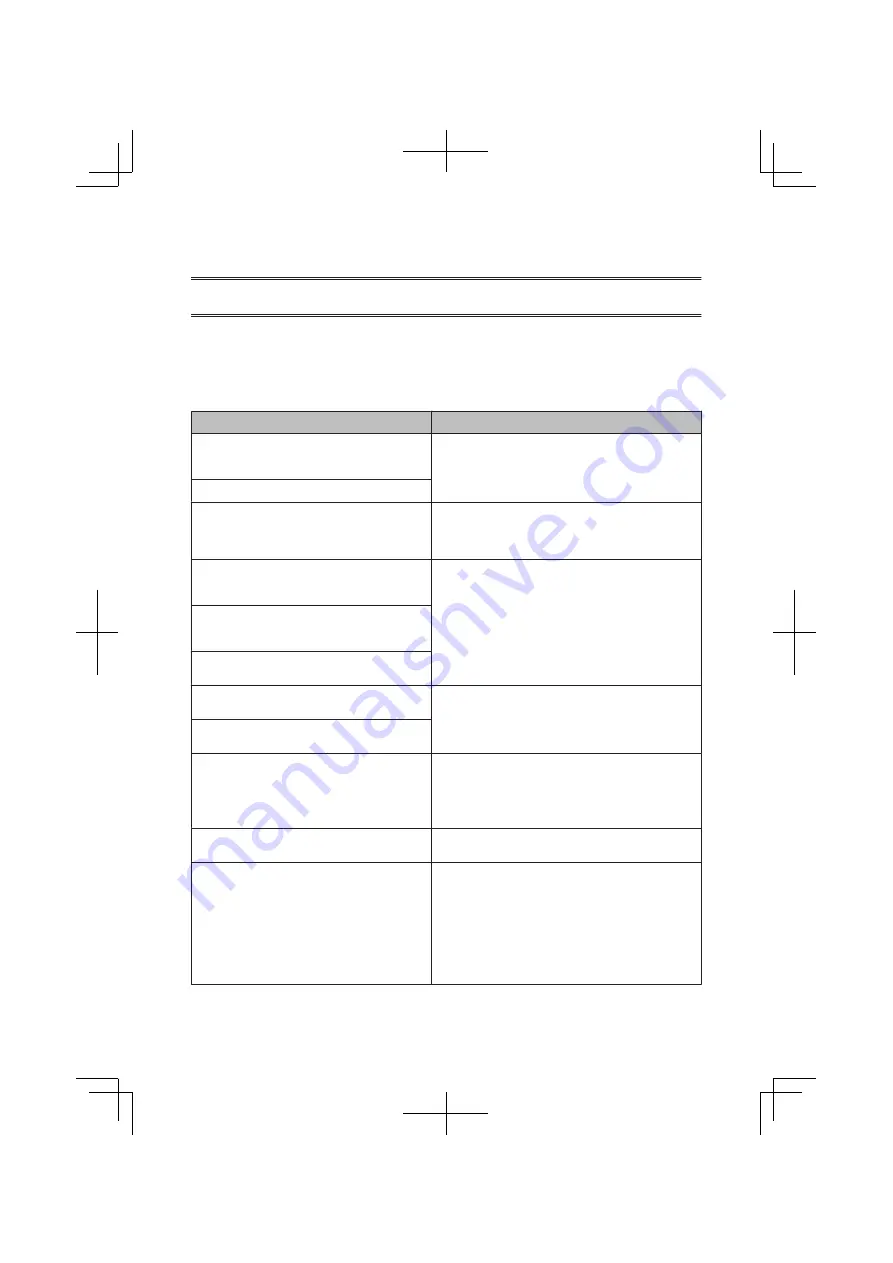
Error Messages

This section describes the meaning of messages displayed on the LCD screen.

Error Messages

Solutions

Paper jam
Press OK. If the error does not clear, remove the paper by
hand.

Remove the jammed paper.

&

 “Paper Jams” on page 16

Paper jam in the ADF. Remove the jammed paper.

Communication error. Make sure the cable is connected,
then try again.

Make sure the computer is connected correctly. If the error
messages still appears, make sure that scanning software is
installed on your computer and that the software settings are
correct.

Printer error
Paper jam. Open the scanner unit and remove the paper,
then turn off the printer. See your documentation.

Turn the product off and then back on. Make sure that no paper is
still in the product. If the error message still appears, contact Epson
support.

ADF Error.
Remove any objects or documents inside ADF. Turn power
off. See documentation.

Printer error
See your documentation.

Scanner error
See your documentation.

Turn the product off and then back on. If the error message still
appears, contact Epson support.

A fax error has occurred.
See your documentation.

A printer’s ink pad is nearing the end of its service life.
Please contact Epson Support.

Press 

OK

 to resume printing. The message will be displayed until

the ink pad is replaced.

Contact Epson support to replace ink pads before the end of their
service life. When the ink pads are saturated, the product stops and
Epson support is required to continue printing.

A printer’s ink pad is at the end of its service life. Please
contact Epson Support.

Contact Epson support to replace the ink pad.

No dial tone.
Fax job incomplete.

Make sure the phone cable is connected correctly and the phone
line works.

&

 “Connecting to a Phone Line” on page 8

If you connected the product to a PBX (Private Branch Exchange)
phone line or Terminal Adapter, turn off the 

Dial Tone

Detection

.

&

 Press 

K

 and then 

x

. Then select 

Fax Settings

 >

Communication

 > 

Dial Tone Detection

.

     Basic Guide

Basic Troubleshooting

15

Содержание WF-M1561

Страница 1: ...Basic Guide ...

Страница 2: ...Ink Cartridge Code BK Black 251 ...

Страница 3: ...line for fax only 9 Sharing line with phone device 9 Checking the fax connection 9 Setting Up Fax Features 10 Setting up speed dial entries 10 Setting up group dial entries 10 Sending Faxes 10 Receiving Faxes 11 Printing Reports 11 Replacing Ink Cartridges 12 Safety instructions 12 Precautions 12 Replacing an Ink Cartridge 13 Basic Troubleshooting 15 Error Messages 15 Paper Jams 16 Removing jammed...

Страница 4: ...nings and instructions marked on the product Use only the power cord supplied with the product and do not use the cord with any other equipment Useofothercordswiththisproductortheuseofthe supplied power cord with other equipment may result in fire or electric shock BesureyourACpowercordmeetstherelevantlocal safety standard Never disassemble modify or attempt to repair the power cord plug printer u...

Страница 5: ... of the leak for fax capable model Note The following provides safety instructions for ink cartridges Replacing Ink Cartridges on page 12 Control Panel Overview Note Although the control panel design and menu and option names and other items in the LCD display may slightly differ from the actual product the method of operation is the same emits a beep Buttons and LCD Buttons Function a Turns the p...

Страница 6: ... settings Ifthisbuttonispressedtocancelcopying scanning orfaxingwhiletheADFisinuse alloriginalsinthe ADF will be fed out k Displays detailed settings for each mode l Cancels returns to the previous menu m Displays the Wi Fi Setup menus that allow you to set up the product wirelessly For instructions on using the menus see the Network Guide n Start copying faxing Lights Lights Function On when the ...

Страница 7: ...llow these steps to load paper A Flip the feeder guard forward B Slide out the paper support and the output tray and then raise the stopper Note Leave enough space in front of the product for the paper to be fully ejected C Slide the edge guide to the left D Loadpaperwiththeprintable sideup againstthe right side of the rear paper feed Note Fan and align the edges of the paper before loading Thepri...

Страница 8: ...the following originals in the ADF Size A4 Letter Legal Type Plain paper Weight 64 g m2 to 95 g m2 Capacity Total thickness of 3 mm up to about 30 sheets Letter A4 10 sheets Legal cImportant To prevent paper jams avoid the following documents For these types use the scanner glass Documents held together with paper clips staples etc Documents that have tape or paper stuck to them Photos OHPs or the...

Страница 9: ...t inside the hole on the left front corner of the scanner glass Doing so may prevent the ADF from operating When you use the copy function with the Automatic Document Feeder ADF the print settings are fixed at Reduce Enlarge ActualSize Paper Type Plain Paper and Paper Size A4 Legal The print is croppedifyoucopyanoriginallargerthanA4 Legal Scanner glass A Open the document cover and place your orig...

Страница 10: ...s and the scan mode menu list see the PDF User s Guide Your scanned image is saved Faxing Note Refer to the PDF User s Guide for other faxing functions and the Fax mode menu list Introducing FAX Utility FAX Utility is a software capable of transmitting data such as documents drawings and tables created using a word processing or spreadsheet application directly by fax without printing Use the foll...

Страница 11: ... A Connect a phone cable leading from a telephone wall jack to the LINE port B Remove the cap C Connect a phone or answering machine to the EXT port Note See the PDF User s Guide for other connection methods Checking the fax connection You can check whether the product is ready to send or receive faxes A Load plain paper Loading Paper on page 5 B Press K to enter the fax mode C Press x to display ...

Страница 12: ...ter up to 30 characters Press OK to register the name Setting up group dial entries You can add speed dial entries to a group allowing you to send a fax to multiple recipients at the same time Up to 60 combined speed dial and group dial entries can be entered A Press K to enter the fax mode B Press x to display the menus C Select the menu shown below Use u or d to select a menu and press OK Select...

Страница 13: ...n Fax Settings Send Receive Setup Auto Answer On Note When an answering machine is connected directly to this product make sure you set Rings to Answer correctly using the following procedure Depending on the region Rings to Answer may be unavailable E Press y and d to select Communication and press OK F Select Rings to Answer and press OK G Press u or d to select the number of rings and press OK ...

Страница 14: ...t is not covered by Epson s warranties and under certain circumstances may causeerratic productbehavior Information about non genuine ink levels may not be displayed You cannot use the cartridge that came with your product for the replacement To maintain optimum print head performance some ink is consumed from a cartridge not only during printing but also during maintenance operations such as ink ...

Страница 15: ...nance Ink Cartridge Replacement cImportant Do not lift up the scanner unit when the document cover is open Do not move the ink cartridge holder by hand otherwise you may damage the product B Pinch and remove the ink cartridge Note A removed ink cartridge may have ink around the ink supply port so be careful not to get any ink on the surrounding area when removing the cartridge C Gentlyshakeanewrep...

Страница 16: ...move the transparent seal from the bottom of the cartridge otherwise the cartridge may become unusable Do not remove or tear the label on the cartridge otherwise ink will leak E Insert the cartridge and press it until it clicks F Close the scanner unit slowly and press OK Ink charging starts Note The P light continues to flash while the product is charging ink Do not turn off the product during in...

Страница 17: ...ation Printer error See your documentation Scanner error See your documentation Turn the product off and then back on If the error message still appears contact Epson support A fax error has occurred See your documentation A printer s ink pad is nearing the end of its service life Please contact Epson Support Press OK to resume printing The message will be displayed until the ink pad is replaced C...

Страница 18: ...f prompted by a message from the LCD screen or the printer driver Afteryouhaveremovedthejammedpaper pressthe button indicated in the LCD screen Removing jammed paper from inside the product A Open the scanner unit cImportant Do not lift up the scanner unit when the document cover is open B Remove all of the paper inside including any torn pieces C Close the scanner unit slowly Removing jammed pape...

Страница 19: ...refully remove the jammed paper D Open the Automatic Document Feeder ADF E Remove all of the paper inside including any torn pieces F Close the Automatic Document Feeder ADF G Raise the ADF input tray H Carefully remove the jammed paper I Return the ADF input tray to its original position and close the ADF cover Basic Guide Basic Troubleshooting 17 ...

Страница 20: ...ing If this product is not connected to a phone and you want to receive faxes automatically make sure you turn on auto answer Receiving Faxes on page 11 Note For more solutions to faxing problems see the online User s Guide Where To Get Help Technical Support Web Site Epson s Technical Support Web Site provides help with problems that cannot be solved using the troubleshooting information in your ...

Страница 21: ... to this product or excluding the U S failure to strictly comply with Seiko Epson Corporation s operating and maintenance instructions Seiko Epson Corporation shall not be liable for any damages or problems arising from the use of any options or any consumable products other than those designated as Original Epson Products or Epson Approved Products by Seiko Epson Corporation Seiko Epson Corporati...

Страница 22: ... 2012 Seiko Epson Corporation All rights reserved Printed in XXXXXX ...

Отзывы: