background image

Replacing the Maintenance Box

Replacing Ink

To have ink replaced, call 888-201-4696.

Parent topic:

Replacing Ink and Maintenance Boxes

Replacing the Maintenance Box

Make sure you have a new maintenance box before you begin.

Caution:

Do not reuse a maintenance box that has been removed and left uninstalled for more than a

week. Keep the maintenance box away from direct sunlight.

1.

Make sure the product is not printing.

2.

Remove the new maintenance box from its package.

Caution:

Do not touch the green chip on the maintenance box.
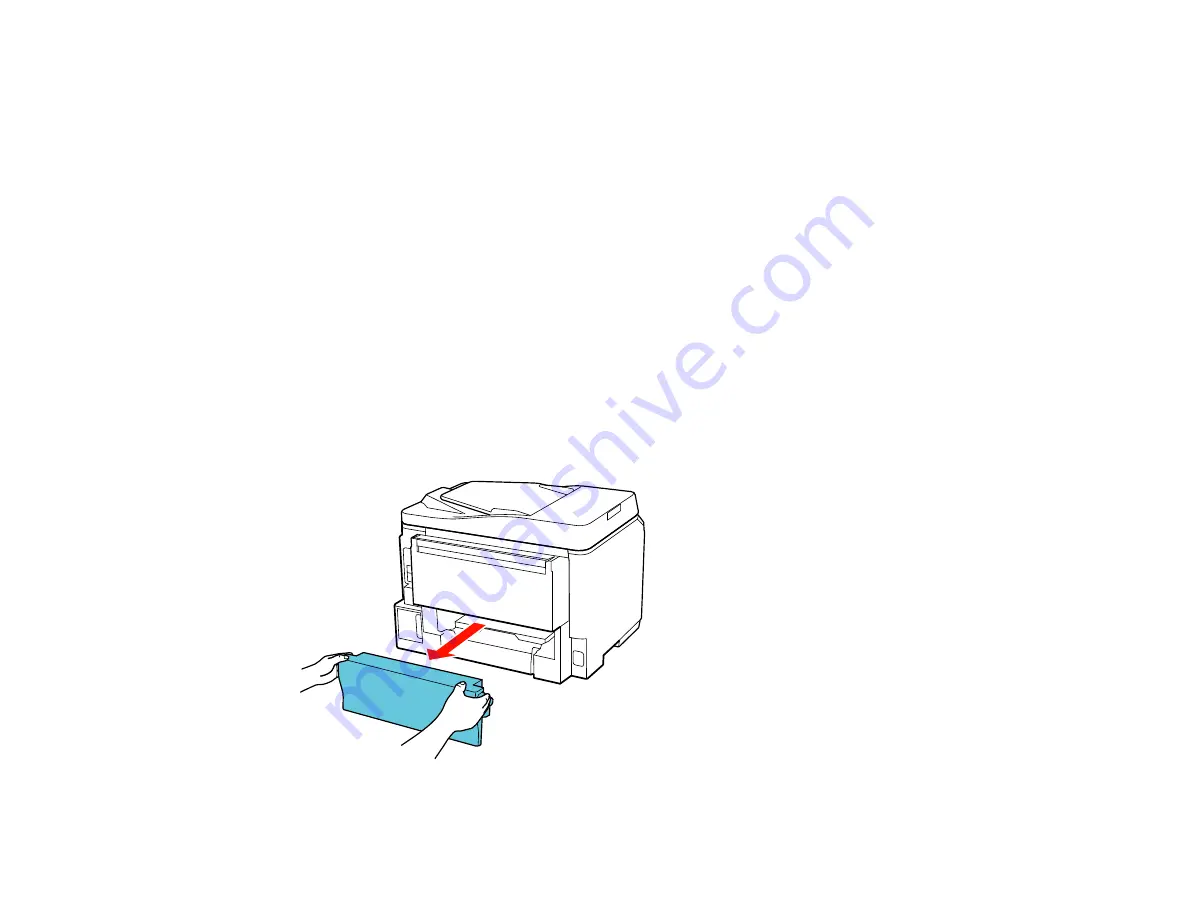
3.

Press the buttons on the sides of the duplexer (rear unit) and remove it.

135

Содержание WF-BM4590

Страница 1: ...WF BM4590 User s Guide ...

Страница 2: ......

Страница 3: ... Envelopes 30 Paper Loading Capacity 33 Available Epson Papers 34 Paper or Media Type Settings 36 Setting the Paper Size for Each Source 37 Setting the Paper Size for Each Source Control Panel 37 Setting the Paper Size for Each Source Standard Epson Printer Software 38 Setting the Paper Size for Each Source Standard Epson Printer Software Windows 38 Setting the Paper Size and Source PCL Printer So...

Страница 4: ...ents Standard EPSON Printer Software Windows 65 Selecting Additional Layout and Print Options Standard EPSON Printer Software Windows 65 Custom Color Correction Options Standard EPSON Printer Software Windows 66 Additional Settings Options Standard EPSON Printer Software Windows 68 Selecting a Printing Preset Standard EPSON Printer Software Windows 68 Printing Your Document or Photo Standard EPSON...

Страница 5: ... a Scan Area Home Mode 98 Available Image Adjustments Home Mode 101 Selecting a Scan Size Home Mode 102 Scanning in Office Mode 104 Selecting a Scan Area Office Mode 106 Available Image Adjustments Office Mode 108 Scanning in Professional Mode 109 Available Image Types Professional Mode 112 Selecting a Scan Area Professional Mode 112 Selecting a Scan Size Professional Mode 115 Available Image Adju...

Страница 6: ...Head Using the Product Software 144 Print Head Alignment 145 Aligning the Print Head Using the Product Control Panel 146 Aligning the Print Head Using the Product Software 148 Cleaning the Paper Path 149 Ink Tube Flushing 149 Flushing the Ink Tubes Using the Product Software 150 Cleaning Your Product 151 Solving Problems 152 Product Status Messages 152 Running a Product Check 154 Resetting Control...

Страница 7: ...s 175 Nothing Prints 175 Settings Are Missing from the PCL or PostScript Printer Software 175 Printing a PS3 PostScript Status Sheet 176 Solving Problems Printing from a Computer 176 Nothing Prints 177 Product Icon Does Not Appear in Windows Taskbar 178 Printing is Slow 178 Solving Page Layout and Content Problems 179 Inverted Image 180 Too Many Copies Print 180 Blank Pages Print 180 Incorrect Mar...

Страница 8: ...e Patterns Appear in an Image 190 Scanned Image Colors Do Not Match Original Colors 191 Scan Area is Not Adjustable in Thumbnail Preview 191 Scanned Image Edges are Cropped 192 When to Uninstall Your Product Software 192 Uninstalling Product Software Windows 192 Uninstalling Product Software PCL Printer Software Windows 193 Where to Get Help 194 Technical Specifications 195 Windows System Requirem...

Страница 9: ...ty Instructions 220 LCD Screen Safety Instructions 220 Wireless Connection Safety Instructions 220 Telephone Equipment Safety Instructions 221 FCC Compliance Statement 221 Software Notices 222 Trademarks 226 Default Delay Times for Power Management for Epson Products 226 Copyright Notice 227 libTIFF Software Acknowledgment 228 A Note Concerning Responsible Use of Copyrighted Materials 229 Copyrigh...

Страница 10: ......

Страница 11: ...WF BM4590 User s Guide Welcome to the WF BM4590 User s Guide 11 ...

Страница 12: ...ard Epson printer software For more information on using the Printer Command Language PCL or PostScript PS3 printer software please see the appropriate sections Setting Up the Control Panel Product Parts Locations Two Sided Printing Scanning and Copying Using the Epson iPrint Mobile App Setting Up the Control Panel See these sections to set up the control panel for use Printer Parts Control Panel ...

Страница 13: ...x button not functional 4 The Scan button 5 The Copy button 6 The Auto Answer button 7 The LCD screen 8 The arrow buttons 9 The OK button 10 The number pad 11 The Stop Reset button 12 The Error light 13 The Speed Dial button 14 The Redial Pause button 15 The Setup button 16 The Help button 13 ...

Страница 14: ... 5 Press the Copy button to exit Parent topic Setting Up the Control Panel Turning Off Control Panel Sounds You can turn off the sound heard when you press buttons on the control panel 1 Press the Setup button 2 Press the arrow buttons to select Printer Setup and press the OK button 3 Select Sound and press the OK button 4 Select the Off setting and press the OK button 5 Press the Copy button to e...

Страница 15: ...ck Parent topic Product Basics Printer Parts Paper Path 1 Edge guides on paper cassette 2 Paper stopper 3 Output tray extension 4 Output tray 5 Edge guides on rear MP tray 6 Rear MP multipurpose tray 7 Feeder guard 15 ...

Страница 16: ...1 Automatic document feeder ADF cover 2 Edge guide 3 Automatic document feeder 4 Paper cassette Parent topic Product Parts Locations 16 ...

Страница 17: ...Printer Parts Front 1 Document cover 2 Scanner glass 3 Control panel 4 USB port for external devices Parent topic Product Parts Locations 17 ...

Страница 18: ...Printer Parts Inside 1 Front cover 2 Print head Parent topic Product Parts Locations 18 ...

Страница 19: ... Locations Two Sided Printing Scanning and Copying You can print on both sides of the page automatically using the product s built in duplexer By loading your pages in the automatic document feeder ADF you can also scan and copy double sided documents on plain paper in these sizes Letter 8 5 11 inches 216 279 mm and A4 8 3 11 7 inches 210 297 mm 19 ...

Страница 20: ...tandard EPSON Printer Software Windows Related tasks Selecting Basic Print Settings PCL Printer Software Windows Selecting Basic Print Settings PostScript Printer Software Windows Scanning in Office Mode Scanning in Professional Mode Related topics Placing Originals on the Product Using the Epson iPrint Mobile App Use this free Apple and Android app to print to nearby Epson networked products The ...

Страница 21: ...5 Print from your mobile device to your Epson product Parent topic Product Basics 21 ...

Страница 22: ...urpose Tray Loading Envelopes Paper Loading Capacity Available Epson Papers Paper or Media Type Settings Setting the Paper Size for Each Source Setting Additional Paper Options Enabling the Optional Second Paper Cassette Loading Paper in the Cassette You can load Letter 8 5 11 inches 216 279 mm A4 8 3 11 7 inches 210 297 mm and Legal 8 5 14 inches 216 357 mm plain paper in the paper cassette 1 Clo...

Страница 23: ...2 Pull out the paper cassette 3 Slide the edge guides outward Note If you are using legal size paper squeeze the tab to extend the paper cassette 23 ...

Страница 24: ...4 Load a stack of paper printable side down in the cassette as shown 24 ...

Страница 25: ...5 Slide the edge guides against the paper but not too tightly Note Make sure the paper fits beneath the top edges of the guide and is not sticking out from the end of the cassette 25 ...

Страница 26: ...Caution To prevent paper feeding problems make sure you do not load too much paper in the cassette 6 Gently replace the paper cassette 7 Extend the output tray and open the paper stopper 26 ...

Страница 27: ...r Related references Paper Loading Capacity Related tasks Loading Paper in the Rear MP Multipurpose Tray Loading Envelopes Loading Paper in the Rear MP Multipurpose Tray You can print documents on a variety of paper types and sizes 1 Extend the output tray and open the paper stopper Note If you are using legal size or longer paper do not open the paper stopper 27 ...

Страница 28: ...2 Pull up the rear MP tray 3 Flip the feeder guard forward then slide the edge guides outward 28 ...

Страница 29: ...ke sure you do not load too much paper in the tray 5 Slide the edge guides against the paper but not too tightly Always follow these paper loading guidelines Load only the recommended number of sheets Load paper short edge first no matter which way your document faces Load letterhead or pre printed paper top edge first Do not load paper above the arrow mark inside the edge guides Check the paper p...

Страница 30: ... 5 14 inches 216 357 mm The holes must be within 0 74 inch 19 mm of the left edge of the page Parent topic Loading Paper Related references Paper Loading Capacity Related tasks Loading Paper in the Cassette Loading Envelopes Loading Envelopes You can print on plain paper envelopes in this size No 10 4 1 9 5 inches 105 241 mm 1 Extend the output tray and open the paper stopper 30 ...

Страница 31: ...2 Pull up the rear MP tray 3 Flip the feeder guard forward then slide the edge guides outward 31 ...

Страница 32: ...ouble loading a stack of envelopes press each envelope flat before loading it or load one envelope at a time If print quality declines when printing multiple envelopes try loading one envelope at a time Do not load envelopes that are curled folded or too thin Parent topic Loading Paper Related references Paper Loading Capacity Related tasks Loading Paper in the Cassette Loading Paper in the Rear M...

Страница 33: ...nches 216 279 mm 250 sheets 1 sheet Legal 8 5 14 inches 216 357 mm Epson Bright White Paper 200 sheets 50 sheets 20 sheets for manual two sided printing Epson Presentation Paper Matte 80 sheets Thick paper cardstock up to 68 lb 10 sheets Letter 8 5 11 inches 216 279 mm and A4 8 3 11 7 inches 210 297 mm 5 sheets for manual two sided printing 33 ...

Страница 34: ...pson Premium Photo Paper Semi gloss Envelopes 10 envelopes Parent topic Loading Paper Available Epson Papers You can purchase genuine Epson ink and paper at Epson Supplies Central at www epson com ink3 U S sales or www epson ca Canadian sales You can also purchase supplies from an Epson authorized reseller To find the nearest one call 800 GO EPSON 800 463 7766 Paper Type Size Part number Sheet cou...

Страница 35: ...entation Letter 8 5 11 inches S041341 50 Paper Matte 216 279 mm Epson Photo Paper Glossy 4 6 inches 102 152 mm S041809 50 S042038 100 Letter 8 5 11 inches S041141 20 216 279 mm S041649 50 S041271 100 Epson Premium Photo Paper 4 6 inches 102 152 mm S041808 40 Glossy S041727 100 5 7 inches 127 178 mm S041464 20 8 10 inches 203 254 mm S041465 20 Letter 8 5 11 inches S042183 25 216 279 mm S041667 50 E...

Страница 36: ...er Matte Premium Presentation Paper Matte Epson Premium Presentation Paper Matte Double sided Epson Ultra Premium Presentation Paper Matte Epson Brochure Flyer Paper Matte Double sided Epson Ultra Premium Photo Paper Glossy Ultra Premium Photo Paper Glossy Epson Premium Photo Paper Glossy Premium Photo Paper Glossy Epson Photo Paper Glossy Photo Paper Glossy Epson Premium Photo Paper Semi gloss Pr...

Страница 37: ...er software before changing the settings Setting the Paper Size for Each Source Control Panel Setting the Paper Size for Each Source Standard Epson Printer Software Setting the Paper Size and Source PCL Printer Software Windows Setting the Paper Size and Source PostScript Printer Software Parent topic Loading Paper Setting the Paper Size for Each Source Control Panel You can change the default pap...

Страница 38: ... set the paper size for each paper source using your standard Epson printer software Setting the Paper Size for Each Source Standard Epson Printer Software Windows Parent topic Setting the Paper Size for Each Source Setting the Paper Size for Each Source Standard Epson Printer Software Windows You can change the default paper size for each source in Windows 1 Do one of the following Windows 7 Clic...

Страница 39: ... Cassette 2 5 If you want the printer software to warn you if you try to print with the wrong paper size select the Paper Size Notice checkbox Note If you turn on Paper Size Notice the printer will prevent you from printing with the wrong paper size settings If you turn this option off and you try to print with the wrong settings the printer will print even if the image size exceeds the printable ...

Страница 40: ...Windows 7 Click and select Devices and Printers Right click your product name and select Printing preferences Windows Vista Click and select Control Panel Click Printer under Hardware and Sound right click your product name and select Printing Preferences Windows XP Click Start and select Printers and Faxes Or open the Control Panel select Printers and Other Hardware if necessary and select Printe...

Страница 41: ...d Source PostScript Printer Software Windows Parent topic Setting the Paper Size for Each Source Setting the Paper Size and Source PostScript Printer Software Windows You can change the default paper size and source in Windows using the PostScript PS3 printer software 1 Do one of the following Windows 7 Click and select Devices and Printers Right click your product name and select Printing prefere...

Страница 42: ...3 Select the Paper Source 4 Click the Advanced button You see this window 42 ...

Страница 43: ...nvelope sizes 6 Click OK 7 Close the Printing Preferences window Parent topic Setting the Paper Size and Source PostScript Printer Software Setting Additional Paper Options When printing or copying on special paper you can adjust these options to ensure your documents print correctly 1 Press the Setup button 2 Select Printer Setup and press the OK button 43 ...

Страница 44: ...tructions to add the optional paper cassette to your product Note If you are using the optional paper cassette with the PCL or PostScript PS3 printer software you must enable the second cassette in the printer software Enabling the Optional Second Paper Cassette PCL Printer Software Windows Enabling the Optional Second Paper Cassette PostScript PS3 Printer Software Windows Parent topic Loading Pap...

Страница 45: ...ound then right click your printer name and select Printing Preferences Click the Printer tab Windows XP Click Start and select Printers and Faxes Right click your product name and select Printing Preferences then click the Printer tab You see this window 2 Select Cassette 1 in the Optional Paper Sources box and click Yes 3 Click OK The optional second paper cassette is now enabled Parent topic En...

Страница 46: ...ices and Printers Right click your printer name and select Printer Properties then click the Device Settings tab Windows Vista Click and select Control Panel Click Printer under Hardware and Sound then right click your printer name and select Properties Click the Devices Settings tab Windows XP Click Start and select Printers and Faxes Right click your product name and select Properties then click...

Страница 47: ...47 ...

Страница 48: ...2 Select 1 Cassette Unit as the Lower Cassette Unit setting 3 Click OK The optional second paper cassette is now enabled Parent topic Enabling the Optional Second Paper Cassette 48 ...

Страница 49: ...e Scanner Glass You can place originals up to this size on the scanner glass Letter 8 5 11 inches 216 279 mm or A4 8 3 11 7 inches 210 297 mm 1 Open the document cover 2 Place your original facedown on the scanner glass with the top facing as shown Slide the original to the edges of the indicated corner Note You can place multiple originals on the scanner glass Just make sure they are at least 0 8...

Страница 50: ... Make sure the originals meet the Automatic Document Feeder specifications before loading them Caution Make sure your originals are not creased or folded and do not contain holes staples tape or other materials that could obstruct the feeder 1 Slide the ADF edge guide outward 2 Fan your stack of originals and tap them gently on a flat surface to even the edges 50 ...

Страница 51: ...riginals into the ADF faceup and top edge first 4 Slide the ADF edge guide against the originals but not too tightly Note If you are copying two originals onto one sheet make sure the originals are loaded as shown 51 ...

Страница 52: ...Parent topic Placing Originals on the Product 52 ...

Страница 53: ...Related references Automatic Document Feeder ADF Specifications Related topics Copying Scanning 53 ...

Страница 54: ...Settings Copying Copying Options Related topics Placing Originals on the Product Loading Paper Copying Documents or Photos You can copy documents or photos onto various sizes and types of paper including Epson special papers 1 Place your original document or photo on the scanner glass or place multi page documents in the ADF 2 Load the paper you want to print on 3 Press the Copy button You see thi...

Страница 55: ...t buttons Note To cancel printing press the Stop Reset button Parent topic Copying Paper Type Settings Copying Select a Paper Type setting that matches the paper you loaded Paper type loaded Paper Type setting Plain paper Plain Paper Epson Bright White Paper Epson Presentation Paper Matte Epson Premium Presentation Paper Matte Matte Epson Ultra Premium Presentation Paper Matte Epson High Quality I...

Страница 56: ...ns Select the copying options you want to use for your copies Note Not all options or settings may be available depending on other copying settings Copying option Available settings Description 2 Sided Copying 1 1 Sided Uses the duplexer and ADF to make 2 sided copies 1 2 Sided 2 1 Sided 2 2 Sided Collate Copying On Specifies the page order for multiple copies of documents Off Layout With Border L...

Страница 57: ... from one size to another other conversions Quality Standard Quality Provides good quality for most copies Best Provides the highest quality for special copies Document Portrait Specifies the orientaton of your originals only available Orientation when 2 1 Sided or 1 2 Sided is selected Landscape Binding Direction Left Specifies the orientation of your originals only available when 2 1 Sided is se...

Страница 58: ... Options Standard EPSON Printer Software Windows Selecting a Printing Preset Standard EPSON Printer Software Windows Printing Your Document or Photo Standard EPSON Printer Software Windows Selecting Default Print Settings Standard EPSON Printer Software Windows Parent topic Printing From a Computer Selecting Basic Print Settings Standard Epson Printer Software Windows Select the basic settings for...

Страница 59: ...Note You can also select the User Defined setting to create a custom paper size 6 Select the orientation of your document Note If you are printing an envelope select Landscape 7 Select the type of paper you loaded as the Paper Type setting Note Check the paper type settings list for details 8 Select the Quality setting that matches the print quality you want to use 59 ...

Страница 60: ...ring printing when you select Plain Paper Bright White Paper select Quiet Mode Paper Source Options Standard EPSON Printer Software Windows Print Quality Options Standard EPSON Printer Software Windows Multi Page Printing Options Standard EPSON Printer Software Windows Parent topic Printing with the Standard Epson Printer Software Windows Related references Paper or Media Type Settings Related tas...

Страница 61: ...y For photos and graphics with good quality and print speed High Quality For photos and graphics with high print quality Best Quality For the best print quality but the slowest print speed Parent topic Selecting Basic Print Settings Standard Epson Printer Software Windows Multi Page Printing Options Standard EPSON Printer Software Windows You can select any of the available options in the Multi Pa...

Страница 62: ...elected or unavailable depending on other settings you have chosen or if you are accessing the product over a network 1 Select the 2 Sided Printing checkbox 2 If the Auto checkbox is not automatically selected do one of the following Select the Auto checkbox to automatically print your double sided print job Deselect the Auto checkbox to print your double sided print job manually by printing one s...

Страница 63: ...4 Select the double sided printing options you want to use 5 Click OK to return to the Main tab 6 Click the Print Density button You see this window 63 ...

Страница 64: ... Adjustments Standard EPSON Printer Software Windows Parent topic Printing with the Standard Epson Printer Software Windows Double sided Printing Options Standard EPSON Printer Software Windows You can select any of the available options on the 2 Sided Printing Settings window to set up your double sided print job Binding Edge Options Select a setting that orients double sided print binding in the...

Страница 65: ...ided printing Increased Ink Drying Time Sets the amount of time required for drying ink after printing on one side of the paper before printing the other side in double sided printing to prevent ink smearing Parent topic Selecting Double sided Printing Settings Standard EPSON Printer Software Windows Selecting Additional Layout and Print Options Standard EPSON Printer Software Windows You can sele...

Страница 66: ...color saturation for your image Select Custom and click the Advanced button to manually adjust the color correction settings or turn off color management in your printer software 3 To add a watermark to your printout select Watermark settings 4 Select any of the Additional Settings options to customize your print Custom Color Correction Options Standard EPSON Printer Software Windows Additional Se...

Страница 67: ...Fix Photo uses a sophisticated face recognition technology to optimize photos that include faces For this to work both eyes and the nose must be visible in the subject s face If your photo includes a face with an intentional color cast such as a statue you may want to turn off Fix Photo to retain the special color effects ICM Lets you manage color using installed color printing profiles No Color A...

Страница 68: ...lity Mirror Image Flips the printed image left to right Edge Smoothing Smooths jagged edges in low resolution images such as screen captures or images from the Web Fix Red Eye Reduces or removes red eye in photos Parent topic Selecting Additional Layout and Print Options Standard EPSON Printer Software Windows Selecting a Printing Preset Standard EPSON Printer Software Windows For quick access to ...

Страница 69: ...oose an option for printing select it 5 Click OK Parent topic Printing with the Standard Epson Printer Software Windows Printing Your Document or Photo Standard EPSON Printer Software Windows Once you have selected your print settings you are ready to save your settings and print 1 Click OK to save your settings You see your application s Print window such as this one 69 ...

Страница 70: ...ware Windows When you change your print settings in a program the changes apply only while you are printing in that program session If you want to change the print settings you use in all your Windows programs you can select new default print settings 1 Right click the product icon in the Windows taskbar 2 Select Printer Settings You see the printer settings window 70 ...

Страница 71: ...nting with the Standard Epson Printer Software Windows Printing with the PCL Printer Software Windows You can print with the PCL printer software using any Windows printing program as described in these sections Note The PCL printer software supports products that are connected via Ethernet If your product is connected via USB you will need to install the standard Epson printer software You can in...

Страница 72: ... to select the product in the PCL printer software before you can adjust your printer settings 1 Do one of the following Windows 7 Click and select Devices and Printers Right click your printer name and select Printing Preferences then click the Printer tab Windows Vista Click and select Control Panel Click Printer under Hardware and Sound then right click your printer name and select Printing Pre...

Страница 73: ...73 ...

Страница 74: ... you want to print 1 Open a photo or document for printing 2 Select the print command in your application Note You may need to select a print icon on your screen the Print option in the File menu or another command See your application s help utility for details 3 If necessary select your product name as the printer you want to use Note You may also need to select Properties or Preferences to view...

Страница 75: ...text in black or shades of gray select the Print all Text as Black checkbox To print all content in black or shades of gray leave both of the checkboxes unselected 5 Select the orientation of your document Note If you are printing an envelope select Landscape 6 Select the size of the paper you loaded as the Paper Size setting Note You can also click Custom button to create a custom paper size 75 ...

Страница 76: ...ions Note Duplex printing is only available if you select Plain as the Paper Type 10 To print multiple copies select the Copies options 11 Click the Advanced button to rotate the image 180 from its original orientation or adjust the print order Parent topic Printing with the PCL Printer Software Windows Selecting Output and Graphics Options PCL Printer Software Windows You can select a variety of ...

Страница 77: ...s the Enhancement Mode setting For text or simple graphics such as charts or presentations select the Vivid or Vivid Accent setting For photos or detailed graphics select the Photo Realistic or Photo Realistic Accent setting 4 To adjust additional TrueType and font settings click the Advanced button and select the options as necessary Parent topic Printing with the PCL Printer Software Windows Sel...

Страница 78: ...caled option To print your document or photo across multiple sheets of paper select the Poster option 2 Adjust the various options that appear in the Settings box as necessary 3 To create or load a text or graphic overlay click the Manage Overlays button and select the options as necessary 4 To add a watermark to your document or photo click the Watermarks button and select the options as necessar...

Страница 79: ...ollowing Windows 7 Click and select Devices and Printers Right click your product name and select Printing Preferences Windows Vista Click and select Control Panel Click Printer under Hardware and Sound then right click your product name and select Printing Preferences Windows XP Click Start and select Printers and Faxes Right click your product name and select Printing Preferences You see the pri...

Страница 80: ...D Selecting Basic Print Settings PostScript Printer Software Windows Selecting Additional Layout and Print Options PostScript Printer Software Windows Selecting Default Print Settings PostScript Printer Software Windows Parent topic Printing From a Computer Selecting Basic Print Settings PostScript Printer Software Windows Select the basic settings for the document or photo you want to print 1 Ope...

Страница 81: ...des settings 6 To change the printing order of the pages select one of the Page Order settings 7 To print multiple pages on one sheet of paper adjust the Pages per Sheet setting 8 To create a folded booklet out of your photo or document select the Booklet option 9 Click the Paper Quality tab You see this window 81 ...

Страница 82: ... following as the Color setting To print a color document or photo select the Color setting To print text and graphics in black only select the Black White setting Parent topic Printing with the PostScript PS3 Printer Software Windows Selecting Additional Layout and Print Options PostScript Printer Software Windows You can select a variety of additional layout and printing options for your documen...

Страница 83: ...lect the ICM Intent setting you want to use 5 Adjust the Pages Per Sheet Layout setting to change the order of multiple pages on a single sheet of paper when you have adjusted the Pages Per Sheet setting on the Layout tab 6 Adjust the Booklet Binding Edge setting to change the orientation of your printed booklet 7 Expand the PostScript Options heading to access the advanced PostScript printer soft...

Страница 84: ...he following Windows 7 Click and select Devices and Printers Right click your printer name and select Printing Preferences Windows Vista Click and select Control Panel Click Printer under Hardware and Sound then right click your printer name and select Printing Preferences Windows XP Click Start and select Printers and Faxes Right click your product name and select Printing Preferences You see the...

Страница 85: ...program session Parent topic Printing with the PostScript PS3 Printer Software Windows Cancelling Printing Using a Product Button If you need to cancel a print job you can press the Stop Reset button on your product Then cancel the print job in your print queue if necessary Parent topic Printing From a Computer 85 ...

Страница 86: ...s Connecting a USB Thumb Drive or External Device To save scanned images on a USB thumb drive or other USB device you must first connect the device to your product Note Epson cannot guarantee the compatibility of your drive 1 Make sure the product is turned on but not printing 2 Insert your USB thumb drive or the USB cable that came with your device into the USB port on the front of your product 8...

Страница 87: ...g start scanning using one of these methods Starting a Scan Using the Product Control Panel Starting a Scan Using the Epson Scan Icon Starting a Scan from a Scanning Program Parent topic Scanning Starting a Scan Using the Product Control Panel You can scan an image to your computer or to a USB device using your product s control panel buttons Your product automatically selects suitable default sca...

Страница 88: ...r image if necessary from an option screen on your computer Note This works with MAPI type email such as Microsoft Outlook Windows Live Mail and Entourage but not web based email such as Gmail Scan to PC WSD lets you manage network scanning in Windows 7 or Windows Vista English only Note To use this feature you must first set up WSD Web Services for Devices on the computer you want to scan to 4 To...

Страница 89: ...t to use Scan to USB Device Available options Description setting Format JPEG JPEG for photos PDF PDF for documents 2 Sided Scanning Off Automatic 2 sided scanning for documents in the ADF On Scan Area Letter Selects the page size for documents or special settings for photos Legal Auto Cropping for photos with A4 dark edges Auto Cropping Max Area for most photos Max Area Document Text Selects the ...

Страница 90: ...n and select Event Manager Windows other versions Click or Start All Programs or Programs EPSON Software Event Manager 2 Open the Scanner drop down list and select your product if necessary 3 Click Make Job Settings 4 Open the Edit Job Settings drop down list and select the scan button settings you want to view or change 5 Change the settings as necessary 6 Click OK 7 Click Close to close the Even...

Страница 91: ...Parent topic Starting a Scan Related topics Selecting Epson Scan Settings 91 ...

Страница 92: ...program and select its scanning option See your scanning program help for instructions 2 Select your product Note In certain programs you may need to select your product as the source first If you see a Select Source option choose it and select your product With Windows do not select a WIA option for your product it will not work correctly You see an Epson Scan window like this 92 ...

Страница 93: ...Note Epson Scan may start in a mode other than Home Mode when you first access it Parent topic Starting a Scan Related topics Selecting Epson Scan Settings 93 ...

Страница 94: ...st them on a preview screen You can also select various image adjustment options and preview your scanned image Home Mode You can select setting groups based on the type of content you are scanning You can also select various image adjustment options and preview and size your scanned image Professional Mode You can manually customize all available settings and preview and size your scanned image N...

Страница 95: ...an automatically saves your scanned file in JPEG format in your operating system s Pictures or My Pictures folder or opens it in your scanning program You can select settings preview and change the scanned file settings as necessary Note You must place your original on the scanner glass when using Home Mode 1 Start Epson Scan and select Home Mode as the Mode setting You see this window 95 ...

Страница 96: ...2 Select the Document Type setting that matches your original such as Photograph or Text Line Art 3 Select the Image Type setting that matches your original 96 ...

Страница 97: ...elect the area in your preview image that you want to scan scan area 8 Select any of the image adjustment settings you want to use Before making adjustments click the image or scan area in the Preview window 9 If you want to reduce or enlarge your image as you scan select the Target Size setting you want to use 10 Click Scan You see the File Save Settings window 11 Change any of the necessary file...

Страница 98: ...y You can also use the scan area to select specific Image Adjustments settings for a scanned image Just be sure to click inside the scan area before selecting the settings 1 Do one of the following to select your scan area in the Preview image Thumbnail preview Your scan area is selected automatically but you can change it Place your cursor in one corner of the desired scan area then click and dra...

Страница 99: ... Normal preview Click the Auto Locate icon to create a marquee dotted line on the preview image 99 ...

Страница 100: ...step To move the marquee click inside the scan area and drag the marquee where you want it To resize the scan area place your cursor over the edge or corner of the marquee then click and drag the edges where you want them Hold down the Shift key as you resize the marquee to retain the same width height proportions 100 ...

Страница 101: ...ted concepts Image Preview Guidelines Available Image Adjustments Home Mode You can select these Image Adjustments options in Epson Scan Home Mode Note Select the Image Option checkbox if you need to set any of the grayed out image adjustments Not all adjustment settings may be available depending on the Document Type and Image Type setting Click the Brightness button to access additional settings...

Страница 102: ...t are delineated improving text recognition in OCR Optical Character Recognition programs Parent topic Scanning in Home Mode Selecting a Scan Size Home Mode You can reduce or enlarge the size of your image as you scan You can also select a specific scan size such as a common photo size like 4 6 inches 102 152 mm This places a scan area of that size on the preview image so you can use it to help cr...

Страница 103: ...ag the marquee where you want it To resize the scan area place your cursor over the edge or corner of the marquee then click and drag the edge where you want it Note Manually adjusting the marquee will not change the target size of the scanned file The marquee only indicates the area of the image that will be scanned 103 ...

Страница 104: ...rtioned for your custom scan size Parent topic Scanning in Home Mode Scanning in Office Mode When you scan in Office Mode Epson Scan automatically saves your scanned file in JPEG format in your operating system s Pictures or My Pictures folder or opens it in your scanning program You can select settings preview and change the scanned file settings as necessary 1 Start Epson Scan and select Office ...

Страница 105: ...hes your original 3 Select the Document Source setting indicating where you placed your original Note If you are using the ADF remove any documents from the scanner glass 4 Select the Size and Orientation settings that match your original 105 ...

Страница 106: ...scans your original and saves the file in the selected folder or opens it in your scanning program If the file was saved directly to your computer you see the file in the Windows Explorer where you can view and print the image if desired Selecting a Scan Area Office Mode Available Image Adjustments Office Mode Parent topic Selecting Epson Scan Settings Related concepts Scan Resolution Guidelines R...

Страница 107: ...ate a marquee dotted line on the preview image 2 Do the following as necessary to work with the selected scan area If the marquee is correct continue with the next step To move the marquee click inside the scan area and drag the marquee where you want it 107 ...

Страница 108: ...can Otherwise only the area inside the currently selected marquee will be scanned To delete a marquee click the marquee then click the Delete Marquee icon 3 Click inside each scan area and make any necessary settings in the Epson Scan window Parent topic Scanning in Office Mode Available Image Adjustments Office Mode You can select these Image Adjustments options in Epson Scan Office Mode Note Sel...

Страница 109: ...justs the overall lightness and darkness of the scanned image Contrast Adjusts the difference between the light and dark areas of the overall scanned image Threshold Adjusts the level at which black areas in text and line art are delineated improving text recognition in OCR Optical Character Recognition programs Parent topic Scanning in Office Mode Scanning in Professional Mode When you scan in Pr...

Страница 110: ...110 ...

Страница 111: ...l into the ADF 9 If desired select the area in your preview image that you want to scan scan area Note You cannot select a scan area if you chose ADF Double sided as the Document Source setting 10 Select any of the image adjustment settings you want to use Before making adjustments click the image or scan area in the Preview window 11 If you want to reduce or enlarge your image as you scan select ...

Страница 112: ... photos Black White Select this setting for black text documents or line art Parent topic Scanning in Professional Mode Selecting a Scan Area Professional Mode You can select a specific area in your preview image to include in your scanned image You can select the entire image area or a portion of it You can even select multiple scan areas to create multiple scanned images of different areas Norma...

Страница 113: ...e icon to create a marquee dotted line on the preview image Thumbnail preview Your scan area is selected automatically but you can change it Place your cursor in one corner of the desired scan area then click and drag the cursor to the opposite corner to create a marquee dotted line on the preview image 113 ...

Страница 114: ...step To move the marquee click inside the scan area and drag the marquee where you want it To resize the scan area place your cursor over the edge or corner of the marquee then click and drag the edges where you want them Hold down the Shift key as you resize the marquee to retain the same width height proportions 114 ...

Страница 115: ...rofessional Mode Related concepts Image Preview Guidelines Selecting a Scan Size Professional Mode You can reduce or enlarge the size of your image as you scan You can also select a specific scan size such as a common photo size like 4 6 inches 102 152 mm This places a scan area of that size on the preview image so you can use it to help crop the image in the correct proportions 1 Click the Previe...

Страница 116: ...ag the marquee where you want it To resize the scan area place your cursor over the edge or corner of the marquee then click and drag the edge where you want it Note Manually adjusting the marquee will not change the target size of the scanned file The marquee only indicates the area of the image that will be scanned 116 ...

Страница 117: ...enter the size click Save and click OK Then create a scan area on the preview image The marquee is automatically proportioned for your custom scan size 6 To use additional sizing tools click the icon next to the Target Size setting and select options as desired Scale Reduces or enlarges your image by the percentage you enter 117 ...

Страница 118: ...able depending on the Image Type setting Click the image adjustment icon to access additional settings Click the icon next to a setting to change the level of adjustment Unsharp Mask Makes the edges of certain image areas clearer Turn off this option to leave softer edges Descreening Removes the ripple pattern that might appear in subtly shaded image areas such as skin tones This option improves r...

Страница 119: ... graphical interface for adjusting tone levels individually For advanced users only Click the tone correction icon to access the settings Brightness Adjusts the overall lightness and darkness of the scanned image Contrast Adjusts the difference between the light and dark areas of the overall scanned image Saturation Adjusts the density of colors in the overall image Color Balance Adjusts the balan...

Страница 120: ... the preview image so you can use it to help crop the image in the correct proportions 1 Click the Preview button to preview your image 2 In the Epson Scan window select the size you want your scanned image to be from the Target Size list Note If you need to rotate the orientation of the target size for your image click the orientation icon A marquee dotted line appears on your preview image propo...

Страница 121: ...ag the marquee where you want it To resize the scan area place your cursor over the edge or corner of the marquee then click and drag the edge where you want it Note Manually adjusting the marquee will not change the target size of the scanned file The marquee only indicates the area of the image that will be scanned 121 ...

Страница 122: ...enter the size click Save and click OK Then create a scan area on the preview image The marquee is automatically proportioned for your custom scan size 6 To use additional sizing tools click the icon next to the Target Size setting and select options as desired Scale Reduces or enlarges your image by the percentage you enter 122 ...

Страница 123: ...on opens a normal preview Parent topic Selecting Epson Scan Settings Scan Resolution Guidelines If you plan to enlarge a scanned image so you can print it at a larger size you may need to increase the resolution from the default resolution set by Epson Scan Follow these guidelines to determine the resolution setting you need You will enlarge the image as you scan it If you will enlarge the image u...

Страница 124: ... Selecting Epson Scan Settings Selecting Scan File Settings You can select the location name and format of your scan file on the File Save Settings window You can also select various optional settings that control how Epson Scan behaves when you scan and save files 124 ...

Страница 125: ...se any of the optional settings you want to use by selecting their checkboxes 7 Click OK Available Scanned File Types and Optional Settings Parent topic Selecting Epson Scan Settings Available Scanned File Types and Optional Settings You can select from a variety scanned file types and optional settings on the File Save Settings window in Epson Scan File Formats Bitmap bmp A standard image file fo...

Страница 126: ... folder after scanning Select to have Windows Explorer automatically open to the folder where your scanned image is saved after scanning Show Add Page dialog after scanning If you are scanning a multi page document using the PDF or Multi Tiff format select to display a prompt for scanning additional pages after the first page is scanned Parent topic Selecting Scan File Settings Scanning Special Pr...

Страница 127: ... Preview your image 6 When you finish selecting all your settings click Scan You see the File Save Settings window 7 Select PDF as the Type setting 8 Select any other settings you want to use on the File Save Settings window Click the Options button to access additional settings 127 ...

Страница 128: ...ages using the icons that appear on the bottom of the editing window When you are finished click OK Note If you installed an OCR Optical Character Recognition program you may see a screen indicating the program is converting your page to text Wait until the program re scans the page and close the program if necessary 11 Click Close to exit the Epson Scan window if necessary Epson Scan scans your o...

Страница 129: ... 2 Start Epson Scan 3 Select the scan mode you want to use 4 Select the scan settings for your scan 5 Preview your image 6 Locate or access the image adjustment settings 7 Select the Color Restoration checkbox 8 When you finish selecting all your settings click Scan 9 Click Close to exit the Epson Scan window if necessary Epson Scan scans your original and saves the color restored file in the sele...

Страница 130: ...Related topics Starting a Scan Selecting Epson Scan Settings 130 ...

Страница 131: ...pended or when the maintenance box needs to be replaced Note When using the PCL or PostScript PS3 printer software with the product you can check ink and maintenance box status by using the printer buttons or the utilities included with the standard Epson printer software Checking Ink Levels on the LCD Screen Checking Ink and Maintenance Box Status With Windows Parent topic Replacing Ink and Maint...

Страница 132: ...k Ink and Maintenance Box Status Checking Ink and Maintenance Box Status With Windows A low ink reminder appears if you try to print when ink is low and you can check your ink or maintenance box status at any time using a utility on your Windows computer 1 To check your status double click the product icon in the Windows taskbar then click Details You see this window 132 ...

Страница 133: ...he maintenance box as indicated on the screen Contact Epson if ink needs replacing 3 To disable the low ink reminder right click the product icon in the Windows taskbar and select Monitoring Preferences You see this window 133 ...

Страница 134: ...e Low Ink Reminder alerts checkbox at the bottom of the screen 5 To disable promotional offers deselect the Display Epson Offers checkbox Parent topic Check Ink and Maintenance Box Status Related tasks Replacing Ink 134 ...

Страница 135: ...box before you begin Caution Do not reuse a maintenance box that has been removed and left uninstalled for more than a week Keep the maintenance box away from direct sunlight 1 Make sure the product is not printing 2 Remove the new maintenance box from its package Caution Do not touch the green chip on the maintenance box 3 Press the buttons on the sides of the duplexer rear unit and remove it 135...

Страница 136: ...roughly with soap and water If ink gets into your eyes flush them immediately with water If ink gets into your mouth spit it out and see a doctor right away Keep the maintenance box out of the reach of children and do not drink the ink 5 Place the used maintenance box in the plastic bag that came with the new maintenance box Seal the bag and dispose of it carefully 136 ...

Страница 137: ... Insert the new maintenance box into the holder and push it all the way in 7 Press the buttons on the sides of the duplexer rear unit and reattach it Parent topic Replacing Ink and Maintenance Boxes 137 ...

Страница 138: ...s before you clean them so you don t clean them unnecessarily Note You cannot clean the print head if ink is expended and may not be able to clean it when ink is low You must have the ink refilled first Print Head Nozzle Check Print Head Cleaning Parent topic Adjusting Print Quality Related topics Replacing Ink and Maintenance Boxes Print Head Nozzle Check You can print a nozzle check pattern to c...

Страница 139: ... 3 Press the arrow buttons to select Maintenance and press the OK button You see this screen 4 Press the OK button You see this screen 5 Press either of the Start buttons After the nozzle pattern prints you see this screen 139 ...

Страница 140: ...ollowing If there are no gaps select Finish Nozzle Check and press the OK button Press the Copy button to exit If there are gaps or the pattern is faint select Head Cleaning and press the OK button to continue 8 Follow the instructions on the screen to clean the print head check the nozzles and repeat the process as necessary 140 ...

Страница 141: ...zle Check Checking the Nozzles Using the Product Software You can check the print head nozzles using a utility on your Windows computer 1 Make sure no product lights are indicating errors 2 Load a few sheets of plain paper in the product 3 Right click the product icon in the Windows taskbar 4 Select Nozzle Check You see a window like this 5 Click Print 6 Check the printed pattern to see if there a...

Страница 142: ...if ink is expended and may not be able to clean it when ink is low You must have the ink refilled first Cleaning the Print Head Using the Product Control Panel Cleaning the Print Head Using the Product Software Parent topic Print Head Maintenance Related topics Replacing Ink and Maintenance Boxes Cleaning the Print Head Using the Product Control Panel You can clean the print head using the control...

Страница 143: ...screen 5 Press the OK button 6 Select the cleaning cycle you want to run then press either of the Start buttons to clean the print head You see a message on the LCD screen during the cleaning cycle Caution Never turn off the product during a cleaning cycle or you may damage it 143 ...

Страница 144: ... Head Cleaning Related topics Replacing Ink and Maintenance Boxes Cleaning the Print Head Using the Product Software You can clean the print head using a utility on your Windows computer 1 Load a few sheets of plain paper in the product 2 Right click the product icon in the Windows taskbar 3 Select Head Cleaning 4 Select the cleaning cycle you want to run based on the nozzle check pattern 5 Click ...

Страница 145: ...up to 4 times turn off the product and wait at least 6 hours Then try cleaning the print head again If the quality still does not improve flush the ink tubes Parent topic Print Head Cleaning Related topics Replacing Ink and Maintenance Boxes Print Head Alignment If your printouts become grainy or blurry you notice misalignment of vertical lines or you see dark or light horizontal bands you may nee...

Страница 146: ...n align the print head using the control panel on your product 1 Make sure plain paper is loaded in the product 2 Press the Setup button 3 Press the arrow buttons to select Maintenance and press the OK button You see this screen 4 Select Head Alignment and press the OK button You see this screen 146 ...

Страница 147: ...e printing a head alignment pattern You see this screen 6 Check the printed pattern and press the arrow buttons to choose the number representing the best printed pattern for each set Press the OK button after each selection then press the OK button when you are done Parent topic Print Head Alignment 147 ...

Страница 148: ... product lights are indicating errors 2 Load a few sheets of plain paper in the product 3 Right click the product icon in the Windows taskbar 4 Select Print Head Alignment 5 Click Next then click Print to print an alignment sheet Note Do not cancel printing while you are printing a head alignment pattern You see a window like this 148 ...

Страница 149: ...eets of plain paper in the product 2 Use the product control panel to make a copy but without placing a document on the scanner glass 3 Check the back of the ejected paper to see if it is clean 4 Repeat as necessary until the paper comes out clean Parent topic Adjusting Print Quality Related topics Copying Ink Tube Flushing If you still see white or dark lines or missing colors in your printouts e...

Страница 150: ...ws taskbar and select Ink Change Then select Power Ink Flushing 2 Follow the on screen instructions to flush the ink tubes 3 When you finish flushing the ink tubes run a nozzle check to check the print quality If necessary also clean the print head If you don t see any improvement turn off the product and wait at least 6 hours Then check the print quality again If quality still does not improve co...

Страница 151: ... cables 4 Remove all the paper from the rear MP tray 5 Clean the rear MP tray using a soft brush 6 Clean the scanner glass with a soft lint free cloth microfiber is recommended moistened with a little glass cleaner Caution Do not spray glass cleaner directly on the glass and do not press the glass surface with any force 7 Open the ADF cover and use a soft dry lint free cloth microfiber is recommen...

Страница 152: ... Get Help Product Status Messages You can often diagnose problems with your product by checking the messages on its LCD screen You can also press the Help button to view help topics LCD screen message Condition solution Paper out or paper jam Follow the instructions on the screen to load paper in the indicated paper source or check for paper jams Paper jam Follow the instructions on the screen to ...

Страница 153: ...ded printing or press You can only use either of the Start buttons to continue printing on one side of the currently Letter A4 size plain loaded paper paper for 2 sided print Data error Document A problem with the print data such as the inclusion of compressed data has was not printed occurred Check the print data Cannot print because Press either of the Start buttons to cancel the current job and...

Страница 154: ...g a Product Check Running a product check helps you determine if your product is operating properly 1 Disconnect any interface cables connected to your product 2 Load plain paper in the product 3 Press the Setup button 4 Press the arrow buttons to select Maintenance and press the OK button You see this screen 5 Press the OK button You see this screen 154 ...

Страница 155: ...ts and the nozzle check pattern is complete the product is operating properly Any operation problem you may have could be caused by your computer cable software or selected settings Check the other solutions in this book or try uninstalling and reinstalling your printer software If the page prints but the nozzle check pattern has gaps clean or align the print head 155 ...

Страница 156: ...ve a problem with settings on the product control panel you can reset them to their factory defaults You can choose which settings to reset or reset them all 1 Press the Setup button 2 Press the arrow buttons to select Restore Default Settings and press the OK button You see this screen 3 Select one of these options and press the OK button Fax Send Receive Settings Resets all settings for sending ...

Страница 157: ...blems while installing the product software try these solutions Make sure the product is turned on and any necessary cables are securely connected at both ends Also make sure the computer meets the operating system requirements Close any other programs including screen savers and virus protection software and install the product software again In Windows make sure the product is selected as the de...

Страница 158: ...s To view LCD screen text in a different language select a different language setting for the panel To turn off the beep heard when you press a button turn off the panel s sound setting This also turns off the dialing sound for sending faxes Parent topic Solving Setup Problems Related tasks Changing LCD Screen Language Turning Off Control Panel Sounds Solving Network Problems Check these solutions...

Страница 159: ...phrase for connection Then make sure to enter the exact WEP key or WPA passphrase correctly Check if your computer is restricting the available wireless channels If so verify that your wireless access point is using one of the usable channels and change to a usable channel if necessary If you need to set up the product with a static IP address use the EpsonNet Config utility Parent topic Solving N...

Страница 160: ...is set correctly for your network If your network does not assign IP addresses using DHCP set the IP address manually If network printing is slow print a network status sheet and check the signal strength If it is poor place your product closer to your router or access point Note Avoid placing your product near a microwave oven 2 4 GHz cordless phone or large metal object such as a filing cabinet ...

Страница 161: ...ettings Windows Click or Start All Programs or Programs EPSON EPSON Scan EPSON Scan Settings Make sure the Connection setting is set to Network then click the Test button Make sure the option selected as the Timeout Setting in the Epson Scan Settings program is long enough to complete scanning over a network You may need to disable the firewall and any anti virus software on your wireless router o...

Страница 162: ...e problems copying with your product Product Makes Noise But Nothing Copies Product Makes Noise When It Sits for a While Parent topic Solving Problems Product Makes Noise But Nothing Copies If your product makes a noise but nothing copies try these solutions Run a nozzle check to see if any of the print head nozzles are clogged Then clean the print head if necessary If the nozzle check page does n...

Страница 163: ...blems feeding paper try these solutions If paper does not feed for printing remove it from the tray or cassette Reload it against the right side then adjust the edge guides Make sure the paper stack is not above the tab on the edge guides inside the cassette If multiple pages feed at once remove the paper fan the edges to separate the sheets and reload it Do not load more than the recommended numb...

Страница 164: ...r Document Jams in the Automatic Document Feeder Paper Loading Capacity Related topics Loading Paper Paper Jam Problems Inside the Product If paper has jammed inside the product try these solutions 1 Cancel the print job from your computer if necessary 2 Open the front cover 3 Remove any paper inside including torn pieces 164 ...

Страница 165: ...4 Close the front cover 5 If any jammed paper remains near the output tray carefully remove it 6 Press either of the Start buttons to resume printing Parent topic Solving Paper Problems 165 ...

Страница 166: ...lems in the Duplexer Paper Jam Problems in the Cassette If paper has jammed in the cassette try this solution 1 Close the output tray 2 Pull out the paper cassette 3 Remove any jammed paper inside the cassette 4 Remove any paper jammed inside the paper cassette slot 166 ...

Страница 167: ...5 Carefully follow all paper loading instructions when you load new paper 6 Replace the paper cassette 167 ...

Страница 168: ...erences Paper Jam Problems Inside the Product Paper Jam Problems in the Duplexer Paper Jam Problems in the Duplexer If paper has jammed in the duplexer rear unit try these solutions 1 Cancel the print job from your computer if necessary 2 Press the buttons on the sides of the duplexer and remove it 168 ...

Страница 169: ...3 Carefully remove the jammed paper 4 If paper is jammed in the duplexer remove the paper as shown 169 ...

Страница 170: ...xer as you press it into place on your product 6 Press either of the Start buttons to resume printing Parent topic Solving Paper Problems Related references Paper Jam Problems Inside the Product Paper Jam Problems in the Cassette 170 ...

Страница 171: ...c Document Feeder Document Jams in the Automatic Document Feeder If you have problems with document jams in the automatic document feeder ADF try these solutions 1 Remove your originals from the ADF 2 Open the ADF cover 3 Remove any jammed pages 171 ...

Страница 172: ...Caution Do not remove pages jammed inside the ADF without opening the cover or you could damage the ADF 4 Leave the ADF cover open then raise the document cover 5 Remove any jammed pages 172 ...

Страница 173: ...6 Lower the document cover 7 Raise the ADF input tray 8 Carefully remove the jammed pages 173 ...

Страница 174: ...to clear any error messages Parent topic Solving Paper Problems Related tasks Placing Originals in the Automatic Document Feeder Paper Ejection Problems If you have problems with paper ejecting properly try these solutions If paper does not eject fully you may have set the wrong paper size Cancel printing to eject the paper Select the correct paper size when you reprint If paper is wrinkled when i...

Страница 175: ...ct s control panel for error messages The PCL and PostScript printing software will not display any error messages on your computer screen if a printing error occurs Make sure your product is selected as the printer in your printing program Parent topic Solving PCL PostScript Problems Settings Are Missing from the PCL or PostScript Printer Software If certain settings are missing or incorrect in t...

Страница 176: ...tton 3 Press either of the Start buttons to print the PS3 status sheet Press the Stop Reset button if you want to cancel the operation Examine the settings shown on the network status sheet to diagnose any problems you have Parent topic Solving PCL PostScript Problems Solving Problems Printing from a Computer Check these sections if you have problems while printing from your computer Note For prob...

Страница 177: ...lect All apps Select Control Panel Hardware and Sound Devices and Printers Right click your product name select See what s printing and select your product name again if necessary Right click the stalled print job click Cancel and click Yes Windows 7 Click and select Devices and Printers Right click your product name select See what s printing and select your product name again if necessary Right ...

Страница 178: ...the Shortcut Icon box 8 Click OK to close the open program windows Parent topic Solving Problems Printing from a Computer Printing is Slow If printing becomes slow try these solutions Make sure your system meets the requirements for your operating system If you are printing a high resolution image you may need more than the minimum requirements If necessary increase your system s memory If you are...

Страница 179: ...h Speed Copies Always spool RAW datatype Page Rendering Mode Print as Bitmap Parent topic Solving Problems Printing from a Computer Related references Paper or Media Type Settings Windows System Requirements Related tasks Selecting Basic Print Settings Standard Epson Printer Software Windows Solving Page Layout and Content Problems Check these sections if you have problems with the layout or conte...

Страница 180: ...etting in your printing program or printer software is not set for multiple copies Parent topic Solving Page Layout and Content Problems Related tasks Selecting Additional Layout and Print Options Standard EPSON Printer Software Windows Blank Pages Print If blank pages print unexpectedly try these solutions Make sure you selected the correct paper size settings in your printing program and printer...

Страница 181: ...ected at both ends In Windows delete all print jobs from the Windows Spooler Windows 8 Navigate to the Start screen right click the screen and select All apps Select Control Panel Hardware and Sound Devices and Printers Right click your product name select See what s printing and select your product name again if necessary Right click the stalled print job click Cancel and click Yes Windows 7 Clic...

Страница 182: ...nt topic Solving Page Layout and Content Problems Related tasks Selecting Basic Print Settings Standard Epson Printer Software Windows Selecting Additional Layout and Print Options Standard EPSON Printer Software Windows Slanted Printout If your printouts are slanted try these solutions Select a higher print quality setting in your printer software Align the print head Make sure the product is not...

Страница 183: ...r product Turn off any high speed settings in your product software Use the Maintenance option in your product software to align the print head You may need to have ink replaced Parent topic Solving Print Quality Problems Related concepts Print Head Cleaning Print Head Alignment Related references Paper or Media Type Settings Related tasks Selecting Additional Layout and Print Options Standard EPS...

Страница 184: ... a nozzle check to see if any of the print head nozzles are clogged Then clean the print head if necessary Align the print head Clean the paper path Note Your product will not operate properly while tilted at an angle Place it on a flat stable surface that extends beyond the base of the product in all directions Parent topic Solving Print Quality Problems Related concepts Print Head Alignment Prin...

Страница 185: ...ing Basic Print Settings Standard Epson Printer Software Windows Cleaning the Paper Path Related topics Replacing Ink and Maintenance Boxes Grainy Printout If your printouts are grainy try these solutions Make sure you loaded the printable side of the paper correctly for your product Select a higher print quality setting and turn off any high speed settings in your product software Run a nozzle ch...

Страница 186: ...n colors However you can use a color management system to get as close as possible Try using the color management options in your printer software For best results use genuine Epson ink and paper Parent topic Solving Print Quality Problems Related concepts Print Head Cleaning Related references Available Epson Papers Related tasks Selecting Additional Layout and Print Options Standard EPSON Printe...

Страница 187: ...re securely connected at both ends Make sure Epson Scan is selected in your scanning program Make sure your computer is not running in a power saving mode such as sleep or standby If so wake your system and restart Epson Scan Check the connection setting and test the connection using Epson Scan Settings Windows 8 Navigate to the Start screen and select EPSON Scan Settings Make sure the correct Con...

Страница 188: ...structions on your Software Setup Guide sheet to install the standard Epson printer software Parent topic Solving Scanning Problems Solving Scanned Image Quality Problems Check these sections if a scanned image on your computer screen has a quality problem Image Consists of a Few Dots Only Line of Dots Appears in All Scanned Images Straight Lines in an Image Appear Crooked Image is Distorted or Bl...

Страница 189: ... lines in an original appear crooked in a scanned image make sure to place your original straight when you scan it Parent topic Solving Scanned Image Quality Problems Related topics Placing Originals on the Product Image is Distorted or Blurry If a scanned image appears distorted or blurry try these solutions Make sure your original is not wrinkled or warped This may prevent the original from layi...

Страница 190: ...ing Scanned Image Quality Problems Related topics Selecting Epson Scan Settings Back of Original Image Appears in Scanned Image If an image from the back of a thin original appears in your scanned image place a piece of black paper on the back of the original and scan it again Parent topic Solving Scanned Image Quality Problems Ripple Patterns Appear in an Image You may see a ripple pattern called...

Страница 191: ... if available and try scanning again Change the Image Type setting and experiment with different combinations of the next settings Adjust the Tone Correction setting Adjust the Auto Exposure setting Parent topic Solving Scanned Image Quality Problems Related topics Selecting Epson Scan Settings Scan Area is Not Adjustable in Thumbnail Preview If you cannot adjust the scan area while viewing a Thum...

Страница 192: ...can uninstall and then re install your product software to solve certain problems 1 Turn off the product 2 Disconnect any interface cables 3 Do one of the following Windows 8 Navigate to the Start screen right click the screen and select All apps Select Control Panel Programs Programs and Features Select the uninstall option for your Epson product then select Uninstall Change Note If you see a Use...

Страница 193: ...ve 6 Restart your computer then re install your software Note If you find that re installing your product software does not solve a problem contact Epson Parent topic When to Uninstall Your Product Software Uninstalling Product Software PCL Printer Software Windows You can uninstall and then re install your product software to solve certain problems Note You cannot uninstall the PostScript printer...

Страница 194: ...Vista Select Epson Scan and click Uninstall Change Windows XP Select Epson Scan and click Change Remove 8 Restart your computer then re install your software Note If you find that re installing your product software does not solve a problem contact Epson Parent topic When to Uninstall Your Product Software Where to Get Help If you need to contact Epson for technical support services call 888 201 4...

Страница 195: ... ADF Specifications Paper Specifications Printable Area Specifications Dimension Specifications Electrical Specifications Environmental Specifications Interface Specifications External USB Device Specifications Network Interface Specifications Safety and Approvals Specifications PS3 Mode Fonts PCL5 Mode Fonts PCL6 Mode Fonts Symbol Sets Windows System Requirements To use your product and its softw...

Страница 196: ...eets at 17 to 24 lb 64 to 90 g m2 Paper cassette capacity Approximately 250 sheets at 17 to 24 lb 64 to 90 g m2 Parent topic Technical Specifications Related references Paper Loading Capacity Scanning Specifications Scanner type Flatbed color Photoelectric device CIS Effective pixels 10 200 14 040 pixels at 1200 dpi Document size Maximum 8 5 11 7 inches 216 297 mm Scanner glass US letter or A4 Sca...

Страница 197: ...b 64 g m2 to 24 lb 95 g m2 Sheet feeding capacity Total thickness 0 12 inch 3 mm Approximately 30 sheets US letter or A4 or 10 sheets legal You cannot use the 2 sided scanning feature with legal size paper Parent topic Technical Specifications Paper Specifications Use paper under normal conditions Temperature 59 to 77 ºF 15 to 25 ºC Humidity 40 to 60 RH Note Since the quality of any particular bra...

Страница 198: ...4 g m2 to 24 lb 90 g m2 Note You can load binder paper with holes in the rear MP tray The paper must be one of the following sizes Letter 8 5 11 inches 216 279 mm A4 8 3 11 7 inches 210 297 mm or Legal 8 5 14 inches 216 357 mm The holes must be within 0 74 inch 19 mm of the left edge of the page Envelopes Size No 10 4 1 9 5 inches 105 241 mm Paper types Plain paper Weight 20 lb 75 g m2 to 24 lb 90...

Страница 199: ...ch 3 mm minimum 3 Right 0 12 inch 3 mm minimum 4 Bottom 0 12 inch 3 mm minimum With the PCL printer Software the minimum margin is 0 16 inch 4 mm With the PostScript printer software and standard Epson printer software the mimimum margin is 0 12 inch 3 mm 199 ...

Страница 200: ...pt printer software the mimimum margin is 0 12 inch 3 mm With the standard Epson printer software the minimum margin is 79 inch 20 mm The recommended margin for No 10 envelopes is 0 79 inch 20 mm Parent topic Technical Specifications Dimension Specifications Height Stored 13 4 inches 341 mm without ink tank Printing 15 1 inches 383 mm Width Stored 18 1 inches 460 mm without ink tank Printing 18 1 ...

Страница 201: ...range 50 60 Hz Input frequency range 49 5 60 5 Hz Rated current 0 7 0 35 A Power consumption Standalone copying mode 19 W ISO IEC24712 Ready mode 9 W Sleep mode 2 4 W Power off mode 0 3 W Parent topic Technical Specifications Environmental Specifications Temperature Operating 50 to 95 ºF 10 to 35 ºC Storage 4 to 104 ºF 20 to 40 ºC 1 month at 104 ºF 40 ºC Humidity Operating 20 to 80 RH non condensi...

Страница 202: ...are powered via USB are not recommended Magneto optical drive 1 3GB Hard disk and USB flash 2TB drives Formatted in FAT FAT32 or exFAT Parent topic Technical Specifications Network Interface Specifications Wireless LAN standard IEEE 802 11 b g n Wireless security WPA PSK TKIP AES WPA2 compliant WEP 64 128 bit Frequency band 2 4 GHz Communication mode Infrastructure mode and Ad hoc mode Ethernet st...

Страница 203: ... Bodoni Italic Bodoni Bold Bodoni Bold Italic Bodoni Poster Bodoni Poster Compressed ITC Bookman Light ITC Bookman Light Italic ITC Bookman Demi ITC Bookman Demi Italic Carta Chicago Clarendon Clarendon Light Clarendon Bold CooperBlack CooperBlack Italic Copperplate Gothic 32BC Copperplate Gothic 33BC Coronet Courier Courier Oblique Courier Bold Courier Bold Oblique GillSans GillSans Italic GillSa...

Страница 204: ...ique Marigold Monaco ITC Mona Lisa Recut New Century Schoolbook Roman New Century Schoolbook Italic New Century Schoolbook Bold New Century Schoolbook Bold Italic New York Optima Optima Italic Optima Bold Optima Bold Italic Oxford Palatino Roman Palatino Italic Palatino Bold Palatino Bold Italic Stempel Garamond Roman Stempel Garamond Italic Stempel Garamond Bold Stempel Garamond Bold Italic Symbo...

Страница 205: ...bon 131 Coronet Clarendon 701 Clarendon Condensed Swiss 742 Medium Bold Italic Bold Italic Univers Swiss 742 Condensed Medium Bold Italic Bold Italic Univers Condensed Incised 901 Medium Bold Italic Antique Olive Aldine 430 Medium Bold Italic Bold Italic Garamond Calligraphic 401 Marigold Flareserif 821 Medium Extra Bold Albertus Ryadh BT Medium Bold Ryadh Miryam BT Medium Bold Italic Miryam David...

Страница 206: ...ld Italic Bold Italic New Century Schoolbook Dutch 801 SWA Medium Bold Italic Bold Italic Times Chancery 801 Medium SWA ITC Zapf Chancery Medium Italic Italic Symbol SWM Symbol Symbol SWA SymbolPS More WingBats SWM Wingdings FixedPitch 850 Regular Bold Italic Letter Gothic Naskh BT Medium Bold Naskh Koufi BT Medium Bold Koufi FixedPitch 810 Dark Medium Bold Italic Bold Italic CourierPS Line Printe...

Страница 207: ...ch 850 Bold 1 FixedPitch 850 Italic 1 FixedPitch 810 Dark 3 FixedPitch 810 Dark Bold 3 FixedPitch 810 Dark Italic 3 FixedPitch 810 Dark Bold Italic 3 Dutch 801 2 Dutch 801 Bold 2 Dutch 801 Italic 2 Dutch 801 Bold Italic 2 Zapf Humanist 601 3 Zapf Humanist 601 Bold 3 Zapf Humanist 601 Italic 3 Zapf Humanist 601 Bold Italic 3 Ribbon 3 Clarendon 3 Swiss 742 2 Swiss 742 Bold 2 207 ...

Страница 208: ...ed 901 Bold 3 Incised 901 Italic 3 Aldine 430 3 Aldine 430 Bold 3 Aldine 430 Italic 3 Aldine 430 Bold Italic 3 Calligraphic 401 3 Flareserif 821 Medium 3 Flareserif 821ExtraBold 3 Swiss 721 SWM 3 Swiss 721 SWM Bold 3 Swiss 721 SWM Italic 3 Swiss 721 SWM Bold Italic 3 Dutch 801 SWM 3 Dutch 801 SWM Bold 3 Dutch 801 SWM Italic 3 Dutch 801 SWM Bold Italic 3 Swiss 721 SWA 3 Swiss 721 SWA Bold 3 208 ...

Страница 209: ...ic 801 SWA Italic 3 Zapf Calligraphic 801 SWA Bold Italic 3 Geometric 711 SWA 3 Geometric 711 SWA Bold 3 Geometric 711 SWA Oblique 3 Geometric 711 SWA Bold Italic 3 Revival 711 Light SWA 3 Revival 711 Demi SWA Bold 3 Revival 711 Light SWA Italic 3 Revival 711 Demi SWA Bold Italic 3 Century 702 SWA 3 Century 702 SWA Bold 3 Century 702 SWA Italic 3 Century 702 SWA Bold Italic 3 Dutch 801 SWA 3 Dutch...

Страница 210: ... 4 David BT 7 David BT Bold 7 Narkis Tam BT 7 Narkis Tam BT Bold 7 Miryam BT 7 Miryam BT Bold 7 Miryam BT Italic 7 Koufi BT 8 Koufi BT Bold 8 Naskh BT 8 Naskh BT Bold 8 Ryadh BT 8 Ryadh BT Bold 8 Bitmap Font Font name Symbol set Line Printer 9 Parent topic Technical Specifications Related references Symbol Sets 210 ...

Страница 211: ...the typefaces and symbol sets When you consider which font to use also consider which symbol set to combine with the font Available symbol sets vary depending on the mode and font you choose PCL5 Mode Typefaces and Symbol Sets In the PCL5 mode symbol sets table you can use any of these typefaces in the left column Zapf Humanist 601 Ribbon 131 Clarendon 701 Swiss 742 Condensed Incised 901 Aldine 43...

Страница 212: ... Line Printer Legal 1U 8859 15ISO 9N FixedPitch 810 PcBlt775 26U Pc1004 9J Dutch 801 WiBALT 19L DeskTop 7J Swiss 742 PsText 10J Windows 9U FixedPitch 850 McText 12J MsPublishi 6J PiFont 15U VeMath 6M VeInternational 13J VeUS 14J PcE Europe 17U PcTk437 9T WiAnsi 19U WiE Europe 9E WiTurkish 5T UK 1E Swedis2 0S Italian 0I Spanish 2S German 1G Norweg1 0D French2 1F Roman 9 4U PcEur858 13U ISO 8859 4 L...

Страница 213: ...BT FixedPitch 810 Pc866Cyr 3R Pc866Ukr 14R Dutch 801 WinCyr 9R Pc8Grk 12G Swiss 742 Pc851Grk 10G WinGrk 9G FixedPitch 850 ISOGrk 12N Greek8 8G FixedPitch 810 ISOCyr 10N Dutch 801 Swiss 742 FixedPitch 850 Line Printer Line Printer Roman Extension 0E FixedPitch 810 Hebrew7 0H FixedPitch 850 ISO 8859 8 Hebrew 7H David BT Hebrew8 8H Narkis Tam BT PC 862 Hebrew 15H Miryam BT 213 ...

Страница 214: ...gdings 579L Ding Dings SWA ZapfDingbats 14L OCR A OCR A 0O OCR B OCR B 1O OCR B Extension 3Q Code3 9 Code3 9 0Y EAN UPC EAN UPC 8Y PCL6 Mode Symbol Sets Symbol set Attribute Font classification name 1 2 3 4 5 6 7 8 9 ISO Norwegian 4 ISO Italian 9 ISO 8859 1 14 Latin 1 ISO Swedish 19 ASCII 21 ISO United 37 Kingdom ISO French 38 ISO German 39 Legal 53 214 ...

Страница 215: ... 83 Roman 9 149 PS Math 173 ISO 8859 9 174 Latin 5 Windows 3 1 180 Latin 5 Microsoft 202 Publishing ISO 8859 10 206 Latin 6 DeskTop 234 Math 8 269 Roman 8 277 Windows 3 1 293 Latin 2 Pc1004 298 ISO 8859 15 302 Latin 9 PC Turkish 308 Windows 3 0 309 PS Text 330 PC 8 341 PC 8 D N 373 MC Text 394 215 ...

Страница 216: ...i Font 501 PC852 565 Unicode 3 0 590 WBALT 620 Windows 3 1 629 Latin 1 PC 755 853 Wingdings 18540 Symbol 621 ZapfDigbats 460 PC 866 114 Cyrillic Greek8 263 Windows 295 Greek Windows 306 Cyrillic PC 851 Greek 327 ISO 8859 5 334 Cyrillic PC 8 Greek 391 ISO 8859 7 398 Greek PC 866 UKR 466 216 ...

Страница 217: ...ssification name 1 2 3 4 5 6 7 8 9 Hebrew7 8 ISO 8859 8 232 Hebrew Hebrew8 264 PC 862 488 Hebrew Arabic8 278 HPWARA 310 PC 864 Arabic 342 Parent topic Technical Specifications Related references PCL6 Mode Fonts PCL5 Mode Fonts 217 ...

Страница 218: ...the printer into an outlet on the same circuit as a photo copier or air control system that regularly switches on and off or on an outlet controlled by a wall switch or timer Do not let the power cord become damaged or frayed If you use an extension cord with the printer make sure the total ampere rating of the devices plugged into the extension cord does not exceed the cord s ampere rating Also m...

Страница 219: ... products that contain flammable gases inside or around the printer Doing so may cause fire Except as specifically explained in your documentation do not attempt to service the printer yourself Unplug the printer and refer servicing to qualified service personnel under the following conditions if the power cord or plug is damaged if liquid has entered the product if the product has been dropped or...

Страница 220: ...s in a cool dark place After bringing an ink pack inside from a cold storage site allow it to warm up at room temperature for at least three hours before using it Parent topic General Printer Safety Instructions LCD Screen Safety Instructions Use only a dry soft cloth to clean the LCD screen Do not use liquid or chemical cleansers If the LCD screen is damaged contact Epson If the liquid crystal so...

Страница 221: ...o frequency energy and if not installed and used in accordance with the instructions may cause harmful interference to radio or television reception However there is no guarantee that interference will not occur in a particular installation If this equipment does cause interference to radio and television reception which can be determined by turning the equipment off and on the user is encouraged ...

Страница 222: ...ce code above please contact the customer support of your region You shall comply with the license terms of each open source software program 3 The open source software programs are WITHOUT ANY WARRANTY without even the implied warranty of MERCHANTABILITY AND FITNESS FOR A PARTICULAR PURPOSE See the license agreements of each open source software program for more details which are described in OSS...

Страница 223: ..._1 60 netbase_4 14 procps_3 1 14 sysvinit 2 85 telnetd_0 17 21 udhcp 0 9 8cvs20050124 5 util linux 2 12 GNU LGPL This printer product includes the open source software programs which apply the GNU Lesser General Public License Version 2 or later version LGPL Programs The list of LGPL Programs inetutils ftpd_1 4 2 libc6_2 3 6 procps_3 1 14 sysvinit 2 85 zeroconf 0 6 1 1 iksemel 1 4 223 ...

Страница 224: ...uct includes t he open source software program OpenSSL toolkit which applies the license terms of OpenSSL License and Original SSLeay License BSD License Berkeley Software Distribution License This printer product includes the open source software programs which apply the Berkeley Software Distribution License BSD Programs The list of BSD Programs busybox_1 7 2 coreutils_5 2 1 ftp_0 17 libc6_2 3 6...

Страница 225: ... libwrap0_7 6 libncurses license This printer product includes the open source software program libncurses which applies the terms and conditions provided by owner of the copyright to the libncurses libncurses Program libncurses5_5 busybox license This printer product includes the open source software program busybox which applies the terms and conditions provided by owner of the copyright to the ...

Страница 226: ...r Vision is a registered logomark of Seiko Epson Corporation Epson StoreSM is a service mark of Epson America Inc Epson iPrintTM is a trademark of Seiko Epson Corporation General Notice Other product names used herein are for identification purposes only and may be trademarks of their respective owners Epson disclaims any and all rights in those marks Parent topic Notices Default Delay Times for P...

Страница 227: ... from the use of any options or any consumable products other than those designated as Original Epson Products or Epson Approved Products by Seiko Epson Corporation Seiko Epson Corporation shall not be held liable for any damage resulting from electromagnetic interference that occurs from the use of any interface cables other than those designated as Epson approved Products by Seiko Epson Corporat...

Страница 228: ...ukonen All Rights Reserved Redistribution and use in source and binary forms with or without modification are permitted provided that this copyright notice and disclaimer are retained THIS SOFTWARE IS PROVIDED BY KALLE KAUKONEN AND CONTRIBUTORS AS IS AND ANY EXPRESS OR IMPLIED WARRANTIES INCLUDING BUT NOT LIMITED TO THE IMPLIED WARRANTIES OF MERCHANTABILITY AND FITNESS FOR A PARTICULAR PURPOSE ARE...

Страница 229: ... OR SILICON GRAPHICS BE LIABLE FOR ANY SPECIAL INCIDENTAL INDIRECT OR CONSEQUENTIAL DAMAGES OF ANY KIND OR ANY DAMAGES WHATSOEVER RESULTING FROM LOSS OF USE DATA OR PROFITS WHETHER OR NOT ADVISED OF THE POSSIBILITY OF DAMAGE AND ON ANY THEORY OF LIABILITY ARISING OUT OF OR IN CONNECTION WITH THE USE OR PERFORMANCE OF THIS SOFTWARE Parent topic Copyright Notice A Note Concerning Responsible Use of ...

Отзывы: