background image


Installing the paper roll in the TM-U300D/U300PD

Be sure to use roll paper that matches the printer’s specifications. See Appendix
A, Specifications.

➀ 

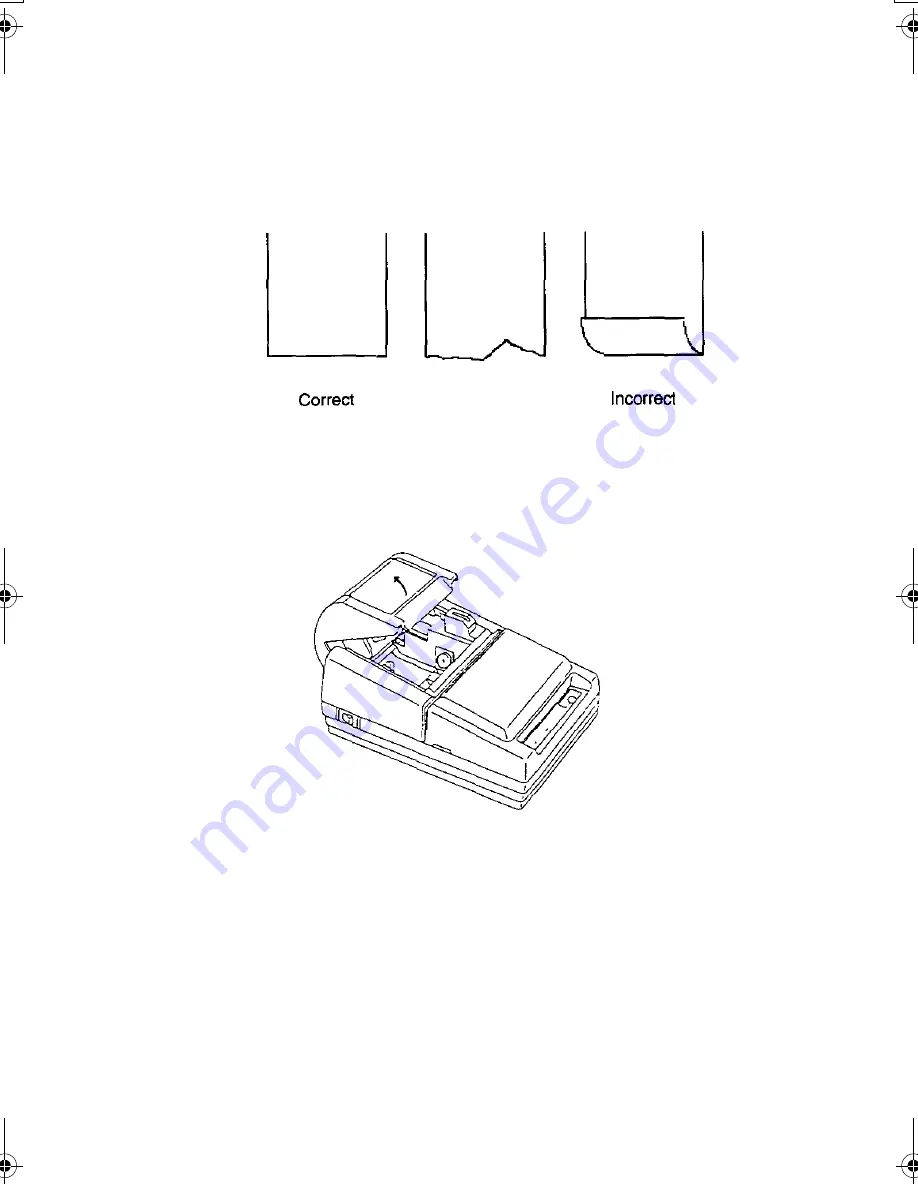
Using scissors, cut the leading edge of the roll paper so that it is perpendicular

to the paper feed direction.

Incorrect

➁ 

Open the roll paper cover.

14

TM-U300CD.fm  19 ページ  2006年3月14日 火曜日 午前9時57分

Содержание TM-U300D

Страница 1: ...TM U300C U300D TM U300PC U300PD User s Manual 400204507 ...

Страница 2: ...er of this product or third parties for damages losses costs or expenses incurred by purchaser or third parties as a result of accident misuse or abuse of this product or unauthorized modifications repairs or alterations to this product or excluding the U S failure to strictly comply with Seiko Epson Corporation s operating and maintenance instructions Seiko Epson Corporation shall not be liable a...

Страница 3: ... The printer conforms to the following Directives and Norms Directive 89 336 EEC EN 55022 Class B EN 55024 IEC 61000 4 2 IEC 61000 4 3 IEC 61000 4 4 IEC 61000 4 5 IEC 61000 4 6 IEC 61000 4 11 FCC Compliance Statement For American Users This equipment has been tested and found to comply with the limits for a Class A digital device pursuant to Part 15 of the FCC Rules These limits are designed to pr...

Страница 4: ...feeding Two print colors black or red Selectable paper feeding increments for various print formats Command protocol based on the ESC POS standard Internal drawer interface that can control two drawers Two character fonts 7 X 9 or 9 X 9 Semi automatic paper loading Compact AC adapter 1 line validation printing Roll paper take up device for the TM U300C and the TM U300PC The table below describes t...

Страница 5: ...Adapter to the Printer 5 2 2 Connecting the Host Computer to the Printer 6 Chapter 3 Installing the Printer Parts 8 3 1 Installing the Ribbon Cassette 8 3 2 Installing the Paper Roll 1 1 3 3 Adjusting the Paper Near End Detector Location 19 3 4 Inserting a Cut Sheet Validation Paper 21 Chapter 4 Setting the DIP Switches 23 Chapter 5 The Self Test 26 Chapter 6 Removing Jammed Paper 27 6 1 Removing ...

Страница 6: ...not be provided in the package If it is not make sure to use a power cord that complies with the safety standards applied 2 Hexagonal lock screws are provided only if the printer has a serial interface See note on page 7 for more information about these screws Make sure you have all the items shown above If any items are damaged or miss ing please contact your dealer for assistance Keep the origin...

Страница 7: ...use or store the printer in a dusty or dirty area Choose a stable horizontal surface for the printer Avoid places subject to intense vibration or shock Make sure there is enough space around the printer so that it can be used easily 1 3 Removing the Transportation Damper The transportation damper must be removed before turning on the printer Open the printer cover and remove the damper as shown be...

Страница 8: ...Part names Take up device cover TM U300C U300PC Interface connector Roll paper cover TM U300D U300PD Drawer kick out connector Printer cover Power connector Control panel DIP switches Power switch TM U300C U300PC TM U300D U300PD 3 ...

Страница 9: ...e POWER LED is on when the printer is turned on and off when the printer is turned off PAPER LED red Normally the PAPER LED is off The PAPER LED is on when the paper roll is nearly finished or completely finished or the paper roll is not installed The PAPER LED flashes when an error occurs when validation paper must be inserted or removed when the self test enters the printing standby state or whe...

Страница 10: ...he printer do not plug in the power cord if the rated voltage of the AC adapter and your outlet voltage do not match Plug the DC cord connector into the printer s power connector with the arrow mark facing upward You can remove the DC cord by grasping the connector firmly at the arrow mark and pulling it straight out Power Connector Frame Ground Screw Frame ground cable AC Adapter Ground the print...

Страница 11: ... tighten the screws on both sides of the connector Plug the drawer kick out cable connector into the printer s drawer kick out con nector You can remove the drawer kick out cable by pressing in the connector s clip and pulling out the connector rawer Kick out Connector Drawer Kick out Cable Interface Connector Serial Interface Cable NOTE Your printer comes with inch type hexagonal lock screws inst...

Страница 12: ......

Страница 13: ... the ribbon cassette Use Epson ribbon cassette ERC 34 B R Follow these steps to install the ribbon cassette Open the printer cover while lightly pressing the printer cover as shown below Turn the ribbon tightening knob in the direction of the arrow to take up any slack in the ribbon 8 ...

Страница 14: ......

Страница 15: ...e printer cover while lightly pressing the printer cover as shown below To remove the ribbon cassette grasp the tab on the left side and lift the left side out first To install a new ribbon cassette follow steps through in the previous section Installing the ribbon cassette 1O ...

Страница 16: ...o that it is perpendicular to the paper feed direction Correct Incorrect Incorrect Open the take up device cover and remove the take up spool from the printer Load the paper roll while lightly pressing the left paper roll holder outward Re lease the holder after fitting the roll paper core onto the holder Make sure the paper roll turns freely and be sure to load the paper roll so that it rotates i...

Страница 17: ...inter semi automatic loading Press the FEED button to continue feeding the paper until it extends about 20 cm 8 inches beyond tear off edge Remove the side board of the take up spool and insert the end of the roll paper or journal paper when using 2 or 3 ply paper into the groove on the take up spool Wrap the paper around the spool two or three times and then replace the side board of the take up ...

Страница 18: ...e gear on the printer on the take up Close the take up device cover Tear off any extra paper at the tear off edge by pulling the paper toward you CAUTION The extra paper must be torn off after closing the take up device cover so that roll paper comes out correctly from the paper exit 13 ...

Страница 19: ...PD Be sure to use roll paper that matches the printer s specifications See Appendix A Specifications Using scissors cut the leading edge of the roll paper so that it is perpendicular to the paper feed direction Incorrect Open the roll paper cover 14 ...

Страница 20: ...ll so it rotates in the correct direc tion Correct Incorrect Turn on the printer The POWER LED goes on While leaving some slack in the paper roll Insert the end of the roll paper straight into the paper inlet The printer automatically feeds the roll paper into the printer semi automatic loading Press the FEED button to continue feeding the paper if insufficient paper is fed by the semi automatic l...

Страница 21: ... cover Tear off any extra paper at the tear off edge by pulling the paper toward you CAUTION The extra paper must be torn off after closing the roll paper cover so that roll paper comes out correctly from the paper exit 16 ...

Страница 22: ...he take up spool using the tear off edge Then remove the roll paper core If there is roll paper remaining cut the paper straight across using scissors at the place shown in illustration below While pressing the FEED switch remove the remaining roll paper in the printer by pulling the paper lightly out in the direction of the arrow Cut here if there is paper remaini To install a new paper roll see ...

Страница 23: ...r core If there is roll paper remaining cut the paper straight across using scissors at the place shown in illustration below While pressing the FEED button remove the remaining roll paper in the printer by pulling the paper lightly out in the direction of the arrow Cut here if there is paper remainin To install a new paper roll see Installing the paper roll in the TM U300D U300PD on page 14 ...

Страница 24: ......

Страница 25: ......

Страница 26: ......

Страница 27: ...he edges wrinkles or warps Otherwise the paper may rub against the ribbon and become dirty or the paper could catch on the ribbon Select multi ply paper carefully because the gluing conditions glue quality gluing method glued length etc and the position of the glued area affect paper insertion insert the validation paper so that the glued position is on the left or top edge of the paper as seen fr...

Страница 28: ...in figure below The tables on the following pages describes the DIP switch functions Setting the DIP switches Follow these steps when changing DIP switch settings Turn the printer power switch off Flip the DIP switches using tweezers or another narrow ended tool Switches are on when up and off when down in the figure below DIP Switches TM U300PC U300PD The new setting takes effect when you turn on...

Страница 29: ...0D DIP Switch Functions Table 4 1 TM U300C U300D DIP Switch Functions Baud rate selection Refer to Table 4 2 Do not change the settings of DIP switches 9 and 10 on the TM U300C U300D Table 4 2 Baud Rate Selection 24 ...

Страница 30: ... TM U300PC U300PD DIP Switch Functions Table 4 3 TM U300PC U300PD DIP Switch Functions Do not change the settings of DIP switches 3 through 6 on the TM U300PC U300PD 25 ...

Страница 31: ...he power while holding down the FEED button The self test begins First the self test prints the current printer status which provides the following information Control ROM version After printing the current printer status it prints Self test printing Please press FEED switch The PAPER LED flashes and the printer enters the test printing standby state Press the FEED button to restart test printing ...

Страница 32: ...Chapter 6 Removing Jammed Paper 6 1 Removing Jammed Paper Turn the paper feed knob as shown below and remove any jammed paper It may be easier if you cut the roll paper or remove the printer cover ...

Страница 33: ...listed above Because switching operations are required for red printing or black red printing their printing speeds are slower than the black printing speed LPS Lines Per Second CPI Characters Per Inch Characters per line Refer to Table A 1 Characters per inch Refer to Table A 1 Print color switching Selectable black or red printing 2 Character Specifications Number of characters Alphanumeric 95 G...

Страница 34: ...inting pattern Temperature Exclusive ribbon cassette ERC 38 Black and Red Black Red Single color ribbon Part No ERC 34 B black and P color ribbon Part No ERC 34 B R black and red are also available When using these ribbons the print color selection command ESC r must not be used Black Approx 1 500 000 characters Red Approx 750 000 characters 7 X 9 font with descenders 96 ASCII character rolling pa...

Страница 35: ...adjusted by the user Refer to section 3 3 Adjust ing the Paper Near End Detector Location ø 10 5 to 12 5 mm 0 41 to 0 49 Adjustable slider 5 Roll Paper Take up Device The TM U300C and TM U300PC are equipped with a take up device The paper is automatically taken up by the paper feed motor 6 Paper Paper feed method Paper feed pitch Paper feed speed Friction feed Default 1 6 inch Can be set in 1 144 ...

Страница 36: ... 1000 sheets 1091 mm x 788 mm Pressure sensitive paper Maximum 1 original 2 copies Copy capability is greatly influenced by the ambi ent temperature Refer to the table below Number of copies Ambient temperature Original 2 copies Approx 25 C 77 F Original I copy 5 to 40 C 41 to 104 F Validation paper Paper type Normal paper pressure sensitive paper carbon copy paper Paper width and paper length Pap...

Страница 37: ...ability Life Mechanism 7 500 000 lines Print head 100 million characters when printing an average of two dots wire character End of Life is defined as the point at which the printer reaches the beginning of the Wearout Period MTBF 180 000 hours Failure is defined as Random Failure occurring at the time of the Random Failure Period MCBF 18 000 000 lines This is an average failure interval based on ...

Страница 38: ...e the operating humidity is limited Storage 10 to 50 C 14 to 122 F excluding paper and ribbon Humidity Operating TM U300C U300PC 20 to 80 non condensing TM U300D U300PD 30 to 85 non condensing Storage TM U300C U300PC 20 to 90 non condensing excluding paper and ribbon TM U300D U300PD 30 to 90 non condensing excluding paper and ribbon 33 ...

Страница 39: ...nto de venta donde adquirió este producto Português A etiqueta com o símbolo de um contentor de lixo traçado com uma cruz que aparece no produto indica que este produto não deve ser deitado fora juntamente com o lixo doméstico Para evitar possíveis danos no ambiente ou na saúde pública por favor separe este produto de outros lixos desta forma terá a certeza de que pode ser reciclado através de mét...

Страница 40: ...oskrbite da bo recikliran na okolju prijazen način Natančne informacije o tem kje se nahajajo primerna odlagališča pridobite v vašem krajevnem uradu ali pri prodajalcu Eesti Teie tootele kleebitud tähis mis kujutab ratastega prügikonteinerit millele on rist peale tõmmatud keelab toote kõrvaldamise majapidamisjäätmetega sarnasel viisil Keskkonnale või inimeste tervisele tekitatava võimaliku kahju v...

Страница 41: ......

Страница 42: ......

Страница 43: ......

Страница 44: ...Printed in Japan 1999 12 ...

Отзывы: