background image

63

Chapter 3    Application Development Information

3

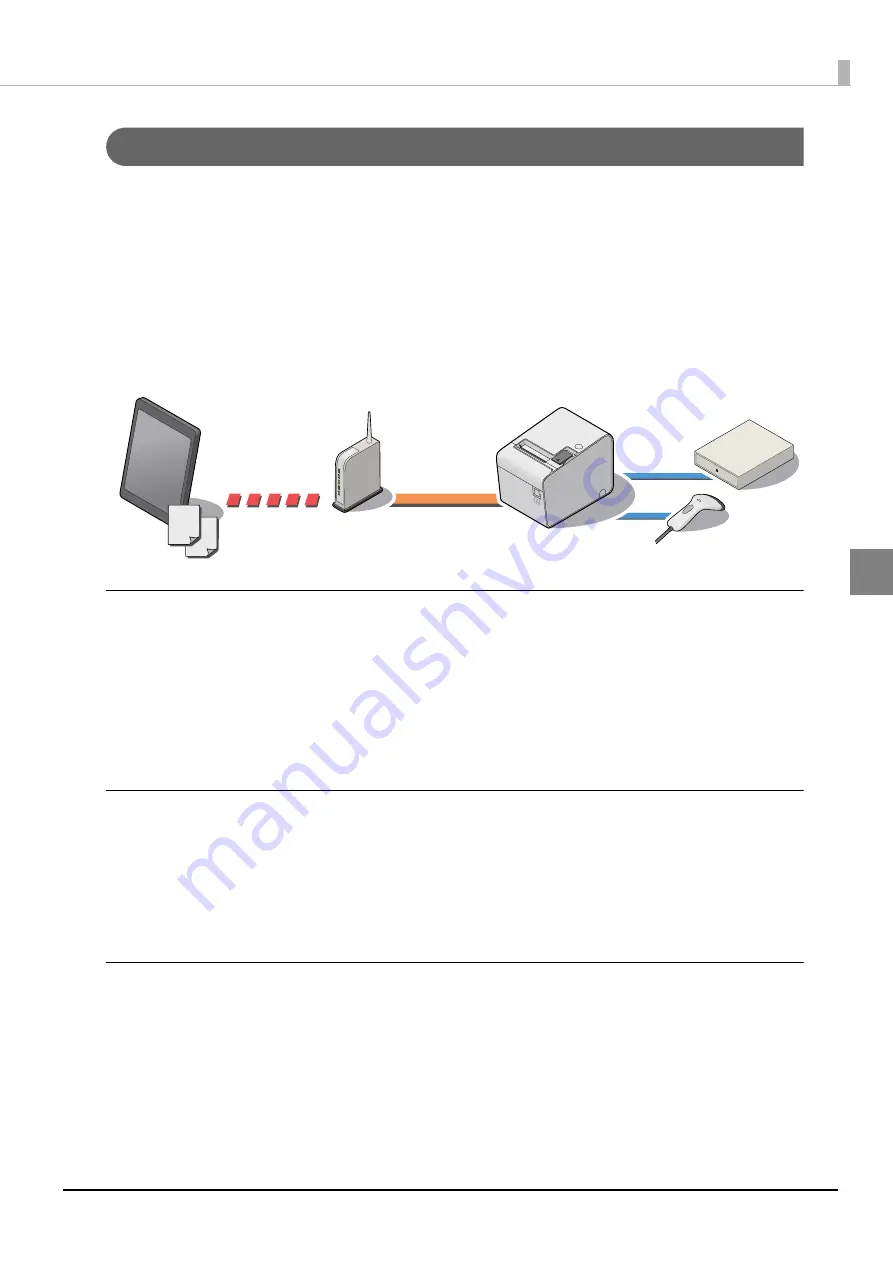
ePOS-Device SDK for iOS

ePOS-Dev

i

ce SDK for 

i

OS 

i

s a SDK for developers 

t

o e

n

able 

t

he 

u

se of 

t

h

i

s prod

u

c

t

 from 

i

OS 

appl

i

ca

ti

o

n

s. Th

i

s prov

i

des a

n

 API 

t

ha

t

 ca

n

 be 

u

sed from appl

i

ca

ti

o

n

s, a

n

d allows 

u

sers 

t

o co

nt

rol 

pr

inting

 a

n

d dev

i

ce co

nt

rols from 

i

OS 

t

erm

in

als.

Th

i

s SDK has 

t

he follow

ing

 fea

tu

res:

• I

t

 e

n

ables 

u

se of 

t

he follow

ing

 dev

i

ces v

i

t

h

i

s prod

u

c

t

:

•Pr

inting


t

o TM pr

int

ers o

n


t

he 

n

e

t

work

•Barcode sca

nn

er of USB 

int

erface, 

in

p

ut

 v

i

a keyboard, e

t

c.

•Tra

n

sm

i

ss

i

o

n

/recep

ti

o

n


t

o/from ser

i

al comm

uni

ca

ti

o

n

 dev

i

ce

Operation environment

Refer 

t

o ePOS-Dev

i

ce SDK for 

i

OS User's Ma

nu

al for 

t

he follow

ing


it

ems.

i

OS Dev

i

ce

i

OS Vers

i

o

n

• Developme

nt

 E

n

v

i

ro

n

me

nt

• Per

i

pherals

The package includes:

• ePOS-Dev

i

ce SDK for 

i

OS User’s Ma

nu

al

• Objec

ti

ve-C header f

i

les

• L

i

brary f

i

les for exec

uting

 f

un

c

ti

o

n

s

• Sample  pro

g

ram 

How to obtain

Dow

n

load from o

u

r web s

it

e.

Содержание TM-T83II

Страница 1: ... setup and installation of the product and peripherals Describes how to handle the product Describes general specifications and character code tables Describes features for the product Technical Reference Guide M00081200 Rev A Product Overview Setup Application Development Information Handling Appendix ...

Страница 2: ...or alterations to this product or excluding the U S failure to strictly comply with Seiko Epson Corporation s operating and maintenance instructions Seiko Epson Corporation shall not be liable against any damages or problems arising from the use of any options or any consumable products other than those designated as Original EPSON Products or EPSON Approved Products by Seiko Epson Corporation Tra...

Страница 3: ... carefully to avoid serious bodily injury CAUTION Provides information that must be observed to prevent damage to the equipment or loss of data Possibility of sustaining physical injuries Possibility of causing physical damage Possibility of causing information loss Provides information that must be observed to avoid damage to your equipment or a malfunction Provides important information and usef...

Страница 4: ...ce multiple loads on the power outlet Overloading the outlet may lead to fire Shut down your equipment immediately if it produces smoke a strange odor or unusual noise Continued use may lead to fire Immediately unplug the equipment and contact your dealer or a Seiko Epson service center for advice Never attempt to repair this product yourself Improper repair work can be dangerous Never disassemble...

Страница 5: ...on top of this product Never stand or lean on this product Equipment may fall or collapse causing breakage and possible injury Take care not to injure your fingers on the manual cutter When you remove printed paper When you perform other operations such as loading replacing roll paper Do not open the roll paper cover without taking the necessary precautions as this can result in injury from the au...

Страница 6: ...his product only after giving consideration to including fail safes and redundancies into your design to maintain safety and total system reliability Because this product was not intended for use in applications requiring extremely high reliability safety such as aerospace equipment main communication equipment nuclear power control equipment or medical equipment related to direct medical care etc...

Страница 7: ... systems order entry systems and other receipt issuing systems that use TM T83II i Manual Content The manual is made up of the following sections Chapter 1 Product Overview Chapter 2 Setup Chapter 3 Application Development Information Chapter 4 Handling Appendix Product Specifications Setting Items for Software Setting Mode Character Code Tables ...

Страница 8: ...per cover Cover open lever 15 Cutter cover 15 Control Panel 15 Interfaces 16 Status LED 17 Wired LAN Status LED 17 Push Button 18 Online and Offline 19 Online 19 Offline 19 Error Status 20 Automatically Recoverable Errors 20 Recoverable Errors 20 Unrecoverable Errors 21 NV Memory 22 NV Graphics Memory 22 Memory Switches Customized Value 22 R E Receipt Enhancement 22 Maintenance Counter 22 Setup 23...

Страница 9: ...Server Direct Print 56 Setting for Connected Devices 57 Registering Web Contents 59 Creating Web Contents 59 Registering Web Contents 61 Application Development Information 62 How to Control the Printer 62 ePOS Device SDK for iOS 63 ePOS Device SDK for Android 64 ePOS Device SDK for JavaScript 65 ePOS Device XML 66 Server Direct Print 68 Web Server 69 Software and Manuals 70 How to Get Manuals and...

Страница 10: ...mation Password 98 PHP settings 99 Status sheet 100 Setting Checking Modes 105 Self test Mode 105 NV Graphics Print Mode 106 Receipt Enhancement Information Print Mode 107 Software Setting Mode 108 Hexadecimal Dumping Mode 111 Easy Setup 112 Checking Updating TM i Firmware 113 Checking the TM i Firmware Version 113 Updating TM i Firmware 113 Handling 114 Installing and Replacing Roll Paper 114 Rem...

Страница 11: ...acter Code 18 152 Page 30 TCVN 3 Vietnamese 153 Page 31 TCVN 3 Vietnamese 154 Page 32 PC720 Arabic 155 Page 33 WPC775 Baltic Rim 156 Page 34 PC855 Cyrillic 157 Page 35 PC861 Icelandic 158 Page 36 PC862 Hebrew 159 Page 37 PC864 Arabic 160 Page 38 PC869 Greek 161 Page 39 ISO8859 2 Latin 2 162 Page 40 ISO8859 15 Latin 9 163 Page 41 PC1098 Farsi 164 Page 42 PC1118 Lithuanian 165 Page 43 PC1119 Lithuan...

Страница 12: ...ts Functions Enables connection to peripherals customer displays barcode scanners etc via a USB or serial interface Provides ePOS Device SDK for developing Web applications applications for iOS and Android Uses the communication box function to enable communications between applications This function allows for communications etc between tablet terminals ePOS Device SDK Supports Server Direct Prin...

Страница 13: ...ll paper guide for 58 mm width paper User s Manual Power switch cover Waterproof power switch cover Wall hanging bracket Screws for installing the wall hanging bracket Rubber feet for vertical installation Switch panel for vertical installation Options Affixing tape for fixing the printer Model DF 10 Buzzer unit Model OT BZ20 ...

Страница 14: ...r the power switch is also included CAUTION Before turning on the product be sure to check that the AC adapter is connected to the power supply After the product is turned on it requires about 30 seconds until it is ready to print WARNING If an accident occurs with the power switch cover attached unplug the power cord immediately Continued use of the printer may cause fire or electric shock Use th...

Страница 15: ...n online On Immediately after the power is turned on or immediately after a reset offline Automatically goes off after a while to indicate that the printer is ready The end of the roll paper is detected and when printing has stopped offline If this happens replace the roll paper Flashing An error has occurred For details about the flash codes see Error Status on page 20 Paper LED Off There is a su...

Страница 16: ...cation device CAUTION When connecting devices other than USB ports make sure to check the devices or manuals etc for current consumption The total value should be 800 mA or less Never use devices that provide no information on current consumption Make sure that the protective cover is securely fit into place while the product is oper ating For Ethernet ports make sure that the outdoor aerial LAN c...

Страница 17: ...uct LED Description On Green Operating normally On Orange Starting up If the status LED is on in orange even after 30 seconds have passed since the printer is turned on repair is required Off Power is not turned on If the status LED is off even if the printer is turned on repair is required LED Description Green On Link established Flashing Transmitting receiving data Off Link not established Yell...

Страница 18: ... on press the push button for approximately 10 seconds When you release the button network setting will be initialized See Initializing the Network Setting on page 55 To print a status sheet release the push button within 10 seconds If the button is kept down for 10 seconds or more the network setting will be initialized Press the push button after the status LED color has changed from orange to g...

Страница 19: ...itions During power on including resetting with the interface until the printer is ready During the self test When the roll paper cover is open While roll paper is fed using the Feed button When printing stops due to end of paper When the roll paper end sensor detects the end of paper or the printer is set so that printing stops upon detection of roll paper near end Macro execution standby state W...

Страница 20: ...wer on again after eliminating the cause of the error Error Error description Error LED flash code Recovery measure Roll paper cover open error The roll paper cover was opened during printing Recovers automatically when the roll paper cover is closed Print head temperature error A high temperature outside the head drive operating range was detected Recovers automatically when the print head cools ...

Страница 21: ...y R W error After R W checking the printer does not work correctly High voltage error The power supply voltage is extremely high Low voltage error The power supply voltage is extremely low CPU execution error The CPU is executing an incorrect address Internal circuit connection error Internal circuits are not connected correctly LED ON LED OFF Approx 160 ms LED ON LED OFF Approx 160 ms LED ON LED ...

Страница 22: ...See Setting the Memory Switches Receipt Enhancement on page 44 R E Receipt Enhancement Graphics such as shop logos can be printed on top or bottom of receipts by setting R E Receipt Enhancement For information about R E see Setting the Memory Switches Receipt Enhancement on page 44 Maintenance Counter With this function printer information such as the number of line feeds the number of autocuts an...

Страница 23: ...i series Easy Setup Guide Flow of Setup The setting items are different depending on the system to be used Check the items by referring to How to Control the Printer on page 62 ePOS Device SDK iOS Android JavaScript ePOS Device XML page 24 Server Direct Print page 25 Using This Product as a Web Server page 26 This chapter consists of the following sections along with the setup flow of the product ...

Страница 24: ...ing the Product page 27 Settings for Printer 2 Changing the Paper Width page 31 3 Adjusting the Paper Roll Near End Sensor page 32 4 Connecting the Peripherals page 36 5 Connecting the Product to the Network page 35 6 Connecting the AC Adapter page 42 7 Attaching the Power Switch Cover page 43 9 Network Setting page 53 10 Setting for Connected Devices page 57 ...

Страница 25: ...ing the Paper Roll Near End Sensor page 32 4 Connecting the Peripherals page 36 5 Connecting the Product to the Network page 35 6 Connecting the AC Adapter page 42 7 Attaching the Power Switch Cover page 43 8 Setting the Memory Switches Receipt Enhancement page 44 9 Network Setting page 53 11 Setting for Connected Devices page 57 10 Setting for Server Direct Print page 56 ...

Страница 26: ...End Sensor page 32 4 Connecting the Peripherals page 36 6 Connecting the Product to the Network page 35 7 Connecting the AC Adapter page 42 8 Attaching the Power Switch Cover page 43 9 Setting the Memory Switches Receipt Enhancement page 44 10 Network Setting page 53 12 Registering Web Contents page 59 11 Enabling PHP page 56 5 Installing the microSD Card page 34 Available when PHP is enabled ...

Страница 27: ... it on a wall be sure to disable the setting Otherwise false detections occur For information about the paper near end sensor see Adjusting the Paper Roll Near End Sensor on page 32 Take measures to prevent the printer from moving by vibration during paper cutting and when using a drawer Affixing tape Model DF 10 is provided as an option Do not place the printer in dusty locations Do not knock or ...

Страница 28: ... mounting surface using the included wall hanging bracket 1 Attach the control panel label for vertical installation on the roll paper cover 2 Install the wall hanging bracket on the printer and fix it using 2 included screws 3 Attach 2 rubber feet in the rectangular indents in the printer case and attach 2 rubber feet within the scribed line on the hanging bracket 4 Place the printer with the wal...

Страница 29: ...e wall at an interval of 80 mm 3 15 Make sure the length of the screw s body in the wall is 10 mm 0 39 or more and the length outside the wall is 3 to 4 mm 0 12 to 0 16 To fix the printer securely install the wall hanging bracket on a wall made of wood concrete or metal The thickness of the wall should be 10 mm 0 4 or more Be sure to use metallic screws The screws on the wall side must have a pull...

Страница 30: ...d 2 screws from the printer install the wall hanging bracket on the printer and fix it using the screws 4 Align the holes in the wall hanging bracket with the screws on the wall and hook it securely Screws Wall hanging bracket ...

Страница 31: ... rectangular holes in the printer and push it downwards Because some parts of the print head and the autocutter contact the platen and they may become worn out once you change the paper width from 80 to 58 mm and use the printer you cannot change it back to 80 mm When changing the paper width be sure to make the setting for the paper width with the memory switch For information about the memory se...

Страница 32: ...o set the memory switch see Setting the Memory Switches Receipt Enhancement on page 44 When you install the printer vertically or hang it on a wall be sure to disable the paper near end sensor Otherwise false detections occur Since roll paper cores vary slightly in shape depending on paper roll design and manufacturing tolerances it is impossible to detect the remaining paper exactly Use roll pape...

Страница 33: ...33 Chapter 2 Setup 2 3 Tighten the adjustment screw 4 Make sure that the detection lever operates smoothly Adjustment screw Positioning plate Detection lever ...

Страница 34: ...e cover Removing the microSD Card 1 Open the protective cover on this product and gently push the microSD card into the slot 2 When the microSD card is slightly ejected pull it out carefully 3 Close the protective cover Use a microSD card that has wear leveling functions The microSD card can only be used if the PHP function is enabled Insert the microSD card with its metal side facing down Push th...

Страница 35: ... the LAN connector until it clicks CAUTION When LAN cables are installed outdoors make sure devices without proper surge protection are cushioned by being connected through devices that do have surge protection Otherwise the devices can be damaged by lightning Never attempt to connect the customer display cable drawer kick cable or a standard telephone line cable to the LAN connector ...

Страница 36: ... The optional external buzzer and the drawer cannot be used together at the same time If you configure the memory switch customized value setting to enable the optional external buzzer the drawer cannot be opened because the pulse is not sent to the drawer kick connector pin Make sure to use the accessory affixing tape hook and loop fastener to attach the optional external buzzer to the product Be...

Страница 37: ...r of the attaching surface of the optional external buzzer 4 Connect the cable of the optional external buzzer to the drawer kick connector on the product Connect and disconnect the optional external buzzer while the product is turned off If you connect it while the product is turned on the buzzer does not function correctly Do not connect both the optional external buzzer and the drawer by using ...

Страница 38: ...emory Switches Receipt Enhancement on page 44 Adjusting the Buzzer Volume Turn the volume adjustment knob to adjust the buzzer volume To use this product be sure to enable the optional external buzzer with the product setting For the details on the setting see Setting the Memory Switches Receipt Enhancement on page 44 When the optional external buzzer is enabled with the product setting the drawer...

Страница 39: ...onditions Communication Speed Data bit Parity Stop bit Flow control The communication conditions of this product are configured using EPSON TMNet WebConfig For detail refer to Setting for Connected Devices on page 57 Key Input Device via a USB Interface For key input devices such as barcode scanners and keyboards connect a USB cable of a device to the USB port at the rear of this product Use EPSON...

Страница 40: ...tor When the drawer open close signal is used a switch must be provided between drawer kick connector pins 3 and 6 The resistance of the load such as a drawer kick solenoid must be 24 Ω or more or the input current must be 1A or less Be sure to use the 24V power output on drawer kick connector pin 4 for driving the equip ment Use a shielded cable for the drawer connector cable Two driver transisto...

Страница 41: ... Chapter 2 Setup 2 Drawer Connection Circuitry F G 24V With shielded Drawer kick connector Printer side User side Drawer kick side Drawer open close switch Drawer kick solenoid Control device 1 2 3 4 5 6 ...

Страница 42: ...dard power supply can result in electric shock and fire Should a fault ever occur in the included AC adapter immediately turn off the power to the product and unplug the power supply cable from the wall socket Be sure to unplug the power supply unit s cable from the wall socket whenever connecting or disconnecting the power supply unit to the product Failure to do so may result in damage to the po...

Страница 43: ... the appearance of the product To operate the power switch insert an object with a pointed tip such as a ballpoint pen into the hole on the power switch cover To detach the cover also use a sharp pointed object WARNING If an accident occurs with the power switch cover attached unplug the power cord immediately Continued use of the product may cause fire or electric shock Power switch cover Power s...

Страница 44: ... receive error 1 BUSY condition 2 Auto line feed 1 USB power saving function Release condition of receive buffer BUSY Paper sensor to output paper end signals default 1 Error signal output 1 Paper near end sensor Sounds buzzer on signal output from DK con nector pin 2 Sounds buzzer on signal output from DK con nector pin 5 Customized Values Paper width Print density Print speed Character code tabl...

Страница 45: ...eceipt Enhancement Auto top logo 3 Auto bottom logo Auto top bottom logo extended functions 3 For information about the TM T83II Utility see the TM T83II Utility User s Manual To directly configure the product in the Software Setting Mode see Software Setting Mode on page 108 Function TM T83II Utility Software Setting Mode ...

Страница 46: ...ed Always disabled initial setting USB power saving function Disabled Enabled initial setting Release condition of receive buffer BUSY Releases when the remaining receive buffer capacity becomes 256 bytes initial setting Releases when the remaining receive buffer capacity becomes 138 bytes No settings are required Do not change the settings No settings are required This function is enabled only wh...

Страница 47: ...ng Enabled Sounds buzzer on signal output from DK connector pin 2 Disabled initial setting Enabled Sounds buzzer on signal output from DK connector pin 5 Disabled initial setting Enabled Paper width 80 mm initial setting 58 mm No settings are required No settings are required To change the paper width you need to install the 58 mm width paper guide plate For information about how to change the pap...

Страница 48: ...Level TF50KS EY TF60KS E PD160R PD190R P220AGB 1 P35024 AF50KS E KT55FA KT48FA 7 100 F5041 8 105 When the print density level is increased printing speed may be reduced Depending on print conditions such as print duty print head temperature and data transmission speed print speed is automatically adjusted which may cause white lines due to intermittent print the motor sometimes stops To avoid this...

Страница 49: ...ts Does not cut initial setting Paper reduction Extra upper space reduction Disabled initial setting Enabled Extra lower space reduction Disabled initial setting Enabled Line space reduction rate Not reduced initial setting 25 50 75 Line feed reduction rate Not reduced initial setting 25 50 75 Barcode height reduction rate Not reduced initial setting 25 50 Do not change the settings ...

Страница 50: ...uously 10000 ms Communication condition of serial interface This function is enabled only when Number of columns is set to Standard mode This function is enabled only when Number of columns is set to Standard mode For information about how to connect the optional external buzzer see Connecting the Optional External Buzzer on page 36 When the optional external buzzer or Built in buzzer is enabled a...

Страница 51: ...e Selectable from key codes of registered logos Alignment Left Center Right Number of lines to be deleted below top logo Auto bottom logo Key code Selectable from key codes of registered logos Alignment Left Center Right Do not change the settings TM T83II Utility does not support the function for Number of lines to be deleted below top logo ...

Страница 52: ... setting Top logo print while clearing the buffer to recover from a recoverable error Disabled Enabled initial setting Top logo print after paper feeding with the Feed button has finished Disabled initial setting Enabled TM T83II Utility does not support the following functions Top logo print while paper feeding to the cutting position Top logo print while clearing the buffer to recover from a rec...

Страница 53: ... a status sheet and check the IP address 3 Start EPSON TMNet WebConfig Access the address bar of the Web browser on the PC for setting to start EPSON TMNet WebConfig http TM i s IP address webconfig For detail see Starting EPSON TMNet WebConfig on page 72 4 Set up TCP IP Select the System Settings menu and then Wired TCP IP and set TCP IP After setting click Apply at the bottom of the screen Then ...

Страница 54: ...curity Mode Wireless TCP IP Get IP Address Set using Automatic Private IP Addressing APIPA IP Address Subnet Mask Default Gateway About how to print the status sheet see Status sheet on page 100 Confirming with EPSON TMNet WebConfig Refer to the followings General Information on page 74 Information Wired TCP IP on page 76 Information Wireless TCP IP on page 77 ...

Страница 55: ... on the product 2 Push and hold the push button for 10 seconds or longer The following initialization start message is printed Press the push button with a thin object such as a tweezers 3 20 to 25 seconds later the following message is printed and a status sheet is printed out Other settings such as device ID style sheet and Server Direct Print settings are not initialized Do not turn off the pow...

Страница 56: ...ed Setting for Server Direct Print Set up Server Direct Print using EPSON TMNet WebConfig This section briefly explains the setup procedure 1 Connect this product to a network Connect this product to a network and turn on the product 2 Start EPSON TMNet WebConfig Access the address bar of the Web browser on the PC for setting to start EPSON TMNet WebConfig http TM i s IP address webconfig For deta...

Страница 57: ...Device or Serial Communication Device in the Configuration menu register and set up the controlled devices After setting click Apply or Add at the bottom of the screen Then the settings are written to the product If Apply or Add is not clicked the settings are not applied For detail see the following information Printer For setting this product and TM printer on the network device IDs and performi...

Страница 58: ...g http TM i s IP address webconfig For detail see Starting EPSON TMNet WebConfig on page 72 2 Change the device ID From Printer in the Web Service Settings menu change the device ID of this product Select local_printer from Model and enter the device ID to be applied in Device ID After setting click Add at the bottom of the screen Then the settings are written to the product If Add is not clicked ...

Страница 59: ...s or a style sheet together with the certificate files that are used when Authenticate Server is set to Enable in Web Contents Automatic Update Settings in Server Access Direct Print and in Server Access Status Notification 1 Create the ssltrustedcerts folder and include the certificate files 2 Zip ssltrustedcerts folder 3 Perform the Web Contents Automatic Update or the Web Contents Manual Update...

Страница 60: ...html http the product s IP address webpage index php Item Specification When enabling PHP When disabling PHP Content save location microSD card Inside this product Registering Web contents Simple overwrite Replacement with existing file Automatic updating of Web contents Simple overwrite Replacement with existing file The maximum amount of Web content Depends on the capacity of the microSD card 30...

Страница 61: ... specify the zip file to be registered and then click Upload For detail see Web Service Settings Web Contents Update Settings on page 85 Automatic Update 1 Connect this product to a network Connect this product to a network and turn on the product 2 Start EPSON TMNet WebConfig Access the address bar of the Web browser on the PC for setting to start EPSON TMNet WebConfig http TM i s IP address webc...

Страница 62: ...and peripheral operations from iOS native applications ePOS Device SDK for iOS page 63 Controlling printing and peripheral operations from Android native applications ePOS Device SDK for Android page 64 Controlling printing and peripheral operations from Web applications ePOS Device SDK for JavaScript page 65 Controlling printing and peripheral operations from computer smartphone tablet terminals ...

Страница 63: ...res It enables use of the following devices via this product Printing to TM printers on the network Barcode scanner of USB interface input via keyboard etc Transmission reception to from serial communication device Operation environment Refer to ePOS Device SDK for iOS User s Manual for the following items iOS Device iOS Version Development Environment Peripherals The package includes ePOS Device ...

Страница 64: ...les use of the following devices via this product Printing to TM printers on the network Barcode scanner of USB interface input via keyboard etc Transmission reception to from serial communication device Operation environment Refer to ePOS Device SDK for Android User s Manual for the following items Android Device Android Version Development Environment Peripherals The package includes ePOS Device...

Страница 65: ...browser No need to install drivers or plugins on the terminals Information communicated with peripherals can be encrypted It enables use of the following devices via this product Printing to TM printers on the network Barcode scanner of USB interface input via keyboard etc Transmission reception to from serial communication device Operation environment Refer to ePOS Device SDK for JavaScript User ...

Страница 66: ...se This command system has the following features It enables use of the following devices via this product Printing to TM printers on the network Barcode scanner of USB interface input via keyboard etc Transmission reception to from serial communication device Operation environment Application Environment capable of performing socket communications and handling XML documents OS Example iOS Android...

Страница 67: ...67 Chapter 3 Application Development Information 3 The package includes ePOS Device XML User s Manual Sample program How to obtain Download from our web site ...

Страница 68: ...n the network by including print data in its responses to requests from the product This function has the following features Can acquire print data from three different URLs Print data can be used in ePOS Device XML format Printable to TM printers on the network via TM T83II i The package includes Server Direct Print User s Manual Sample programs in ePOS Print format How to obtain Download from ou...

Страница 69: ...ting database The Web contents registered on this product can be automatically obtained or updated from a specified URL The package includes PHP Setup Manual Sample program How to obtain Download from our web site TM T83II i Device microSD Http Server Apache ePOS Device Service 1 Request http index php 3 Response HTML JavaScript etc 2 Data processing Database PHP module SQLite3 Web Browser Web pag...

Страница 70: ...re unavailable TM T83II Utility User s Manual Installed along with TM T83II Utility EpsonNet Config Software for configuring IP addresses etc for Epson printers on the network EpsonNet Config User s Manual ePOS Device SDK The ePOS Device SDK package contains the following SDKs ePOS Device SDK for iOS Sample program ePOS Device SDK for iOS User s Manual ePOS Device SDK for Android Sample program eP...

Страница 71: ...the product TM T83II i Technical Reference Guide This document Describes how to handle and set up this product Web TM i series WebConfig API User s Manual Packs an API for setting EPSON TMNet WebConfig for this product Using this API you can set and reference EPSON TMNet WebConfig values from your application Web TM i series Easy Setup Guide Explains procedures that enable settings on the TM i to ...

Страница 72: ...he network 2 Start up the web browser and input the following http This product s IP address webconfig EPSON TMNet WebConfig starts For the product s IP address see the status sheet For the status sheet see Con firming with a status sheet on page 53 A user name and a password will be required on the authentication screen Enter epson for both the user name and the password You can change the passwo...

Страница 73: ... Application Development Information 3 Help Screen Display Click Help to display the help screen for EPSON TMNet WebConfig Version Screen Display Click About to display the version screen for EPSON TMNet WebConfig ...

Страница 74: ...rator name set by the user Location Person Displays the product s installation location set by the user Firmware Version Shows the TM i firmware version of the TM T83II i ePOS Device Version Shows the ePOS Device version Printer Serial Number Shows the serial number of the TM T83II i Wired MAC Address Shows the MAC address for wired LAN ...

Страница 75: ...wireless LAN Communication Standard Shows the communication standard Network Mode Shows the communication mode SSID Shows the SSID Wireless LAN Frequency Region Shows region codes Ad Hoc Channel Shows the ad hoc channel Access Point MAC Address Shows the MAC address for the access point Signal Condition Shows the signal strength Time Shows the date and the present time Refresh Refreshes the inform...

Страница 76: ...wn when the wireless LAN is enabled Subnet Mask Shows the subnet mask set with the wired LAN Nothing is shown when the wireless LAN is enabled Default Gateway Shows the default gateway set with the wired LAN Nothing is shown when the wireless LAN is enabled Acquire DNS Server Address Automatically Shows the method of getting the address of the DNS server DNS Server Address Shows the addresses of t...

Страница 77: ...h the wireless LAN Nothing is shown when the wired LAN is enabled Subnet Mask Shows the subnet mask set with the wireless LAN Nothing is shown when the LAN is enabled Default Gateway Shows the default gateway set with the wireless LAN Nothing is shown when the wired LAN is enabled Acquire DNS Server Address Automatically Shows the method of getting the address of the DNS server DNS Server Address ...

Страница 78: ...RL for the web content file to update automatically Date of Installed Web Contents When automatic update setting is enabled Shows the date and time when the registered web contents were created When manual update setting is disabled Shows Date of Last Automatic Update Shows the latest date and time when the web contents were installed on the TM T83II i automatically Status of Last Automatic Update...

Страница 79: ...ription Time Shows the date and the present time Use Time Server Shows whether time server is used for time setting Get Time Server Shows the method of getting time server Time Server Shows the IP address or host name of the time server Time Server Status Shows the result of communication with the time server ...

Страница 80: ... page 58 Item Description Printer to be registered Device ID Sets the ID of a printer to register Model Selects the model of a printer to register IP Address Sets the IP address of a printer to register Retry Interval ms Sets the retry interval of a printer to register Add Adds a printer to the Device List Registered printers Displays a list of registered printers Test Print Performs a test printi...

Страница 81: ...he Customer Display Communica tions settings Communications speed bps Set the communication speed Usually not required set Data bit Set the data bit length Usually not required set Parity Set the parity Usually not required set Brightness settings Set the brightness of the customer display You can set 20 40 60 or 100 The maximum bright ness is 100 Test display Performs a test display to the custom...

Страница 82: ...the key input device Device name Set the device name for the key input device Control script Set the device control script to control the key input device Add Adds a device to the Device List Registered key input devices Displays a list of registered key input devices Operating test Performs an operating test for a registered key input device Delete Deletes a registered key input device ...

Страница 83: ...check its operation Item Description Serial communication device Set whether to use the Serial communication device Communica tions settings Communications speed bps Set the communication speed Data bit Set the data bit length Parity Set the parity Stop bit Set the stop bit Flow control Set the flow control Communication test Performs a communication test Apply Saves settings to TM T83II i ...

Страница 84: ...e network Item Description List of detected printers Printer Lists the printers connected to the same subnet network as this product and their information TCP IP Setting For making the TCP IP setting for printers detected Wireless LAN Setting For making the wireless LAN setting for printers detected Refresh Updates information ...

Страница 85: ...cting Disable enables Web Contents Manual Update Frequency Sets the frequency of automatic update for web contents Timing Sets the timing of automatic update for web contents Update Time Sets the start time of automatic update for web contents ID Sets ID for identifying this product at the Web server when Automatic Update is set to Enable This ID will be the user ID used for Digest authentication ...

Страница 86: ...pecified correctly Authenticate Server Sets whether the server authentication is performed with the registered certificate when accessed through https Apply Saves settings to TM T83II i Web Contents Manual Update Web Contents Archive File zip Specifies the web content files to register Upload Registers the specified web contents on the TM T83II i Item Description ...

Страница 87: ...lso be passed as an ID parameter value for the form data posted to the server Password Set your password used for Digest access authentication when Server Direct Print is set to Enable Server1 to 3 URL Specifies the Web server URL and the application path when Server Direct Print is set to Enable Example http IP address of Web server Test_print php Click the Access Test button to check if the addr...

Страница 88: ... an ID parameter value for the form data posted to the server Password Set your password used for Digest access authentication when Status Notification is set to Enable URL Specify the Test_print php address of the Web server when Status Notification is set to Enable Example http IP address of the Web Server Test_status php Click the Access Test button to check if the address is accessible Interva...

Страница 89: ...pplication Development Information 3 System Settings Network Wired You can make settings for a wired LAN network Item Description Link Speed Duplex Sets the speed of data link layer Apply Saves settings to TM T83II i ...

Страница 90: ...uto IP Address Sets the IP address when Get IP Address is set to Manual Subnet Mask Sets the subnet mask when Get IP Address is set to Manual Default Gateway Sets the default gateway when Get IP Address is set to Manual Acquire DNS Server Address Automatically Sets the method of getting the address of the DNS server DNS Server Address Sets the addresses of the DNS server in order of usage when Acq...

Страница 91: ... to use WEP Key 1 Sets the WEP key 1 when Security mode is set to WEP WEP Key 2 Sets the WEP key 2 when Security mode is set to WEP WEP Key 3 Sets the WEP key 3 when Security mode is set to WEP WEP Key 4 Sets the WEP key 4 when Security mode is set to WEP WPA WPA2 Pre Shared Key Enter the pass phrase of the pre shared key when Security mode is set to WPA or WPA2 Apply Saves settings to TM T83II i ...

Страница 92: ... Sets the IP address when Get IP Address is set to Manual Subnet Mask Sets the subnet mask when Get IP Address is set to Manual Default Gateway Sets the default gateway when Get IP Address is set to Manual Acquire DNS Server Address Automatically Sets the method of getting the address of the DNS server when Get IP Address is set to Auto DNS Server Address Sets the addresses of the DNS server in or...

Страница 93: ...duct You can only specify the PEM format Certificate File Specifies certificate files to be registered in this product Upload Registers the specified certificate files in this product Up to 6 files can be registered Certificate List Certificate Displays a list of the certificate files registered in this product and detailed information Place a check mark next to a certificate displayed in the list...

Страница 94: ...1 8008 ID Registers the authentication ID for using proxy authentication Password Registers the authentication password for using proxy authentication Enable Proxy for following services Automatic Update Sets whether the proxy is used for automatic update of Web contents Direct Print Sets whether the proxy is used for Server Direct Print Status Notification Sets whether the proxy is used for Statu...

Страница 95: ...ts the time zone Time Server Setting Use Time Server Sets whether to use the time server or not for time setting Get Time Server Sets the method of getting the IP address host name for the time server Time Server Sets the IP address host name for the time server when Get Time Server is set to Manual Time Server Status Shows the result of last getting time from the time server Apply Saves settings ...

Страница 96: ...Item Description Reset Restarts the network functions while retaining the network setting values such as IP address The settings for EPSON TMNet WebConfig other than the network settings are retained Factory Default Restores the settings for EPSON TMNet WebConfig to the factory default settings All the settings except for the internal time are initialized ...

Страница 97: ...formation Administrator You can set the information for the administrator of the TM T83II i Item Description Administrator Name Sets the name of the administrator of the TM T83II i Location Person Sets the location where the TM T83II i is installed Apply Saves settings to TM T83II i ...

Страница 98: ...rrent password New Password Enter the new password Re input Password Enter the new password for confirmation Apply Saves settings to TM T83II i A user name and a password will be required on the authentication screen when you start up this utility and when you change settings Enter epson for the user name and the password you set for the password ...

Страница 99: ...nput the following in the address bar http This product s IP address webconfig PHPSetting PHP settings You can configure the PHP settings for this product Item Description PHP Enables disables PHP function Web Contents Save Storage Shows the storage to save the Web contents microSD Status Displays whether microSD card can be used Free Space Total Size Shows the free space and total size of the mic...

Страница 100: ...s sheet you can check the network settings Press the push button with a thin object such as a tweezers Information on a status sheet If you keep pressing the button for more than 10 seconds the network settings are initialized General Information Firmware X XX ePOS Device X XX Model TM T83II i Time yyyy mm dd hh nn ss GMT hh nn Server Direct Print Use Disable Status Notification Status Notificatio...

Страница 101: ...ng APIPA Shows the APIPA setting IP Address Shows the IP address Subnet Mask Shows the subnet mask Default Gateway Shows the default gateway Acquire DNS Server Address Automatically Shows the method of getting the address of the DNS server DNS Server Address Shows the address of the DNS server Wireless Shows wireless LAN settings MAC Address Shows the MAC address Hardware Version Shows the hardwar...

Страница 102: ...r s IP address and host name Time Server Status Shows the result of communication with the time server Proxy Configuration Shows proxy settings Proxy URL Shows the proxy server URL ID Shows the proxy authentication ID to be registered Web Contents Update UseProxy Shows whether the proxy is used when automatic updating for Web contents Server Direct Print UseProxy Shows whether the proxy is used fo...

Страница 103: ...red in ePOS Device use Shows whether using the serial communication device Communications speed bps 3 Shows the communication speed Data bit 3 Shows the data bit Parity 3 Shows the parity Stop bit 3 Shows the stop bit Flow Control 3 Shows the flow control Web Contents Update Shows update settings for web contents Use Automatic Update Shows whether automatic updating of web contents is enabled or d...

Страница 104: ...ccessed through https Server1 to 3 5 Shows the information of the registered web server URL 5 Shows the URL of the registered web server Access Test 5 To perform the test access to the Web server and shows the results Interval s 5 Shows the request interval Status Notification Shows Status Notification settings Status Notification Shows Enable or Disable of Status Notification ID 6 Shows ID for th...

Страница 105: ...ts Print density Maintenance Information Print head running length count of autocutting Follow the steps below 1 Close the roll paper cover 2 While pressing the Feed button turn on the printer Keep pressing the Feed button until the printer starts printing After the printer status is printed the self test printing continuance guidance is printed and Paper LED flashes 3 Press the Feed button for le...

Страница 106: ... the Feed button until the printer starts printing After the printer status is printed the self test printing continuance guidance is printed and Paper LED flashes 3 Hold down the Feed button for 1 second or more to move to mode selection The mode selection guidance is printed and Paper LED flashes 4 Press the Feed button for less than 1 second and then hold down for more than 1 second to print th...

Страница 107: ...g After the printer status is printed the self test printing continuance guidance is printed and Paper LED flashes 3 Hold down the Feed button for 1 second or more to move to mode selection The mode selection guidance is printed and Paper LED flashes 4 Press the Feed button for less than 1 second two times and then hold down for more than 1 second to print the Receipt Enhancement Information After...

Страница 108: ...pacity Follow the steps below 1 Close the roll paper cover 2 While pressing the Feed button turn on the printer Keep pressing the Feed button until the printer starts printing After the printer status is printed the self test printing continuance guidance is printed and Paper LED flashes For detailed information about memory switches customized value see Setting the Memory Switches Receipt Enhance...

Страница 109: ...alue Settings 4 or more None Select Modes by executing following procedure step 1 Press the Feed button less than 1 second as many times as the selected mode number step 2 Press Feed button for 1 second or more Modes 0 Exit 1 Print Current Settings 2 Print Density 3 Serial Interface Settings 4 Automatic Paper Reduction 5 Auto Paper Feed Cut at cover close 6 Paper Width 8 Default Character 9 Embedd...

Страница 110: ...1 second After the settings are saved the Software Setting Mode guidance is printed and Paper LED flashes For some items item selection continues before printing the values For details on the setting items see Setting Items for Software Setting Mode on page 131 7 To exit the Software Setting Mode turn off the printer or select Exit to return to the mode selection guidance and then select Exit and ...

Страница 111: ... printer is printed in hexadecimal numbers and their cor responding ASCII characters Printing example 4 Turn off the printer or press the Feed button three times to return to the normal mode If there is no character corresponding to print data is printed If print data is less than one line press the Feed button to print the line Applications that confirm printer status may not work correctly durin...

Страница 112: ...t by inserting a USB memory in TM i and turning the power on If you are using a network connected TM printer you can make the network settings at the same time with Easy Setup For detail refer to TM i series Easy Setup Guide WebConfig IP address USB Memory Web contents file setting ini file ...

Страница 113: ... Updating TM i Firmware Checking the TM i Firmware Version Use Software in the status sheet page 53 Use General in EPSON TMNet WebConfig page 74 Updating TM i Firmware You can use the TM i Firmware Update Tool to do the update For detail see Software on page 70 ...

Страница 114: ...inting The product may be damaged Do not touch the manual cutter with your hands when installing or replacing the roll paper Otherwise you may be injured because the manual cutter blade is sharp Use roll paper that meets the product specification For details about paper specification see Paper Specifications on page 126 Paper must not be pasted to the roll paper core When the roll paper cover cann...

Страница 115: ...115 Chapter 4 Handling 4 3 Install the roll paper in the correct direction 4 Pull out some roll paper and close the roll paper cover 1 2 ...

Страница 116: ...er 1 Turn off the product 2 Slide the cutter cover toward the front to open it 3 Turn the knob until you see a triangle in the opening This returns the cutter blade to the normal position 4 Close the cutter cover CAUTION Do not touch the thermal head See Cleaning the Thermal Head on page 117 because it can be very hot after printing Cutter cover Indent Triangle Knob ...

Страница 117: ...laten roller and roll paper end sensor To remove the paper dust clean the platen roller and roll paper end sensor with a cotton swab moistened with water Turn on the product power only after the water has completely dried Preparing for Transport Follow the steps below to transport the product 1 Turn off the product 2 Remove the AC adapter 3 Remove the roll paper 4 Pack the product upright CAUTION ...

Страница 118: ...ake sure that the product power is turned off before inserting or removing a microSD card Use a microSD card with wear leveling Ethernet 10Base T 100Base TX Drawer kick Pin 6 pin Connector Modular only for cash drawer or external optional buzzer Buffers Receive buffer 4 KB 45 bytes Downloaded buffer 12 KB downloaded images NV graphics data 256 KB Barcode two dimensional symbol printing JAN 8 EAN 8...

Страница 119: ...83 5 75 W D H Weight mass Approx 1 7 kg 3 74 lb roll paper excluded Print control ePOS Device SDK for iOS ePOS Device SDK for Android ePOS Device SDK for JavaScript ePOS Device XML Server Direct Print Utility EPSON TMNet WebConfig Network setting Ethernet Wireless LAN Web contents registration ePOS Device setting Server Direct Print Status Notification setting Printer s Device ID settings Easy Set...

Страница 120: ...I TM U220 TM L90 Customer Display Not available Key Input Device Barcode scanner Keyboard Serial Communication Device Device that has a serial interface such as a scale cash recycler or CAT terminal ePOS Device SDK provides only an API that sends receives commands For control of a serial communication device you will have to use an application of your own Cash drawer Cash drawer ...

Страница 121: ...al line printing Dot density 180 180 dpi Printing direction Unidirectional with friction feed Reverse feed is not supported Printing width 72 0 mm 2 83 512 dots 50 8 mm 2 360 dots Characters per line Font A 42 Font B 56 kanji font A 21 Kanji font B 32 Font A 30 Font B 40 kanji font A 15 Kanji font B 23 Maximum print speed 200 mm s 7 87 s Line spacing 4 23 mm 1 6 initial setting programmable by com...

Страница 122: ... pages International characters 18 sets Korean KS C5601 8 366 Font A 12 24 including 2 dot horizontal spacing Font B 9 17 including 2 dot horizontal spacing Kanji font A 24 24 Kanji font B 16 16 Standard W H mm Double height W H mm Double width W H mm Double width double height W H mm Font A 1 41 3 39 1 41 6 77 2 82 3 39 2 82 6 77 Font B 0 99 2 40 0 99 4 80 1 98 2 40 1 98 4 80 Kanji font A 3 39 3 ...

Страница 123: ... Double height Double width Double width double height 80 mm width paper printing 58 mm width paper printing Font A 42 42 21 21 30 30 15 15 Font B 56 56 28 28 40 40 20 20 Kanji font A 21 21 10 10 15 15 7 7 Kanji font B 32 32 16 16 23 23 11 11 ...

Страница 124: ...printing The printable area of paper with a width of 57 5 0 5 mm 2 26 0 02 is 50 8 0 2 mm 2 00 0 008 360 dots and the space on the left side is approximately 3 7 mm 0 15 and the space on the right side is approximately 3 0 mm 0 12 79 5 0 5 mm 3 13 0 02 72 0 0 2 mm 2 83 0 008 3 7 mm 0 15 3 7 mm 0 15 All the numeric values are typical 57 5 0 5 mm 2 26 0 02 50 8 0 2 mm 2 00 0 008 3 7 mm 0 15 3 0 mm 0...

Страница 125: ...htly as a result of paper slack or variations in the paper Take this into account when setting the cutting position of the autocutter Autocutter blade position Approx 27 1 mm Approx 10 5 mm Manual cutter position Center of the print dotline Paper feed direction Printable area ...

Страница 126: ... mm 3 13 0 02 57 5 0 5 mm 2 26 0 02 Specified roll paper type NTP080 80 NTP058 80 Specified original paper type TF50KS EY TF60KS E NIPPON Paper Industries Co Ltd PD160R PD190R OJI Paper Mfg Co Ltd P220AGB 1 Mitsubishi Paper Mills Limited P35024 Kanzaki Specialty Papers AF50KS E Jujo Thermal Oy F5041 Mitsubishi HiTec Paper Flensburg GmbH KT55FA KT48FA Koehler Paper Group Paper must not be pasted to...

Страница 127: ...50Hz 2 8W 115V 60Hz Power supply On Off Use the power switch on the product If printing is continuously performed with a high ratio the overcurrent protection may be acti vated and result in uneven print density or a low voltage error Therefore the printing length must not exceed the following values when printing with high print ratio Print ratio Number of dots being energized per one dot line To...

Страница 128: ...except for paper Acoustic noise operating Approximately 55 dB bystander position Note The values above are measured in the Epson evaluation condition Acoustic noise differs depending on the paper used printing contents and the setting values such as print speed or print density Relative humidity Operating environment range 90 60 80 10 20 40 0 0 10 20 30 40 50 Ambient temperature RH 34 C 90 40 C 65...

Страница 129: ...endix External Dimensions and Mass Width Approximately 140 mm 5 51 Depth Approximately 199 mm 7 83 Height Approximately 146 mm 5 75 Mass Approximately 1 7 kg 3 74 lb except for roll paper 140 146 199 Units mm ...

Страница 130: ...130 AC Adapter PS 180 Input conditions Input voltage AC 100V to 240V Frequency 50 60 Hz Input current rating 1 3A Output conditions Output voltage rating DC 24V 5 Output current rating 2 0A ...

Страница 131: ...educe 4 Blank Space 25 50 75 Not Reduce 5 Barcode Height 25 50 75 Not Reduce 5 Auto Paper Feed Cut at cover close Enable Disable 6 Paper Width 80mm 58mm 8 Default Character 1 1 Code Page 1 Western Europe Southern Europe Page0 PC437 USA Standard Europe Page3 PC860 Portuguese Page11 PC851 Greek Page14 PC737 Greek Page15 ISO8859 7 Greek Page16 WPC1252 Page18 PC852 Latin2 Page19 PC858 Page34 PC855 Cyr...

Страница 132: ...ietnam Arabia 9 Embedded Font Replacement 1 Font A Replacement Font A No Replacement Font B 2 Font B Replacement Font A Font B No Replacement 10 Interface Selection 2 UIB Built in USB Auto 11 USB Interface Settings 1 Class 2 Vendor Class Printer Class 2 USB Power Saving Enabled Disabled 12 Power Supply Output Level 1 Low Level 2 Level 3 High 13 Printing Speed Level 1 Slow to Level 13 Fast 14 Other...

Страница 133: ...2000 ms 3000 ms 10 Buzzer Time Offline No Sound Continuous 1000 ms 3 Interface Settings 1 Receive Buffer Capacity 4 KB 45 bytes 2 BUSY Condi tion 2 Receive Buffer Full or Offline Receive Buffer Full 3 Auto Line Feed 1 Always disabled Always enabled 4 State to cancel buffer BUSY Not BUSY 256 bytes Not BUSY 138 bytes 5 Output Paper end Signals 1 Paper End Near end Sensor Enabled Disabled 6 Error Sig...

Страница 134: ...n to All Pages When International character set See International Character Sets on page 178 is USA The character code tables show only character configurations They do not show the actual print pattern SP in the table shows a space ...

Страница 135: ...135 Appendix Page 0 PC437 USA Standard Europe ...

Страница 136: ...136 Page 1 Katakana ...

Страница 137: ...137 Appendix Page 2 PC850 Multilingual ...

Страница 138: ...138 Page 3 PC860 Portuguese ...

Страница 139: ...139 Appendix Page 4 PC863 Canadian French ...

Страница 140: ...140 Page 5 PC865 Nordic ...

Страница 141: ...141 Appendix Page 11 PC851 Greek ...

Страница 142: ...142 Page 12 PC853 Turkish ...

Страница 143: ...143 Appendix Page 13 PC857 Turkish ...

Страница 144: ...144 Page 14 PC737 Greek ...

Страница 145: ...145 Appendix Page 15 ISO8859 7 Greek ...

Страница 146: ...146 Page 16 WPC1252 ...

Страница 147: ...147 Appendix Page 17 PC866 Cyrillic 2 ...

Страница 148: ...148 Page 18 PC852 Latin 2 ...

Страница 149: ...149 Appendix Page 19 PC858 Euro ...

Страница 150: ...150 Page 20 Thai Character Code 42 ...

Страница 151: ...151 Appendix Page 21 Thai Character Code 11 ...

Страница 152: ...152 Page 26 Thai Character Code 18 ...

Страница 153: ...153 Appendix Page 30 TCVN 3 Vietnamese ...

Страница 154: ...154 Page 31 TCVN 3 Vietnamese ...

Страница 155: ...155 Appendix Page 32 PC720 Arabic ...

Страница 156: ...156 Page 33 WPC775 Baltic Rim ...

Страница 157: ...157 Appendix Page 34 PC855 Cyrillic ...

Страница 158: ...158 Page 35 PC861 Icelandic ...

Страница 159: ...159 Appendix Page 36 PC862 Hebrew ...

Страница 160: ...160 Page 37 PC864 Arabic ...

Страница 161: ...161 Appendix Page 38 PC869 Greek ...

Страница 162: ...162 Page 39 ISO8859 2 Latin 2 ...

Страница 163: ...163 Appendix Page 40 ISO8859 15 Latin 9 ...

Страница 164: ...164 Page 41 PC1098 Farsi ...

Страница 165: ...165 Appendix Page 42 PC1118 Lithuanian ...

Страница 166: ...166 Page 43 PC1119 Lithuanian ...

Страница 167: ...167 Appendix Page 44 PC1125 Ukrainian ...

Страница 168: ...168 Page 45 WPC1250 Latin 2 ...

Страница 169: ...169 Appendix Page 46 WPC1251 Cyrillic ...

Страница 170: ...170 Page 47 WPC1253 Greek ...

Страница 171: ...171 Appendix Page 48 WPC1254 Turkish ...

Страница 172: ...172 Page 49 WPC1255 Hebrew ...

Страница 173: ...173 Appendix Page 50 WPC1256 Arabic ...

Страница 174: ...174 Page 51 WPC1257 Baltic Rim ...

Страница 175: ...175 Appendix Page 52 WPC1258 Vietnamese ...

Страница 176: ...176 Page 53 KZ1048 Kazakhstan ...

Страница 177: ...177 Appendix Page 255 ...

Страница 178: ...in I Japan Norway Denmark II Spain II Latin America Korea Slovenia Croatia China Vietnam Arabia 23 24 25 2A 40 5B 5C 5D 5E 60 7B 7C 7D 7E à ç é ù è Ä Ö Ü ä ö ü β Æ Ø Å æ ø å É Ä Ö Å Ü é ä ö å ü é ù à ò è ì Pt Ñ ñ É Æ Ø Å Ü é æ ø å ü É Æ Ø Å Ü é æ ø å ü á Ñ é í ñ ó ú á Ñ é ü í ñ ó ú W Ž Š Đ Ć Č ž š đ ć č Ұ ...

Отзывы: