background image

57

Chapter 2 Setup

Bluetooth Interface (For Bluetooth model)

Pair the printer with your device using the Bluetooth function of the device or using other methods.
Pairing the printer is also possible by using EPSON TM Bluetooth Connector (Windows) or Epson TM Utility.

Setting up using Bluetooth Paring Function of OS

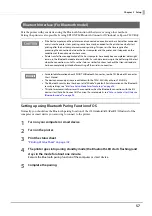
Normally, you should use the Bluetooth pairing function of the OS (Android/iOS/iPadOS/Windows) of the 
computer or smart device you are using to connect to the printer.

1

Turn on your computer or smart device.

2

Turn on the printer.

3

Print the status sheet.

"Printing a Status Sheet" on page 102

4

The printer goes into pairing standby mode (the Bluetooth LED starts flashing) and 
stays in the mode for about one minute.

Execute the Bluetooth pairing function of the computer or smart device.

5

Complete the pairing.

If the host computer and the printer are not connected on a continuous basis but rather connected 
every time the printer starts printing, some time may be needed for the printer to actually start 
printing after the host computer commands printing. This pause is the time required for 
processing the connection between the host computer and the printer, and it depends on the 
conditions of the environment where used.

If data transfer from an application of the host computer has already been completed, data might 
remain in the Bluetooth module internal buffer. As such data remaining in the buffer might be lost 
when the connection is cut off, use the status or similar functions to check that transmitted data 
has been completely printed before cutting off the wireless connection.

For detailed information about EPSON TM Bluetooth Connector, see the TM Bluetooth Connector 
User’s Manual.

The device name and passkey are editable with the TM-L100 Utility or Epson TM Utility.

The Bluetooth security level has been set to "Middle" by default. For information on the Bluetooth 
security settings, see 

"Interface Setup Mode (Interface Setup)" on page 98

.

This printer automatically restores the connection when the Bluetooth connection with the iOS 
device is lost (Auto Re-Connect iOS function). For more details, see 

"Auto re-connect to iOS device 

(Bluetooth model)" on page 98

.

Содержание TM-L100

Страница 1: ... how to handle the product Describes advanced usage methods for the product Describes how to control the printer and necessary information when you develop applications Describes general specifications and character code tables M00143801 Rev B Product Overview Setup Handling Advanced Usage Application Development Information Appendix ...

Страница 2: ...on Corporation Trademarks EPSON is a registered trademark of Seiko Epson Corporation Exceed Your Vision and ESC POS are registered trademarks or trademarks of Seiko Epson Corporation Microsoft and Windows are registered trademarks of Microsoft Corporation in the United States and or other countries Wi Fi WPATM and WPA2TM are either registered trademarks or trademarks of Wi Fi Alliance The Bluetoot...

Страница 3: ... that the plug is clean before plugging it in Be sure to push the plug all the way in Be sure to use the specified AC adapter PS 180 Connection to an improper power source may cause fire or shock Do not place multiple loads on the power outlet Overloading the outlet may lead to fire Shut down your equipment immediately if it produces smoke a strange odor or unusual noise Continued use may lead to ...

Страница 4: ...ease the separation between the equipment and the radio TV Connect the equipment into an outlet on a circuit different from that to which the receiver is connected Consult your dealer or an experienced radio TV technician for help Never disassemble or modify this product Seiko Epson Corporation shall not be liable for interference to radio TV resulting from changes or modifications to this product...

Страница 5: ...pen source software in addition to Epson proprietary software For information of the open source software used in this product see the following URL http xxx xxx xxx xxx licenses html For xxx xxx xxx xxx in the above URL input your printer s IP address ...

Страница 6: ...ign of printer applications for developers Manual Content The manual is made up of the following sections Chapter 1 Product Overview Chapter 2 Setup Chapter 3 Handling Chapter 4 Advanced Usage Chapter 5 Application Development Information Appendix Product Specifications Specifications of Interface and Connector Character Code Tables Compatibility with USB Type A ...

Страница 7: ...dels 13 Accessories 13 Options 13 Part Names and Functions 14 Top Front Rear 14 Panel LED 15 Connectors 16 Online and Offline 19 Status and Errors 20 Status Display 20 Network Connection Status 21 Error Status 22 NV Memory Non Volatile Memory 24 NV Graphics Memory 24 User NV Memory 24 Memory Switches customized values 24 R E Receipt Enhancement 24 Maintenance Counter 25 Useful Functions for Smart ...

Страница 8: ...d specifications of cash drawers 42 Connecting the drawer kick cable 43 Connecting to the Power Source 44 Connecting the AC Adapter 44 Connecting the Printer to the Host Devices 47 USB Interface 47 Ethernet Interface 47 Wireless LAN Interface With OT WL06 For Device charging model Bluetooth model 50 Bluetooth Interface For Bluetooth model 57 MAC Address Confirmation 60 Printing Using Multiple Inte...

Страница 9: ...100 Peripheral Device Information Print Mode Peripheral Device Information 100 Hexadecimal Dumping Mode 101 Printing a Status Sheet 102 Resetting the Interface Settings 104 Resetting using the Interface Setup Mode 104 Resetting using the Status Sheet Button 104 TM Intelligent Function 105 Server direct print 105 Status Notification 105 Network Tethering iOS device only For Device charging model Bl...

Страница 10: ...aracter Specifications 119 Auto Cutter 120 Paper Detector 120 Roll Paper Feeder 121 Paper Specifications 122 Printable Area 126 Printing and Cutting Positions 127 Built in Memory 128 Electrical Specifications 128 Reliability 129 Environmental Conditions 130 External Dimensions and Weight 131 Specifications of Interface and Connector 133 USB Interface 133 Network Interface 134 RS 232 Serial Interfa...

Страница 11: ...f printed paper Ethernet Bluetooth and Wi Fi connection status can be easily checked by viewing respective LED lights Equipped with three USB Type A ports for connecting the option devices Device Charging model Bluetooth model The USB port for connecting a tablet computer USB A Device Charging can provide up to 2 1A Device Charging model Bluetooth model Software TM Intelligent function is equipped...

Страница 12: ...er saving function is available Others Optional external buzzer is available Optional Wireless LAN unit customer display are available Device Charging model Bluetooth model Optional wall hanging bracket is available to attach the printer to a wall ...

Страница 13: ...he printer is shipped with 58 mm width roll paper guides installed inside Rubber feet 4 pieces Tape for fixing the printer 2 pieces Locking wire saddle AC adapter AC cable depending on printer model Manuals Options Wireless LAN unit Model OT WL06 Customer display Model DM D30 DM D70 Optional external buzzer Model OT BZ20 Wall Hanging Bracket Set Model OT WH30 They cannot be connected to the Serial...

Страница 14: ... paper cover Open this cover when installing or replacing the roll paper 6 NFC Tag A mark is printed here to indicate the position of the NFC tag Bring a smart device that supports NFC close to the NFC mark to establish communication 7 Top cover Open this cover if the roll paper cover does not open 8 Rear cover Open this cover when connecting the DC cable of the AC adapter interface cables or peri...

Страница 15: ... Wi Fi Off while the printer is not connected to Wi Fi or while the printer is connected to a wired LAN Flashes while communication is temporarily disabled because an IP address has not been acquired or for other reason Ethernet LED Lights while the printer is connected to Ethernet Off while the printer is not connected to Ethernet or while the printer is connected to Wi Fi Flashes while communica...

Страница 16: ...or Connects the 10BASE T 100BASE TX LAN cable 2 Serial connector Connects a serial cable 3 Power supply connector Connects the DC cable for the AC adapter 4 USB Type B connector Connects the USB cable for connecting to computers 5 Drawer kick connector Connects the modular cable for the cash drawer 6 Status sheet button Initializes the interface settings or prints a status sheet to verify the sett...

Страница 17: ...connector USB A Device Charging The USB connector color is white Connects a USB cable for connecting to a tablet computer Enables data communication with the tablet while charging it 5 Power supply connector Connects the DC cable for the AC adapter 6 USB Type B connector Connects the USB cable for connecting to computers 7 Drawer kick connector Connects the modular cable for the cash drawer 8 Stat...

Страница 18: ...he cable or the USB connector and USB cable may be damaged Contact qualified service personnel if you encounter the trouble To communicate with a tablet computer via Bluetooth while charging the tablet through the USB connector USB A Device Charging on the printer set the Interface selection setting to Bluetooth only For more details see Software Setting Mode Customize Value Settings on page 95 Ho...

Страница 19: ...ng conditions While the printer power is turning on off During the setting and check modes operating except the hexadecimal dumping mode While roll paper is fed using the Feed button When the printer stops printing due to a paper end when the paper out detector detected the paper out During an operation standby state When an error has occurred See Status and Errors on page 20 While the roll paper ...

Страница 20: ...oll paper cover open while not printing N N N No roll paper F 4 O N Waiting for printed paper to be removed N N Automatically Recoverable Errors O F 3 A warning about TM Intelligent function NOTE Unable to connect to the server Check the status of the destination server configured by TM Intelligent function N N Recoverable Errors O O O F 1 N Unrecoverable Errors CAUTION Turn off the power immediat...

Страница 21: ... power off NOTE When a power off command is executed When turning off the printer without using the power button using the command is recommended because doing so reliably saves printer operating status information N Starting up the network firmware F 1 N N Waiting for the roll paper cover to be closed to print a status sheet Bluetooth LED Wi Fi LED Ethernet LED Paper LED Error LED Power LED Print...

Страница 22: ...en the roll paper cover is closed Paper error black mark detection error 2BD31 Paper with black marks is selected but no black mark is detected Reload the paper with black marks or change the setting if you do not use paper with black marks Error Error code Description Recovery Autocutter error 3CA21 Abnormal auto cutter operation was detected The printer recovers from the error when jammed paper ...

Страница 23: ... on If the error still occurs the printer may be defective Contact qualified service personnel Error Error code Description High voltage error AKA41 Abnormal power supply voltage high voltage was detected Low voltage error AKA42 Abnormal power supply voltage low voltage was detected Unrecoverable error A9999 Other unrecoverable error is detected ...

Страница 24: ...urposes such as for storing a note including customizing or maintenance information of the printer Memory Switches customized values With the memory switches which are software switches for the printer you can configure various settings of the printer For information about the memory switch see Software Settings on page 77 R E Receipt Enhancement You can set the graphics data such as a shop logo r...

Страница 25: ... read the counter information to use it for periodical checks or part replacement You can also check the head running length and number of times of autocutting with the self test See Self test Mode on page 92 The maintenance counter values are automatically saved in the NV memory usually every two minutes up to four minutes However the values are not saved when the printer is in power saving mode ...

Страница 26: ... status sheet with the camera on your smart device to acquire the printer information information for specifying the device By using the acquired information the device can specify the printer to send a print job over a network or Bluetooth Programming using Epson ePOS SDK is required to use these functions These functions are created by combining NFC touch and QR code capturing operations and the...

Страница 27: ... External Buzzer page 41 5 Connecting the Optional Customer Display For Device charging model Bluetooth model page 40 4 Connecting the Optional Wireless LAN Unit For Device charging model Bluetooth model page 39 3 Connecting Interface Cables page 36 1 Installing the Printer page 28 2 Changing the Paper Width page 32 8 Connecting to the Power Source page 44 7 Connecting the Cash Drawer page 42 9 Co...

Страница 28: ...igh dust levels Be careful not to place cords or foreign substances under the printer Take measures to prevent the printer from moving due to vibrations when using the cash drawer Do not give a high impact on the printer during operation Doing so may cause the print failure You can hang the printer on a wall by using the optional Wall Hanging Bracket Set OT WH30 Refer to the manual of the Wall Han...

Страница 29: ...e included four rubber feet and two pieces of fixing tape to the bottom of the printer 1 Lay the printer on its side 2 Remove the release paper from the rubber feet 3 Attach the rubber feet to the four positions on the bottom of the printer 4 Place the printer ...

Страница 30: ... to secure the printer to the installation surface 1 Lay the printer on its side 2 Remove the release paper from one side of the fixing tape 3 Attach the fixing tape to the two positions 4 Remove the other release paper from the fixing tape 5 Place the printer on the installation surface and then hold the printer down to secure it ...

Страница 31: ...e Printer Horizontally Attach the included four rubber feet to the rear of the printer 1 Remove the release paper from the rubber feet 2 Attach the rubber feet to the four positions on the bottom of the printer 3 Place the printer ...

Страница 32: ...printer Because parts of the print head that had not touched paper may be damaged by being rubbed against the platen roller and the autocutter may have worn out No roll paper guide Attach 58 mm width roll paper guide to the right Attach 40 mm width roll paper guide to the left Attach 58 mm width roll paper guide to the right Default 80 mm 80 mm 58 mm 58 mm 58 mm 58 mm 80 mm 80 mm 40 mm 40 mm 40 mm...

Страница 33: ... default Using 80 mm Wide Roll Paper Remove all the roll paper guides Follow the procedure below to remove the 58 mm width roll paper guide 1 Lay the printer on its side 2 Open the roll paper cover Opening Closing the Roll Paper Cover on page 63 3 Remove the roll paper guide by pulling its tab up and toward you ...

Страница 34: ... 80 mm It is not necessary to change the setting by using TM L100 Utility or other software How to attach the 58 mm width roll paper guide Tilt the guide and insert its protrusion into the groove inside the printer and then fit it into place The pins on the printer fit into the positioning holes in the guide ...

Страница 35: ... roll paper cover Opening Closing the Roll Paper Cover on page 63 3 Tilt the guide and insert its protrusion into the groove inside the printer and then fit it into place 4 By using TM L100 Utility change the paper width setting of the printer to 40 mm For more details see Software Settings on page 77 How to remove the 40 mm width roll paper guide Remove the roll paper guide by pulling its tab up ...

Страница 36: ...les of a computer or peripheral devices to the connectors on the rear of the printer The on board connectors vary depending on the printer model 1 Lay the printer on its side 2 Remove the rear cover 3 Connect the interface cable to the appropriate connector Serial model ...

Страница 37: ...evice charging model Bluetooth model When connecting a USB cable to the USB Type B connector By attaching the included locking wire saddle and pass the cable through the hook you can prevent the cable from being unplugged ...

Страница 38: ...e through the cutout of the rear cover 5 Connect the interface cable to your computer or peripheral device 6 Connect the AC cable plug to a power outlet WARNING Should a fault ever occur immediately turn off the power to the printer and unplug the AC cable from the socket ...

Страница 39: ...bles you to use the product with a Wi Fi connection Refer to the manual for the wireless LAN unit for instructions on how to connect it Be sure to turn off the printer when connecting the Wireless LAN unit If you connect the optional DM D30 customer display you can connect the OT WL06 directly to the DM D30 For details refer to the DM D30 manual ...

Страница 40: ...30 or DM D70 to this product using USB connection Refer to the manual for the customer display for instructions on how to connect it Be sure to turn off the printer when connecting the customer display If you connect the DM D30 you can connect the optional OT WL06 wireless LAN unit directly to the DM D30 For details refer to the DM D30 manual ...

Страница 41: ... about the memory switch customized values see Software Settings on page 77 Attachment Position The optional external buzzer is recommended to be installed in the following positions Be sure to turn off the printer before you connect disconnect the optional external buzzer Do not connect both the optional external buzzer and the cash drawer to the printer at the same time by using a branched conne...

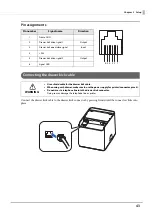
Страница 42: ...olenoid must be 24 Ω or more or the input current must be 1A or less Be sure to use the 24V power output on drawer kick connector pin 4 for driving the equipment Drawer Connection Diagram Adaptable Connector RJ12 modular connector Do not connect both the optional external buzzer and the cash drawer to the printer at the same time by using a branched connector When using a cash drawer make sure to ...

Страница 43: ...ection 1 Frame GND 2 Drawer kick drive signal 1 Output 3 Drawer kick open close signal Input 4 24 V 5 Drawer kick drive signal 2 Output 6 Signal GND WARNING Use a shield cable for the drawer kick cable When using cash drawer make sure to use the power supply for printer connector pins 4 Do not insert a telephone line into the drawer kick connector Doing so may damage the telephone line or printer ...

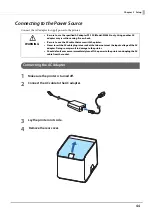
Страница 44: ...ear cover WARNING Be sure to use the specified AC adapter PS 190 Model M368A only Using another AC adapter may result in causing fire or shock Be sure to use the AC cable that came with the printer Never insert the AC cable plug into a socket that does not meet the input voltage of the AC adapter Doing so may result in damage to the printer Should a fault ever occur immediately turn off the power ...

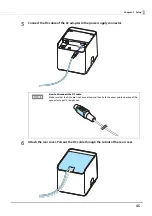
Страница 45: ...he power supply connector 6 Attach the rear cover Pull out the DC cable through the cutout of the rear cover How to disconnect the DC cable Make sure that the AC cable is not connected and then hold the arrow printed portion of the connector to pull it straight out ...

Страница 46: ...46 Chapter 2 Setup 7 Connect the AC cable plug to a power outlet ...

Страница 47: ...s Check the values set in the printer on the status sheet 3 Start up your Web browser and input the printer s IP address into the address field E g http 192 168 192 168 Do not place any weight or stress on the cable when using Doing so could damage the cable and connectors When setting up using EpsonNet Config web version the network settings of the device to be used must be set to the same networ...

Страница 48: ...nd change the setting 6 After changing the necessary parameters click the Send button The changes are sent to the printer 7 Click the Reset button on the Web page displayed after sending The sent contents are enabled Depending on the changes such as the IP address the connection with the setting computer may be lost and the EpsonNet Config window may not be displayed To connect again the network s...

Страница 49: ... computer with a USB cable 2 Turn on the computer 3 Turn on the printer 4 Start TM L100 Utility 5 Select the printer and click OK If the printer does not appear click the Add Port button to add the USB connected printer 6 Use the Network menu to configure the network settings For details on the settings refer to the TM L100 Utility manual 7 After completing the settings turn off the printer Networ...

Страница 50: ...ituation in the surrounding area before use Avoid using the same channel that is used in the neighboring shops where Wireless LAN is used Wireless LAN with a frequency band of 2 4 GHz may interfere with Bluetooth communication When using Bluetooth and Wi Fi at the same time it is recommended to use 5 GHz When using the printer in environments where kitchen microwaves and other devices that may int...

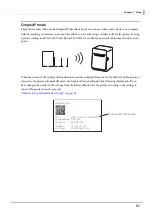
Страница 51: ...eless LAN settings of the printer have not been changed from the factory default and the printer is turned on the printer automatically enters the Simple AP mode and prints the following information If you have changed the wireless LAN settings from the factory default start the printer according to the settings to connect the printer to an access point Interface Setup Mode Interface Setup on page...

Страница 52: ...er 2 Connect the printer to the computer with a USB cable 3 Turn on the computer 4 Turn on the printer 5 Start TM L100 Utility 6 Select the printer and click OK If the printer does not appear click the Add Port button to add the USB connected printer 7 Use the Network menu to configure the network settings For details on the settings please refer to the TM L100I Utility manual 8 After completing t...

Страница 53: ...er 3 Start the printer in the SimpleAP mode The printer prints SSID and QR code SimpleAP mode on page 51 4 Start TM L100 Utility 5 Connect the printer using SimpleAP Select Add Port Network and then click Connect with SimpleAP to add the printer 6 Use the Network menu to configure the network settings For details on the settings refer to the TM L100 Utility manual 7 After completing the settings t...

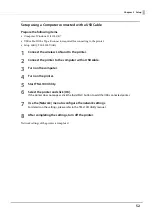
Страница 54: ... 2 Connect the iPhone or iPad to the printer with the Lightning to USB cable Connect the cable to the USB A Device Charging connector on the printer 3 Turn on the iPhone or iPad 4 Turn on the printer 5 Start Epson TM Utility 6 Select the printer 7 Select Change printer settings to configure the network settings 8 When the settings are complete exit Epson TM Utility 9 Turn off the printer Wireless ...

Страница 55: ...wireless LAN unit to the printer 2 Connect the Android device to the printer with the USB cable Connect the cable to the USB Type B connector on the printer 3 Turn on the Android device 4 Turn on the printer 5 Start Epson TM Utility 6 Select the printer 7 Select Change printer settings to configure the network settings 8 When the settings are complete exit Epson TM Utility 9 Turn off the printer W...

Страница 56: ... Start the printer in the SimpleAP mode The printer prints SSID and QR code SimpleAP mode on page 51 4 Start Epson TM Utility 5 Run Wi Fi Setup Wizard 6 Following the on screen instructions scan the printed QR code and connect the printer with SimpleAP 7 Configure the network settings following the on screen instructions 8 When the settings are complete exit Epson TM Utility 9 Turn off the printer...

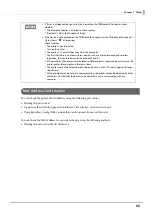
Страница 57: ...he printer to actually start printing after the host computer commands printing This pause is the time required for processing the connection between the host computer and the printer and it depends on the conditions of the environment where used If data transfer from an application of the host computer has already been completed data might remain in the Bluetooth module internal buffer As such da...

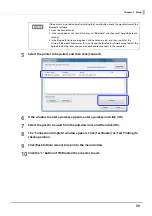
Страница 58: ...et from Bluetooth Setup Wizard in the menu Follow the on screen instructions to complete the setup Setting up from a Windows Computer Follow the procedure below to make the settings 1 Have a Bluetooth wireless technology compatible computer ready Make sure you have installed TM Bluetooth Connector 2 Turn on the printer 3 Start TM Bluetooth Connector 4 Select Search all printers around this compute...

Страница 59: ...he main window 10Click the x button of TM Bluetooth Connector to exit If the printer has not detected after clicking the Search button check the manufacturer of the Bluetooth software 1 Open the Control Panel 2 In the search box on the Control Panel enter Bluetooth and then click Change Bluetooth settings 3 In the Bluetooth Settings dialog box click the Hardware tab and then search for the Microso...

Страница 60: ...gs If the device is not displayed on the TM Bluetooth Connector or the TM Bluetooth Connector Status shows after pairing Check whether The printer is not turned on Turn on the printer The printer is 10 m or further away from the computer Confirm that there is no other wireless device such as a microwave oven and cordless telephone that can interfere with the Bluetooth printer If the printer and th...

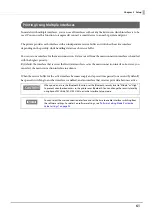
Страница 61: ... first data transfer is set as the main connection interface however you can select the main connection interface in advance When the receive buffer for the active interface becomes empty and a preset time period one second by default has passed switching to another interface is enabled and an interface that receives print data becomes active When you do not use the Bluetooth function set the Blue...

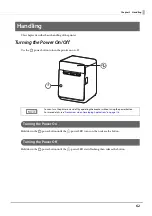
Страница 62: ... the Power On Hold down the power button until the power LED turns on then release the button Turning the Power Off Hold down the power button until the power LED starts flashing then release the button You can turn the printer on and off by operating the breaker without using the power button For more details see Precautions when Developing Applications on page 116 ...

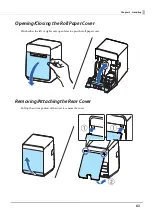
Страница 63: ...andling Opening Closing the Roll Paper Cover Pinch either the left or right cover open lever to open the roll paper cover Removing Attaching the Rear Cover Pull up the cutout portion of the cover to remove the cover ...

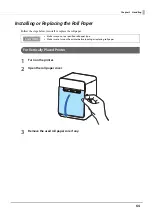
Страница 64: ...elow to install or replace the roll paper For Vertically Placed Printer 1 Turn on the printer 2 Open the roll paper cover 3 Remove the used roll paper core if any Make sure you use a specified roll paper type Make sure to turn on the printer before loading or replacing roll paper ...

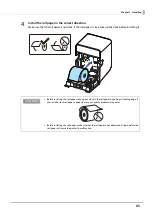
Страница 65: ...he slack before installing it Before installing the roll paper take up any slack in the roll paper by pulling its leading edge If you install a slack roll paper a paper jam or print quality problems may occur Before installing the roll paper make sure that the roll paper is not deformed Using a deformed roll paper will cause the printer to malfunction ...

Страница 66: ...ut some paper and close the roll paper cover When the printer power is on the roll paper is automatically cut For Horizontally Placed Printer 1 Turn on the printer 2 Open the roll paper cover 3 Remove the used roll paper core if any ...

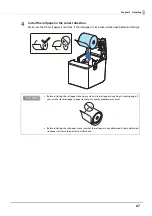
Страница 67: ...he slack before installing it Before installing the roll paper take up any slack in the roll paper by pulling its leading edge If you install a slack roll paper a paper jam or print quality problems may occur Before installing the roll paper make sure that the roll paper is not deformed Using a deformed roll paper will cause the printer to malfunction ...

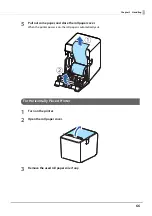
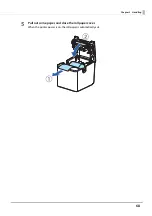
Страница 68: ...68 Chapter 3 Handling 5 Pull out some paper and close the roll paper cover When the printer power is on the roll paper is automatically cut ...

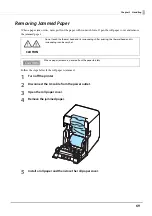
Страница 69: ...the roll paper is jammed 1 Turn off the printer 2 Disconnect the AC cable from the power outlet 3 Open the roll paper cover 4 Remove the jammed paper 5 Install a roll paper and then close the roll paper cover Do not touch the thermal head and its surroundings After printing the thermal head and its surroundings can be very hot CAUTION When a paper jam occurs never pull out the paper forcibly ...

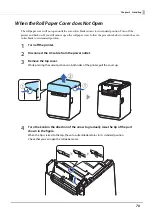
Страница 70: ...return the auto cutter blade to its standard position 1 Turn off the printer 2 Disconnect the AC cable from the power outlet 3 Remove the top cover While pressing the cutout portions on both sides of the printer pull the cover up 4 Turn the knob in the direction of the arrow to gradually raise the tip of the part shown in the figure When the tip is raised to the top the auto cutter blade returns t...

Страница 71: ...71 Chapter 3 Handling 5 Open the roll paper cover and remove jammed paper 6 Close the roll paper cover 7 Attach the top cover ...

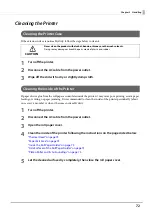
Страница 72: ...nside of the printer periodically about once every 6 months or when it becomes noticeably dirty 1 Turn off the printer 2 Disconnect the AC cable from the power outlet 3 Open the roll paper cover 4 Clean the inside of the printer following the instructions on the pages listed below Thermal Head on page 73 Paper Exit Area on page 73 Inside the Roll Paper Holder on page 74 Side Surfaces of the Roll P...

Страница 73: ... ethanol or IPA Paper Exit Area Wipe off paper dust or glue with a slightly damp cloth CAUTION After printing the thermal head and its surroundings can be very hot Be careful not to touch it and to let it cool before you clean it Do not damage the thermal head by touching it with your fingers or any hard object ...

Страница 74: ...74 Chapter 3 Handling Inside the Roll Paper Holder Wipe off paper dust with a dry or slightly damp cloth ...

Страница 75: ...cohol solvent ethanol or IPA Platen Roller and Its Surroundings Wipe off paper dust or glue with a slightly damp cloth If paper dust or glue has attached to the black mark sensor blow it off or wipe it off with a slightly damp cloth CAUTION Do not use alcohol solvents to clean areas other than those specified Doing so may damage or break the parts made of plastic and rubber Black mark sensor ...

Страница 76: ...Preparing for Transport Follow the steps below to transport the printer 1 Turn off the printer 2 Confirm that the Power LED is off 3 Disconnect the AC cable from the socket 4 Remove the roll paper 5 Pack the printer upright ...

Страница 77: ...tility Epson TM Utility Software Setting Mode ESC POS Menu name in software setting mode Power ON notification Memory Switches Handshaking Condition for BUSY BUSY Condition Data reception error Auto line feed Auto Line Feed Power saving function for USB USB power saving function Roll paper end near end sensors Output Paper end Signals Error signal output Error Control Network tethering Network Tet...

Страница 78: ...t Automatic Paper Reduction Character Height Font A Replacement Font A Replacement Font B Replacement Font B Replacement Buzzer Select Buzzer Select Buzzer When an error occurs frequency When an error occurs pattern When the roll paper ends frequency When the roll paper ends pattern When automatic paper cut activates frequency When automatic paper cut activates pattern When specified pulse 1 2 pin...

Страница 79: ...shaking Serial Interface Data Bits Receipt Enhancement Power supply SW setting Power Supply SW Setting Pre feed before next print Pre feed before next print Paper initialization when power ON Paper initialization when power ON Periodic time of paper initialization Periodic time of paper initialization Black mark control Black mark control Setting the conditions that cancel the receive buf fer BUSY...

Страница 80: ...etting Enabled Roll paper end near end sensors Enabled Roll paper end sensor initial setting Disabled Error signal output Enabled initial setting Disabled In either case above the printer enters the BUSY state after power is turned on and when a self test is being run The USB power saving function is valid only when the USB interface communication condition is set to the vendor defined class and t...

Страница 81: ...Slow Fast Initial setting level 11 Thai Character Composition Thai 1 pass initial settings Thai 3 pass When changing from 80 mm wide paper to 58 mm wide paper the paper width is automatically detected and no setting is required The higher the print density is set the more likely the print speed will decrease The higher the print density is set the more likely it is that paper dust will adhere to t...

Страница 82: ...lt in USB only Ethernet Wi Fi USB A Device Charging only only for Device charging models Enable all the interfaces initial setting Enable all the interfaces except for Bluetooth only for Bluetooth models Number of columns Standard mode initial setting 42 characters mode Command execution during offline Enabled initial setting Disabled If you want to connect a tablet and the printer via Bluetooth w...

Страница 83: ... paper may get wrinkled or smeared due to a slack in the roll It is recommended to use thermal paper that has high resistance to abrasion Make sure to feed the paper by at least 35 mm before moving the auto cutter It the paper feed length is not enough it may cause a paper jam or make it difficult to remove the paper When using the TM L100 Utility and TM Utility you can specify values in 0 5 mm in...

Страница 84: ...nitial setting Enabled Line Space Reduction Rate Disabled initial setting 25 50 75 Reduce to minimum width Line Feed Reduction Rate Disabled initial setting 25 50 75 Barcode Height Reduction Rate Disabled initial setting 25 50 75 The displayed items vary depending on the interface configuration For information about the function see on page 26 ...

Страница 85: ...zzer Built in buzzer initial setting External buzzer Disabled When an error occurs frequency Continues to sound initial setting Does not sound 1 time No reduction is applied to blank dot lines that exist in a graphic data Reduced barcodes are not guaranteed to be correctly scanned Make sure to check whether they are properly read by a barcode reader that is actually used For information about how ...

Страница 86: ...tial setting Does not sound When automatic paper cut activates pattern Selectable from Patterns A to E Initial setting Pattern A When specified pulse 1 2 pin occurs frequency 1 time initial setting Does not sound When specified pulse 1 2 pin occurs pattern External buzzer only Selectable from Patterns A to E Initial setting Pattern A When specified pulse 2 5 pin occurs frequency 1 time initial set...

Страница 87: ...ror Cutter error Command and close of the roll paper cover initial setting Command only USB Interface Settings Class Printer class initial setting Vendor defined class Bluetooth Interface Settings Bluetooth model only Device name initial setting TM L100_xxxxxx xxxxxx is the last 6 digits of the printer serial number Passkey initial setting 0000 Security initial setting Middle Auto Re Connect with ...

Страница 88: ...ed Centered Right justified Undefined Number of deleted lines after top logo printing Undefined Automatic bottom logo printing Key code Undefined Justification Left justified Centered Right justified Undefined Advanced settings for automatic top bottom logo printing Print top logo when paper is fed to the cut position Enabled Disabled Enabled Print top logo at power on Enabled Disabled Disabled Pr...

Страница 89: ...ion Selectable from Disabled and 1 to 720 minutes Initial setting 720 minutes Black mark control Disabled initial setting Enabled Setting the conditions that cancel the receive buffer BUSY state Cancels the BUSY state when the remaining capacity of the receive buffer reaches 256 bytes initial setting Cancels the BUSY state when the remaining capacity of the receive buffer reaches 138 bytes Refer t...

Страница 90: ...turn on the printer while pressing the Feed button Self test Briefly press the Feed button Hold down the Feed button Open the roll paper cover and turn on the printer while pressing the Feed button and then close the roll paper cover Continuing the self test Mode selection guidance Hexadecimal dumping Press the Feed button once briefly and then hold it down NV Graphics Information Press the Feed b...

Страница 91: ...0 Exit and Reboot Printer 1 NV Graphics Information 2 Receipt Enhancement Information 3 Customize Value Settings 4 Restore Default Values 5 Interface Setup 6 TM Intelligent Information 7 Peripheral Device Information 8 or more None Select Modes by executing following procedure step 1 Press the Feed button less than 1 second as many times as the selected mode number step 2 Press Feed button for 1 s...

Страница 92: ...un the self test using the ESC POS commands 1 Close the roll paper cover 2 While pressing the Feed button turn on the printer Hold down the Feed button until printing starts After printing the current print status a Continuing self test guidance is printed and the Paper LED flashes 3 Briefly press the Feed button less than one second to continue the self test The printer prints a rolling pattern o...

Страница 93: ... be defined NV graphics data Follow the steps below 1 After running a self test hold down the Feed button for at least one second and then select the Mode selection The Mode selection guidance is printed and the Paper LED flashes 2 After briefly less than one second pressing the Feed button once hold it down for at least one second to print the NV graphics information After information printing th...

Страница 94: ...o Follow the steps below 1 After running a self test hold down the Feed button for at least one second and then select the Mode selection The Mode selection guidance is printed and the Paper LED flashes 2 After briefly less than one second pressing the Feed button twice hold it down for at least one second to print the R E information After information printing the Mode selection guidance is print...

Страница 95: ...own for at least one second to enter the Software settings mode Customized value setting The Software setting mode guidance is printed and the Paper LED flashes You can also make the software settings using the ESC POS commands Customize Value Settings Modes 0 Exit 1 Print Current Settings 2 Print Density 3 Print Speed 4 Automatic Paper Reduction 5 Auto Paper Feed Cut at cover close 6 Paper Width ...

Страница 96: ...ge 77 4 Select a setting by briefly pressing the Feed button less than one second for the number of times applicable to the setting and then hold down the button for more than one second to confirm your selection After saving the settings the Software setting mode guidance is printed and the Paper LED flashes 5 To close Software setting mode turn off the printer or select Exit to return to Mode se...

Страница 97: ...lues The guidance is printed 3 When only restoring the default settings Briefly press the Feed button once less than one second hold it down for at least one second Hold down the Feed button until the message of restore completion is printed When restoring default settings and deleting user defined data Briefly press the Feed button twice less than one second and then hold it down for at least one...

Страница 98: ... and select Initialize to restore the communication settings to the factory default The printer is reset and restarted SimpleAP mode When using the OT WL06 When using the Wireless LAN unit select Wi Fi Ethernet Setup and select SimpleAP to start in SimpleAP mode the same as the factory default setting The printer is reset and restarted and it begins printing the SimpleAP Start information Select t...

Страница 99: ...m Middle or Low to High or vice versa the link key pairing information is deleted If the printer is already paired with a terminal unpair them and then pair again You can change the settings with TM L100 Utility and TM Utility Security Pairing Mode Pairing Method Low initial setting Pairing is always possible Just Works Middle Pairing is possible for one minute after turning the printer on or afte...

Страница 100: ... flashes 2 Briefly press the Feed button six times less than one second and then hold it down for at least one second to print the TM Intelligent setting information After information printing the Mode selection guidance is printed again 3 To finish turn off the power or select Exit and Reboot Printer Peripheral Device Information Print Mode Peripheral Device Information This function allows you t...

Страница 101: ... Error LED turns on 3 Close the roll paper cover From this point all data received by the printer is printed in the corresponding hexadecimal numbers and ASCII characters Example of printing in hexadecimal dumping mode 4 To close hexadecimal dumping mode turn off the printer after printing is complete or press the Feed button for three times When there are no characters that correspond to the prin...

Страница 102: ...the power while the Power LED is flashing CAUTION After the status sheet is printed only the print settings of the mainly connected interface are retained For the mainly connected interface see Printing Using Multiple Interfaces on page 61 Ethernet and Wi Fi status sheets are not printed while the printing communication protocol is being established They will be printed after the connection is cut...

Страница 103: ...t Wi Fi Ethernet Interface Wi Fi Status MAC Address SSID EPSON_Printer Network Mode Comm Standard Encryption Type Link Status Channel Transmission Access Point Signal Level Unmounted Infrastructure 802 11b g n WPA2 PSK Unknown Unknown Unknown Unknown Unknown Ethernet Status MAC Address2 Physical Layer Link Status XX XX XX XX XX XX Auto negotiation Disconnect MAC Address XX XX XX XX XX XX Network S...

Страница 104: ...ce Setup mode see the link below Interface Setup Mode Interface Setup on page 98 Resetting using the Status Sheet Button If you have removed the rear cover of the printer you can use the status sheet button 1 Turn off the printer and close the roll paper cover 2 Hold down the status sheet button while turning on the printer A message is printed indicating that resetting is being performed and the ...

Страница 105: ... Print XML format You can use this product to print to TM printers on a network Regarding details on server direct printing see the Server Direct Printing User s Manual Careful consideration should be given when enabling the Paper removal standby setting in your system that use the server direct printing function Status Notification Status Notification is used to periodically notify the TM printer...

Страница 106: ...ed LAN Communication Using the Network tethering If the network tethering is enabled and an iOS device is connected to the USB A Device Charging connector white connector on the printer that is connected to a wired network the iOS device can communicate over the wired network using the tethering function instead of Wi Fi communication The speed of the wired network communication using the network ...

Страница 107: ... TM Utility TM L100 Utility or in the software settings mode Enabling by Using Epson TM Utility Select Change Printer Settings Network tethering in that order to enable or disable the tethering function Enabling by Using TM L100 Utility Select Detailed Settings Interface Network tethering in that order and then enable or disable it For more details see TM L100 Utility User s Manual See Download on...

Страница 108: ...order and then enable or disable it See Software Settings on page 77 Connection Procedure Follow the procedure below to connect a tablet using the tethering function 1 Connect the printer to a wired network 2 Turn on the printer and then wait until the Ethernet LED stops flashing and stays on 3 On the iOS device tap Settings Wi Fi and disable Wi Fi ...

Страница 109: ...rnet and then check that an IP address has been set If Ethernet does not appear in Settings of the iOS device the tethering function of the printer might have been disabled See Enabling the Tethering Function on page 107 to enable the tethering If a DHCP server is not used in the network set the IP address and subnet mask manually To print from the iOS device select one of the interfaces USB or ne...

Страница 110: ...ts For details on ePOS Print XML refer to the ePOS Print XML User s Manual ePOS Device XML ePOS Device XML is Epson s original control command system for POS printers defined in XML Request messages in XML format created by the application side are sent to the supported printer via Socket communication The ePOS Device Service embedded in the supported printer interprets the request message and pri...

Страница 111: ...ol using the OpenDrawer method or the DirectIO function For details see the EPSON OPOS ADK MANUAL APPLICATION DEVELOPMENT GUIDE Cash Drawer and the UnifiedPOS Specification OPOS for NET Register a cash drawer using the SetupPOS Utility and control using the OpenDrawer method or the DirectIO function For details see the EPSON OPOS ADK for NET MANUAL Application Development Guide Cash Drawer EPSON S...

Страница 112: ...IO function or the API for opening the drawer For details see the manual for Status API of the drivers OPOS OCX Driver Register a POS printer using the SetupPOS Utility and control using the DirectIO function For details see the EPSON OPOS ADK MANUAL APPLICATION DEVELOPMENT GUIDE POSPrinter TM Series OPOS for NET Register a POS printer using the SetupPOS Utility and control using the DirectIO func...

Страница 113: ...e with Microsoft POS for NET It allows you to develop applications that are compatible with the UPOS Unified POS specification When developing applications use a separate development environment such as Microsoft Visual Studio NET Epson TM Print Assistant A native application that relays print data between an application and the TM printer Epson TM Print Assistant allows you to develop a system th...

Страница 114: ... application Using this software makes it easy to pare the printer because the software searches for and displays only Epson Bluetooth printers and allows you to search the printer by its product name Windows Deployment Tool Use to make network and printer settings simultaneously Allows you to make settings efficiently at the time of introducing TM printers for the first time or when configuring m...

Страница 115: ...tion Download You can obtain software and manuals from one of the following URLs For customers in North America go to the following web site U www epson com support For customers in other countries go to the following web site U www epson biz com ...

Страница 116: ...ing The Power Supply SW Setting function allows you to disable power on off with the power button Software Settings on page 77 If the buzzer is connected you can set the buzzer to sound while the printer is waiting for the paper removal Software Settings on page 77 Power Supply SW Setting Description Enabled The power button is enabled and the printer can be turned on or off with the button If the...

Страница 117: ... PDF417 two dimensional symbol the following settings are recommended Module height 3 to 5 times the module width Vertical size of the symbol approximately 5 mm 0 20 or more The recognition rate of ladder bar codes and two dimensional symbols may vary depending on widths of the modules print density environmental temperature type of paper and characteristics of the reader Make sure to check the re...

Страница 118: ...anges automatically depending on the applied voltage head temperature and print density The maximum print speed may not be reached depending on the data transmission conditions and combination of commands When the printing speed fluctuates or intermittent printing occurs due to data transmission conditions variations in print density or white streaks may occur The image quality of barcodes may be ...

Страница 119: ... 1 Japanese ISO 2022 JP Shift_JIS Shift_JIS 2004 Simplified Chinese GB18030 2000 Traditional Chinese Big5 Korean KSC5601 Unicode 2 UTF 8 The number of dots per character Standard mode ANK Font A 12 24 includes 2 dot horizontal spacing ANK Font B 9 17 includes 2 dot horizontal spacing Kanji Font A 24 24 Kanji Font B Japanese 20 24 Korean 16 16 Special Font A 12 24 includes 2 dot horizontal spacing ...

Страница 120: ...d blade cutter Cutting method Partial cut cutting with one point in center left uncut When taking off the cut paper the paper is pulled at the cut position and it may cause line spacing of the next print to partially narrow To prevent the uneven line spacing when printing after paper cutting it is recommended to advance the paper by approximately 1 mm 16 406 inch immediately before printing If the...

Страница 121: ...ide is set If it is set the paper width is set to 58 mm if it is not set the paper width is set to 80 mm You need to change the paper width setting manually only when using 40 mm wide roll paper Once you print on 40 or 58 mm wide roll paper do not change to a wider paper change from 40 to 58 or 80 mm or change from 58 to 80 mm If you do so the following problems may occur The printout is faint The...

Страница 122: ... end of paper on the printed surface use ink that does not adversely affect the printing and thermal head Even when using labels that has glue on its entire surface use one that has no glue in the range of 1 mm or more from the paper edge To ensure good print quality it is recommended to set the print density Software Settings on page 77 according to the paper to be used It is recommended that you...

Страница 123: ... 80 mm wide paper 9023 1274 Lane Coated 6 rolls 9023 1253 Lane Coated 12 rolls For the certified roll paper model number please check Epson Certified Media List for Thermal Receipt Printers from the website below www epson biz com Paper type Base Paper Glue type Manufacturer Plain thermal paper TF50KS EY NIPPON Paper Industries Co Ltd Liner free label paper 150PLS LST Glued entirely or strong adhe...

Страница 124: ... combination in the table below Measure the reflectance on the back non printing side of the paper For measuring the reflectance use Macbeth reflectance meter PCM II filter D or an equivalent meter Pre printing is not allowed in the range of 15 mm from the paper edges Reflectance of black mark 1 17 or more 16 or more 15 or more 14 or more 13 or more Reflectance of a part without black mark 2 90 or...

Страница 125: ...eprinted thermal paper When using preprinted thermal paper perform preprinting according to the conditions recommended by the paper manufacturer ink type printing conditions etc and confirm in advance that there are no printing defects reduced printing density or other problems with the thermal paper 40 mm wide paper 58 or 80 mm wide paper Front printing side Front printing side Preprinting is pro...

Страница 126: ...mm wide paper 80 mm wide paper 39 5 0 5 mm 35 0 mm 280 dots 2 15 mm 2 35 mm 0 125 mm Dot No 280 Dot No 1 0 125 mm 57 5 0 5 mm 52 5 mm 420 dots 2 65 mm 2 35 mm Dot No 420 Dot No 1 79 5 0 5 mm 72 mm 576 dots 2 65 mm 4 85 mm Dot No 576 Dot No 1 0 125 mm ...

Страница 127: ...r jams and to ensure print quality it is recommended to feed the paper at least 1 mm after paper cutting Printing position and cutting position will change according to the paper type and software settings Software Settings on page 77 The values are design center values for the location of the structure and are different from the top margin values Autocut position Approx 36 0 mm Approx 14 0 mm Eme...

Страница 128: ...phics 384 KB Area for downloaded graphics 208 KB Area for user NV memory 1 KB Power supply PS 190 power supply with the AC adapter Operating voltage DC 24 V 7 Current consumption 24V 25 C standard print density Operating Approx 1 8 A on average When print ratio is approximately 18 Font A 48 characters mode Printing ASCII characters repeating 20h to 7Fh in 30 lines paper feed 5 lines Autocut Standb...

Страница 129: ...ccidental failure period MCBF Print 70 million lines Indicates overall mean time between failures including wear and accidental failures over a product life of 20 million lines of print Print 35 million lines Indicates overall mean time between failures including wear and accidental failures over a product life of 10 million lines of print Reliability varies depending on the paper used For details...

Страница 130: ... no visual or operational problems on the exterior or interior When unpacked Height 5 cm 1 97 Orientation Lift one edge and release it for all 4 edges After being dropped while not operating there should be no visual or operational problems on the exterior or interior Noise Operating Approx 52 dB ANSI bystander position Note The above noise value is based on Epson evaluation conditions Noise varie...

Страница 131: ...installed Vertically External dimensions wide x depth x height When installed vertically 140 x 148 5 x 207 mm 5 52 x 5 85 x 8 15 inch When installed horizontally 140 x 205 x 151 mm 5 52 x 8 07 x 5 95 inch including rubber feet Weight Approx 1 9 kg excluding paper weight Unit mm ...

Страница 132: ...132 Appendix When installed Horizontally Unit mm ...

Страница 133: ...USB self power supply function Current consumed by USB bus 2 mA USB packet size with full speed connection USB bulk OUT TM 64 bytes USB bulk IN TM 64 bytes USB device class Both USB vendor defined class and USB printer class are supported To set the USB device class see Software Settings on page 77 USB vendor defined class USB printer class Vendor ID 04B8h 04B8h Product ID 0202h 0E2Ah String Descr...

Страница 134: ...play and EpsonNet Config Web version SNMP ENPC Used in setting and monitoring DHCP APIPA Used in automatic setting for the IP address and so on Item Initial settings IP address acquisition Automatic APIPA Disabled arp ping Disabled Socket Timeout 90 seconds Community name 1 Read Only Fixed at public Community name 2 Read Write Unavailable SNMP IP Trap 1 Disabled SNMP IP Trap 2 Disabled Communicati...

Страница 135: ...n 2 4 GHz IEEE802 11a 5 GHz IEEE802 11n 5 GHz IEEE802 11ac 5 GHz Security Security can be selected from among the following WPA PSK AES WPA2 Personal WPA2 Enterprise Port type TCP communication port for direct printing Port number 9100 Port communication direction bidirectional Max simultaneous connections 6 Number of connections for which printing is available 1 occupied until the connection is r...

Страница 136: ...ion of the printer in combination with all the Wireless LAN units is not guaranteed Especially in the ad hoc mode the printer may not operate normally depending on the combination of the device to connect with Be sure to carry out evaluation of the operation before use Notes on use When you initialize or change the printer settings the printer is reset to reflect the settings It may take about 1 m...

Страница 137: ...bps bits per second Select one of the following with DIP switch 1 7 1 8 4800 9600 19200 38400 bps Select one of the following with commands 2400 4800 9600 19200 38400 57600 115200 bps Parity check Select one of the following with DIP switch 1 5 Yes No Parity selection Select one of the following with DIP switch 1 6 Even Odd Stop bit 1 or more bits However the stop bit for data transfer from the pr...

Страница 138: ... ms or more 7 SG Signal ground 20 DTR Output 1 When DTR DSR control is selected this signal indicates whether the printer is BUSY SPACE status Indicates that the printer is ready to receive data MARK status Indicates that the printer is BUSY Set BUSY conditions with DIP switch 2 1 2 When XON XOFF control is selected the signal indicates that the printer is properly connected and ready to receive d...

Страница 139: ... receive buffer is released from the buffer full state Transmit Transmit 3 When the printer switches from offline to online Transmit 4 When the printer recovers from an error using some ESC POS commands Transmit XOFF 5 When the receive buffer becomes full Transmit Transmit 6 When the printer switches from online to offline Transmit CAUTION When the printer goes from offline to online and the recei...

Страница 140: ...tooth can be used are limited Since notes are provided for each country check the sheet supplied with the product Setting Contents Setting Items Initial Settings Bluetooth communication settings Bluetooth passkey 0000 Bluetooth device name TM L100_xxxxxx Where xxxxxx is the last six digits in the serial number Bundle Seed ID TXAEAV5RN4 Enable Disable auto reconnect to iOS device 1 Enable Bluetooth...

Страница 141: ...vice that stopped using the printer the connection will just be restored when the printer is restarted For instruction on how to enable or disable the auto reconnect feature see Interface Setup Mode Interface Setup on page 98 Auto Reconnect Feature Enabled Disabled Printer operations when Bluetooth is disconnected Perform the following reconnection sequence Reconnection sequence 1 The printer trie...

Страница 142: ...g the optional Wireless LAN unit with 2 4 GHz may disrupt Bluetooth communication or printing 5 GHz Wi Fi is recommended when using Wi Fi with Bluetooth Notes when communicating with Android devices The printer cannot connect to Android 2 3 and 2 3 2 When communicating with Android 2 3 3 or later versions communicate through an insecure connection When connecting an Android device to the USB conne...

Страница 143: ...ature is not enabled you need to reconnect from the Bluetooth settings screen on the iOS device When using the SDK from Epson this connection process is not necessary NFC Tag Transmission standard ISO14443 A Frequency 13 56 MHz Memory 144 byte Transmission distance Approximately 10 mm from the NFC installation location The transmission distance is an estimate that depends on our experiment conditi...

Страница 144: ...144 Appendix Character Code Tables Refer to the following URL regarding the character code table U www epson biz com pos reference charcode ...

Страница 145: ...an those above cannot be used Barcode scanners with USB HID interface or with CDC ACM interface can be used To use a barcode scanner set the scanner suffix delimiter to CR carriage return code Data cannot be obtained using any other settings Secondary connection Direct connection TM L100 Extension cable of OT WL06 Barcode scanner DM D30 DM D70 Optional extension cable OT UL30 Wireless LAN unit of ...

Отзывы: