background image

Maintenance

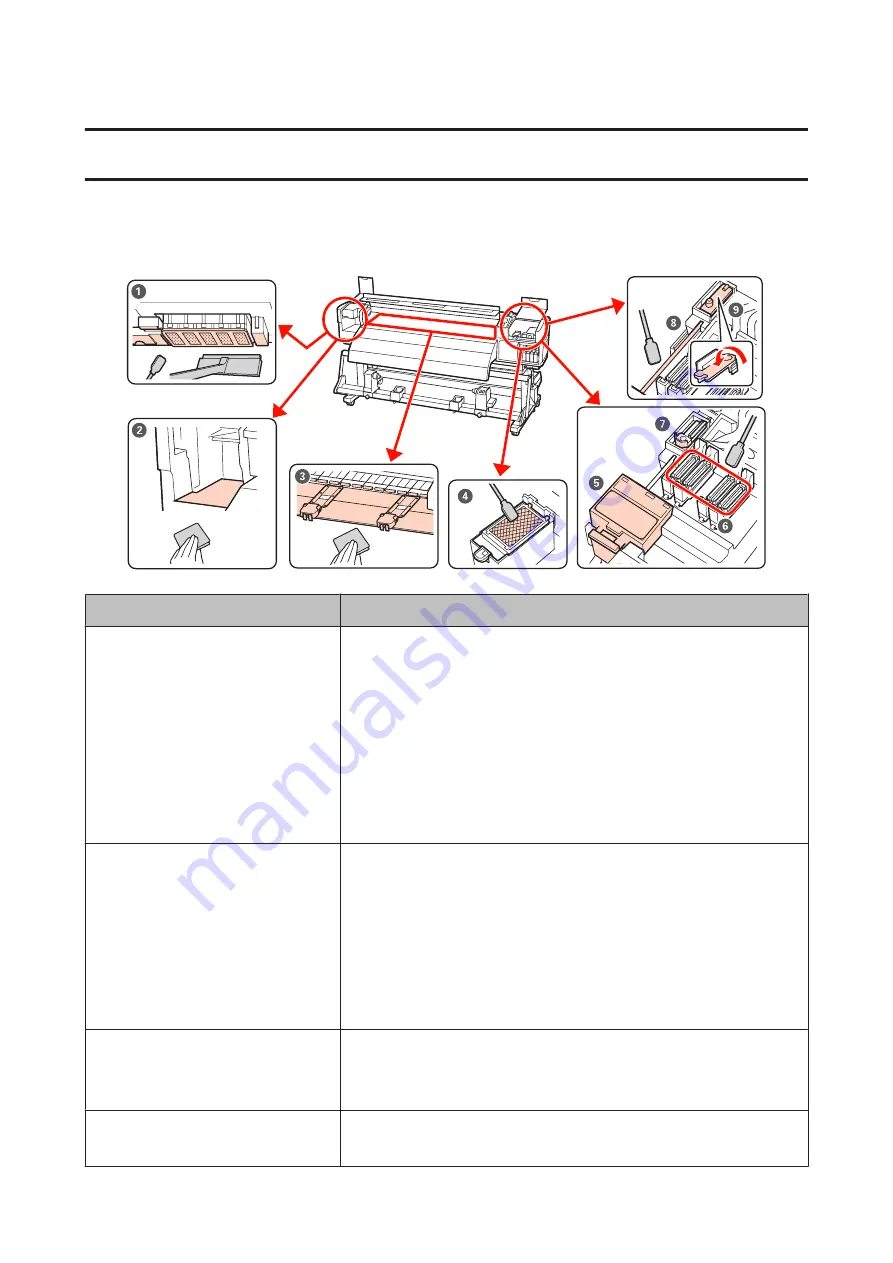
Cleaning Parts and Timings

When to perform

Component to be cleaned

Daily (at the end of every workday)

A

 Around the Print Head

U


“Cleaning Around the Print Head (Daily)” on page 30

E

 Rear of wiper cleaner

F

 Caps

G

 Wipers (rubber part)

U


“Cleaning Around the Caps (Daily)” on page 33

You can check the procedure in a video on YouTube.

U


“Video Manuals” on page 2

Once every two weeks

H

Wiper rail

U


“Cleaning the Wiper Rail (Once Every Two Weeks)” on page 39

I

Entire wiper and attachment point

U


“Cleaning the Entire Wiper and Attachment Point (Once Every Two Weeks)” on

page 37

You can check the procedure in a video on YouTube.

U


“Video Manuals” on page 2

From once a week to once a month
(depending on the condition)

B

 Left-side maintenance cover interior

C

 Platen heater, pressure rollers, media holding plates

U


“Cleaning Inside the Printer (Once a week to once a month)” on page 39

When ink stains, lint, and dust are adhered

D

 Flushing pad

U


“Cleaning the Flushing Pad (When It Is Dirty)” on page 41

EPSON SC-S70600 series/SC-S50600 series     Operator's Guide

Maintenance

25

Содержание SURECOLOR SC-S30670

Страница 1: ...4129728 00 BK cover Front 2014 Seiko Epson Corporation All rights reserved Printed in XXXXXX Operator s Guide ...

Страница 2: ...ageresultingfromelectromagneticinterferencethatoccursfromtheuseofanyinterfacecables other than those designated as Epson Approved Products by Seiko Epson Corporation EPSON and EPSON EXCEED YOUR VISION or EXCEED YOUR VISION and their logos are registered trademarks or trademarks of Seiko Epson Corporation Microsoft Windows and Windows Vista are registered trademarks of Microsoft Corporation Apple M...

Страница 3: ...nt Head Daily 30 Cleaning Around the Caps Daily 33 Cleaning a wiper rubber part daily 33 Cleaning caps daily 33 Cleaning the wiper cleaner daily 35 Cleaning the Entire Wiper and Attachment Point Once Every Two Weeks 37 Cleaning the Wiper Rail Once Every Two Weeks 39 Cleaning Inside the Printer Once a week to once a month 39 Cleaning the Flushing Pad When It Is Dirty 41 Cleaning Check Sheet 43 Shak...

Страница 4: ...the Epson video manual YouTube channel Refer to these for useful information Follow the steps below to view the video manuals A Access YouTube http youtube com B Enter EpsonVideoManuals LFP inthesearch field at the top of the screen C Click Epson Video Manuals LFP from the search results D Select the video you want to view from the playlists If the subtitles are not displayed when you play the vid...

Страница 5: ... Airflow vents U LAN port D Roll core holder M Waste ink bottle holder V USB port E Tensioner media guide N Adjuster W Maintenance cover right F Tensioner O Waste ink bottle X Media loading lever G Roll core holder locking screw P Waste ink tube Y Alert lamp H Roll support Q Ink cartridges Z Control panel I Auto switch R Lock levers a Front cover EPSON SC S70600 series SC S50600 series Operator s ...

Страница 6: ... Media holding plates F Platen heater I Wiper C Cutter groove G Wiper cleaner J Flushing pad D Pressure rollers high Back A Drive switch D Lift lever G Handle B Roll holder E Pre heater C Roll holder fixing screw F Roll support EPSON SC S70600 series SC S50600 series Operator s Guide Part Names 4 ...

Страница 7: ...burns Because the media is heavy it should not be carried by one person Be careful not to trap your hands or fingers when opening or closing the front cover Failure to observe this precaution could result in injury Do not rub your hands along the edges of the media The edges of the media are sharp and can cause injury Load the media just before printing Thepressure rollers maycreasemedialeftinthep...

Страница 8: ...utions when positioning media to ensure that the positioning of pressure rollers is appropriate for the media width Ensure that the left edge of the media always passes within the range of A The right edge of the media must pass within the squares of B through H according to the media width Only when media except for transparent or milky white film is loaded or when not performing ink layering EPS...

Страница 9: ...use depends on the media width When transparent or milky white film is loaded or during ink layering Use high pressure rollers Note Iflowpressurerollersareusedwhenloadingtransparentormilkywhitefilm thepressurerollersmayleavetracesinthe print area If low pressure holders are used during ink layering ink layering is not performed correctly EPSON SC S70600 series SC S50600 series Operator s Guide Bas...

Страница 10: ...e P button and then wait until Load media is displayed on the screen B C Whileholdingthetabsofthemediaholdingplate on both sides move the plate out of the way toward both edges of the platen D cImportant If the right holder handle shaft is not visible rotate the handle forward until it stops The mediacannotbeproperlyloadedifthehandle shaft is not visible E EPSON SC S70600 series SC S50600 series O...

Страница 11: ...e If the label with black squares is not in place affix the label as described in the Setup Guide U Setup Guide G Tighten the locking screw until the screw no longer turns Note If the media roll has an outer diameter that is less than 140mm liftitmanually andloaditto theroll holder The roll core will not reach the holder when raised using the lift lever H Note If the media roll has an outer diamet...

Страница 12: ...inting This couldcausestripesandunevennessinthe print results If the left or right edges of the roll are not properly aligned realign the edges K Rotate the handle until part A in the illustration below is fully inserted cImportant Once part A is hidden do not turn the handle anyfurther Failuretoobservethisprecaution could damage the roll holder If part A is still visible even after the handle has...

Страница 13: ...the edges of the media are not within the square holes Do not attempt to reposition the roll holders while they are inserted in the media N O Hold the center of the media in one hand and pull it to the center of the after heater Do not pull the media with both hands This could cause the media to skew or move around The labels on the after heater are not used when media is loaded If it is adjusted ...

Страница 14: ...f the media within 5 mm of the edges Position the remaining low pressure rollers within the black square labels There may be extraneous lowpressurerollersdependingonthemediawidth Position the extraneous low pressure rollers away from the black square labels Whentransparentormilkywhitefilmisloaded or during ink layering Use high pressure rollers only We recommend positioning the rollers within 10 m...

Страница 15: ...if the sidesoftheprintedmediaaresmudgedor torn S Settings for the Loaded Media The control panel displays the following information once the media is loaded This display can be used to view or change the following two options Remaining Setup On The printer displays the amount of media remaining Off The printer does not display the amount of media remaining When Remaining Setup is On the printer wi...

Страница 16: ... d u buttons to select Change Settings and press the Z button B Select the items you want to change and press the Z button C Select the desired option and press the Z button D Press the y button to display the dialog shown in Step 2 and then press the y button again E Afterconfirmingthatthe settings arecorrect use the d u buttons to select Keep Settings Above and press the Z button F The roll type...

Страница 17: ...nit while it is operating Failure to observe this precaution could result in injury Use a roll core that is longer than the width of the media Thisallowsthemediatobetakenupwithoutprotruding from the core Attach media to the roll core using the paper tape supplied Using the paper tape reduces a take up roll misalignment error When the supplied parts have been completely used purchase commercially a...

Страница 18: ... media and cut at least 25 cm in height from the left and right corners of the media Cutting the media prevents feeding problems such as the left and right corners of media being folded and caught at the start of take up E Insert the roll core onto the right holder EPSON SC S70600 series SC S50600 series Operator s Guide Basic Operations 16 ...

Страница 19: ...th the Printed Side Facing Out on page 17 For information on taking up with printed side in seeU Take upwiththePrintedSideFacing In on page 20 Take up with the Printed Side Facing Out A Cut the paper tape approximately 60 cm in length andpasteitapproximatelyinthecenterof the media using commercially available adhesive tape B Hold down the u button until the tip of the tape reaches the center of th...

Страница 20: ...D Flip the Auto switch to E Lower the tensioner until it slightly touches the paper tape F Continue holding down the d button until both edges of the media reach the paper core and wrap around once or twice G Positiontherightandleftmediatensionerguides until they slightly touch the media EPSON SC S70600 series SC S50600 series Operator s Guide Basic Operations 18 ...

Страница 21: ...ights are added to one side only or the quantities are different on the left and right For media other than banner media always remove the counterweights before printing Failure to do so may cause the print head to strike the media during printing To remove counterweights open them in the same way as when attaching them EPSON SC S70600 series SC S50600 series Operator s Guide Basic Operations 19 ...

Страница 22: ...nter of the pipe C Turnthepapertapeoverfromthefrontoftheroll core and stick using commercially available adhesive tape cImportant Attach the media to the take up roll core with the media in a taut state If media is attached in a loose state the media may move around during take up D Flip the Auto switch to E Lower the tensioner until it slightly touches the paper tape EPSON SC S70600 series SC S50...

Страница 23: ...rapped around once or twice G Positiontherightandleftmediatensionerguides until they slightly touch the media H When using banner media attach three counter weights to both ends of the tensioners EPSON SC S70600 series SC S50600 series Operator s Guide Basic Operations 21 ...

Страница 24: ...r media always remove the counterweights before printing Failure to do so may cause the print head to strike the media during printing To remove counterweights open them in the same way as when attaching them Removing the Take up Roll Cutting Media A Press the button and then the Z button to feed the print end to the cut position cutter groove B EPSON SC S70600 series SC S50600 series Operator s G...

Страница 25: ...nsport the media Follow the instructions in the manual when loading media or roll cores or removing media from the take up roll Dropping media roll cores or take up rolls could result in injury A To prevent the media from sliding off the roll support the roll at its left end B Loosen the left roll core holder fixing screw and remove the roll core holder from the roll C Lower the roll onto the roll...

Страница 26: ...Loosenthe rightroll coreholderfixingscrew and remove the roll core holder from the roll F Lower the roll onto the roll support EPSON SC S70600 series SC S50600 series Operator s Guide Basic Operations 24 ...

Страница 27: ...nce Every Two Weeks on page 39 IEntire wiper and attachment point U CleaningtheEntireWiperandAttachmentPoint OnceEveryTwoWeeks on page 37 You can check the procedure in a video on YouTube U Video Manuals on page 2 From once a week to once a month depending on the condition B Left side maintenance cover interior C Platen heater pressure rollers media holding plates U Cleaning Inside the Printer Onc...

Страница 28: ...ry three months A Flushing pad D Wiper cleaner E Wiper The replacement frequency depends on the status of the consumables Be sure to replace the wiper and the wiper cleaner at the same time See the U User s Guide PDF Other Maintenance When to perform Type When the following message is displayed on the control panel display displayed once every 24 hours Removeandshake MS WHinkcartridges Shaking ink...

Страница 29: ... switched off Pre storage maintenance perform Pre Storage Maint The storage period guideline varies with the model of printer used U Long term Storage Pre storage Maintenance on page 48 When the following message is displayed on the control panel screen Apply secondary carriage rod grease See manual Applying Secondary Carriage Rod Grease U ApplyingSecondaryCarriageRodGrease Whena Message is Displa...

Страница 30: ...ter Use when putting cleaning utensils removed consumables or ink cleaner moved in the container supplied with the printer cImportant If the used cleaning stick etc are directly put on the printer it may cause a deformation from the characteristics of the ink cleaner Soft cloth brush available in the market Use when cleaning inside the printer We recommend an item that is not likely to generate li...

Страница 31: ...angerous Afterreplacingthewasteinkbottleorusingthe ink cleaner wash your hands and gargle thoroughly Remove the media from the printer before proceeding Never touch the belts circuit boards or any parts that do not require cleaning Failure to observe this precaution could result in malfunction or reduced print quality Use only the supplied cleaning sticks or sticks contained in a maintenance kit O...

Страница 32: ... a cup cImportant Do not reuse ink cleaner Using dirty ink cleaner will make staining worse Used ink cleaner cleaning stick and clean room wipers are industrial waste Dispose of them in the same way as for waste inks U Disposal of used consumables on page 46 Store ink cleaner at room temperature out of direct sunlight Afterusingtheinkcleaner besuretofirst close the inner cap and then the outer cap...

Страница 33: ... not touch the parts framed below Failure to observe this precaution could affect print quality Right side print head Left side print head Ink is prone to adhere to the areas indicated by thearrows sobesuretowipeoffanyinkfound If anylintordustiscaught hookitusingthetipofa cleaning stick E Apply ink cleaner to the areas indicated by the arrows to dissolve adhered ink stains cImportant When applying...

Страница 34: ... by moving the cleaning wiper from the inside toward you once cImportant Do not move the cleaning wiper back and forth Otherwise the print head may be damaged Before cleaning After cleaning The following shows that dried and adhered ink lint and dust are cleanly removed If any ink lint or dust remain repeat steps 6 and 7 EPSON SC S70600 series SC S50600 series Operator s Guide Maintenance 32 ...

Страница 35: ...ything Wiper x2 Cap x10 Wiper cleaner x2 Before starting this procedure be sure to read the following U Precautions Regarding Maintenance on page 29 Cleaning a wiper rubber part daily Instead of following this procedure clean the entire wiper and attachment point once every two weeks U Cleaning the Entire Wiper and Attachment Point Once Every Two Weeks on page 37 A Open the right maintenance cover...

Страница 36: ...her caps in the same way If ink adheres as a film to the guide section in front of and behind the caps and lint adheres to the inside of the cap see the next section If nothing adheres to the caps proceed to the following section U Cleaning the wiper cleaner daily on page 35 Cleaning Around the Caps When Dirty Perform the following procedures depending on the amount of dirt When you have finished ...

Страница 37: ...e removed completely using a cleaning stick remove it using tweezers When there is lint or dust in the cap Remove using the tip of the cleaning stick or tweezers Cleaning the wiper cleaner daily A Press the Z button in the control panel and confirm that the wiper has moved to the back EPSON SC S70600 series SC S50600 series Operator s Guide Maintenance 35 ...

Страница 38: ...the part circled in the photo below you should replace the wiper cleaner with a new one U User s Guide PDF D Remove lint or dust that has adhered to the bottom surface of the wiper cleaner using tweezers E Clean the wiper rail once every two weeks If two weeks have not passed since the last time the wiper rail was cleaned proceed to Step 6 U Cleaning the Wiper Rail Once Every Two Weeks on page 39 ...

Страница 39: ...ire Wiper and Attachment Point Once Every Two Weeks Perform the following cleaning instead of cleaning the wipers rubber section U Cleaning a wiper rubber part daily on page 33 If the use of the printer continues while ink clots remain adheredtothebottomoranattachedpartofthewiper it will cause the adhered ink to be spread around the caps which results innozzleclogsthatcannotbe cleared even after r...

Страница 40: ...U Using Ink Cleaner on page 30 F Wipe off any ink that has hardened at the bottom of the wiper with the cleaning stick G Wipe off any ink that has hardened at the wiper attachment point with the cleaning stick H When you have finished cleaning place the wiper on the attachment point and press down until you hear a click When you have finished cleaning one wiper return to step 3 and clean the other...

Страница 41: ...es clean the other wiper rails in the same way Next go to Step 6 in Cleaning the wiper cleaner U Cleaning the wiper cleaner daily on page 35 Cleaning Inside the Printer Once a week to once a month Lint dust and ink accumulate on the platen heater pressure rollers and media holding plates Ink on these surfaces may be transferred to the media Furthermore if any accumulated lint or dust is left insid...

Страница 42: ...as been soaked in water and squeezed well Carefully remove lint and dust stuck in the groove of the platen G Wipe lint and dust adhered to the media holding plates using a soft cloth that has been soaked in water and squeezed well cImportant When media with glue has been used wipe awayglueusingadiluted neutraldetergent If glue from the media adheres to therear side of the plates it may result in t...

Страница 43: ...re starting this procedure be sure to read the following U Precautions Regarding Maintenance on page 29 A Position the print head for maintenance purposes U Moving the Print Head on page 29 B After the print head moves to the left end of the printer open the right maintenance cover C Dampen the cleaning stick with ink cleaner Use new cleaning stick and ink cleaner U Using Ink Cleaner on page 30 D ...

Страница 44: ...ew one U User s Guide PDF E Close the maintenance cover and press the Z button twice Themenuswillclosewhen theprintheadreturns to its normal position Disposing of used ink cleaner and cleaning stick U Disposal of used consumables on page 46 EPSON SC S70600 series SC S50600 series Operator s Guide Maintenance 42 ...

Страница 45: ...ge 30 E G Around caps U Cleaning Around the Caps Daily on page 33 Once every two weeks H Wiper rail U Cleaning the wiper cleaner daily on page 35 I Entire wiper U CleaningtheEntireWiperand Attachment Point Once Every Two Weeks on page 37 Once a week to once a month B C Inside U Cleaning Inside the Printer Onceaweektoonceamonth on page 39 When dirty D Flushing pad U Cleaning the Flushing Pad When I...

Страница 46: ... the ink expended warning is left displayed the print head or other parts may be damaged If an ink cartridge is expended while printing you can continue printing after replacing the ink cartridge However when replacing ink during a print job you may see a difference in color depending on the drying conditions The following procedure explains how to replace an ink cartridge and a cleaning cartridge...

Страница 47: ...trol panel Prepare empty waste ink bottle Replace waste ink bottle and press Z Leave the waste ink in the waste ink bottle for disposal do not transfer it to another container cImportant During printing or while the printer is running the operations shown below do not remove the waste inkbottleunlessinstructedtodosobytheon screen instructions Failure to observe this precaution could cause ink to l...

Страница 48: ...k Keep the lid in a safe place do not throw it out C Press the Z button D Check again to confirm that a new waste ink bottle has been installed correctly Press the Z button to reset the waste ink counter cImportant Be sure to confirm that the waste ink tube is inserted in the mouth of the waste ink bottle Ink will spill onto the surrounding area if the tube is not inserted in the bottle Disposalof...

Страница 49: ...bottle U Disposing of Waste Ink on page 45 C Ink cartridge U Replacement procedure on page 44 Once every three months Be sure to replace the wiper and the wiper cleaner at the same time D Wiper E Wiper cleaner U User s Guide PDF F Flushing pad U User s Guide PDF When the plates are deformed or damaged A Media holding plates U User s Guide PDF EPSON SC S70600 series SC S50600 series Operator s Guid...

Страница 50: ...period Maintenance colors Cartri dges 2 weeks or more All Nozzles all colors 8 SC S50600 series 5C Mode Standard unused period Maintenance colors Cartri dges 7 to 20 days WH 2 3 weeks or more All Nozzles all colors 10 If the storage interval is short you can perform Pre Storage Maint for spot color ink only SC S50600 series 4C Mode Standard unused period Maintenance colors Cartri dges 3 weeks or m...

Страница 51: ...U User s Guide PDF Applying Secondary Carriage Rod Grease When a Message is Displayed If Apply secondary carriage rod grease See manual is displayed on the screen of the control panel grease using the grease kit supplied with the printer Notes on applying grease The secondary carriage rod is rod A Make sure you do not touch the B rod main carriage rod with the grease tools during this operation Th...

Страница 52: ...o the container so that it is submerged in the grease and then rotate 2 to 3 times to apply the appropriate amount of grease before removing the stick 2 Apply the grease to the pad at the end of the grease tool G Hold the grease tool against the secondary carriage rod and smoothly slide it twice from one end to the other and back again as shown in Step 3 H Remove the stained pad and then store the...

Страница 53: ...w T7134 Light Cyan T7135 Light Magenta T7136 Light Black T7137 Orange 2 T7138 Orange Plus 2 T7139 White T713A Metallic Silver T713B SC S70610 Ink cartridges Black T7141 Cyan T7142 Magenta T7143 Yellow T7144 Light Cyan T7145 Light Magenta T7146 Light Black T7147 Orange 2 T7148 Orange Plus 2 T7149 White T714A Metallic Silver T714B EPSON SC S70600 series SC S50600 series Operator s Guide Information ...

Страница 54: ...T715A Metallic Silver T715B SC S70680 Ink cartridges Black T7161 Cyan T7162 Magenta T7163 Yellow T7164 Light Cyan T7165 Light Magenta T7166 Light Black T7167 Orange 2 T7168 Orange Plus 2 T7169 White T716A Metallic Silver T716B SC S50600 Ink cartridges Black T6871 Cyan T6872 Magenta T6873 Yellow T6874 White T713A EPSON SC S70600 series SC S50600 series Operator s Guide Information on Maintenance It...

Страница 55: ...inter behavior Information about non genuine ink levels may not be displayed and use of non genuine ink is recorded for possible use in service support 2 When switching the Orange ink type see the Using Orange Ink PDF to perform the operations correctly If the operations are notperformed correctly and a different type of Orange ink is installed an erroroccursandthe printer cannot be used UUsing Or...

Страница 56: ...th the printer Cleaning Wiper S090012 Identical to the maintenance kit items supplied with the printer Cleaning Stick S090013 Clean Room Wiper 1 S090016 Flushing Pad 2 S090014 Wiper Kit 2 S090015 Wiper and wiper cleaner set identical to items supplied with the printer 1 Not available for purchase in some countries and regions We recommend BEMCOT M 3II by Asahi Kasei Corporation when purchasing com...

Отзывы: