background image

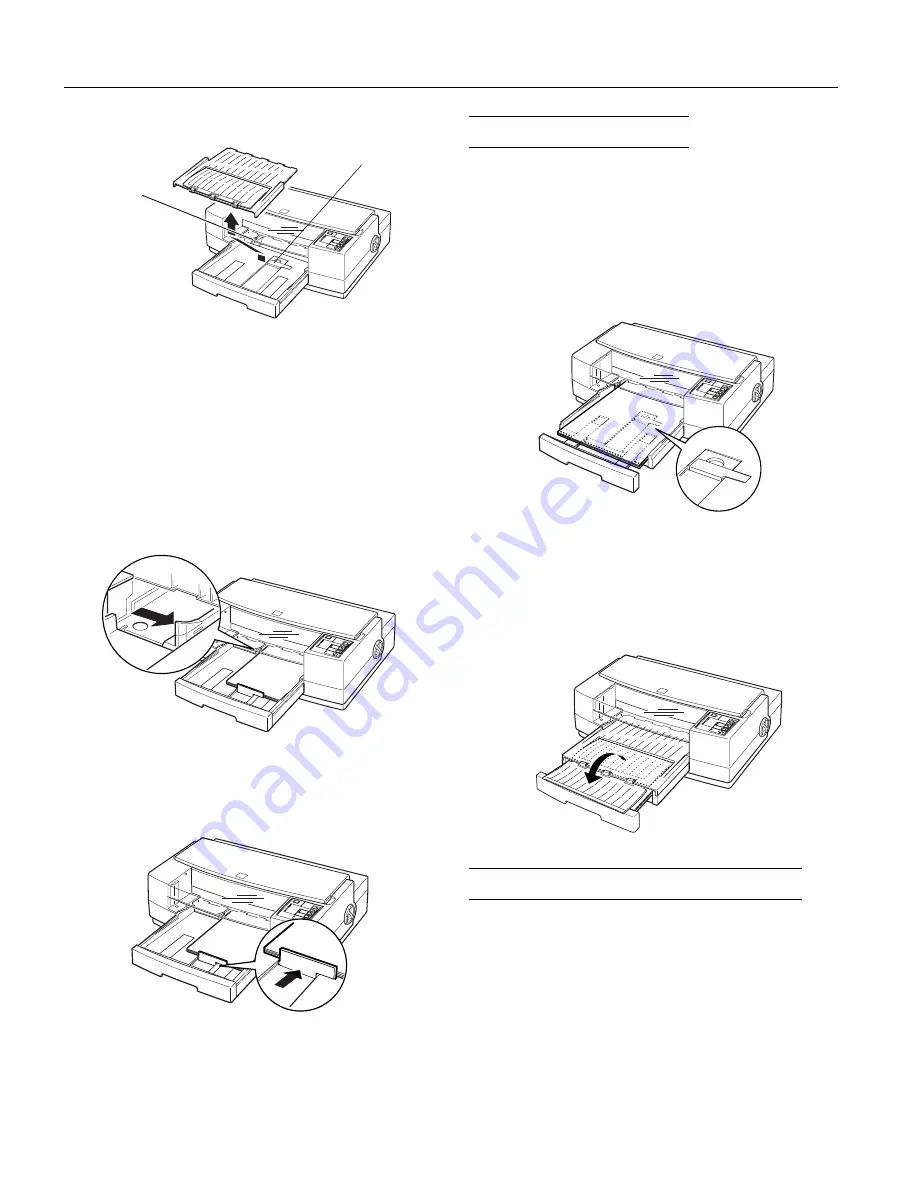
1. Remove the output tray from the top of the paper tray. 

2. Slide the left edge guide inside the paper tray to the left as 

far as it will go.

3. Flip up the rear edge guide and slide it toward you as far as 

it will go.

4. Fan a stack of paper; then tap it on a flat surface to even the

edges.

5. Load the stack of paper, printable side down, so that its 

right edge rests against the right side of the paper tray.
Slide the stack into the tray until you feel some resistance.
Then slide the left edge guide against the left edge of the
paper as shown below.

You can load up to 100 sheets of plain bond paper, but do 
not load paper above the arrow mark on the left edge
guide.

6. Slide the rear edge guide against the rear edge of the paper.

7. Place the output tray on top of the paper tray.

Loading Oversized Paper 

If you are loading paper that is larger than the paper tray,
you need to pull out the paper tray extension. Follow these
steps:

1.  Remove the output tray and remove any paper in the

paper tray.

2. The paper tray extension acts as the rear edge guide, so 

make sure the built-in rear edge guide is folded down as
shown in the illustration below.

3. Gently pull the extension out using both hands—one to 

hold the paper tray in position and the other to pull out
the extension.

4. Load the stack of paper in the tray and then slide in the

extension until it meets the edge of the paper stack.

5. Replace the output tray and fold out its extension.

Using Special Papers and Other Media 

This section explains how to use and load special coated
paper, glossy paper, transparencies, and envelopes in the
printer. When using these special types of media, keep the
following in mind:

Use special coated paper and glossy papers within one
year of purchase. Use transparencies within six months.

Do not touch the printable surface of the paper. The
moisture and oils on your hands can reduce print quality.
Hold sheets by their edges. 

rear edge guide

left edge
guide

paper tray
extension 

EPSON Stylus Pro and Pro XL

EPSON Stylus Pro and Pro XL-10

8/1/95

Ink Jet Printers

Содержание Stylus Pro - Stylus Color Pro Ink Jet Printer

Страница 1: ...60 inch increments using control codes Character tables 1 Italic and 20 graphics character tables Character sets 14 International and 1 legal character sets Paper Note Since the quality of any particular brand or type of paper may be changed by the manufacturer at any time EPSON cannot guarantee the use of any particular brand or type of paper Always test samples of paper stock before purchasing l...

Страница 2: ...ing B S041069 Special coated paper for 720 dpi printing Super A3 B S041060 Special coated paper for 360 dpi printing Letter S041066 Special coated paper for 360 dpi printing Super A3 B S041065 Special coated paper for 360 dpi printing A3 S041072 High quality glossy paper Letter S041074 High quality glossy paper Super A3 B S041073 High quality glossy paper A3 S041075 High quality glossy paper B S04...

Страница 3: ...epth 20 9 inches 530 mm Height 7 2 inches 182 mm Weight 16 7 lb 7 5 kg Stylus Pro XL Width 22 8 inches 580 mm Depth 23 5 inches 597 mm Height 7 2 inches 182 mm Weight 22 1 lb 10 kg Electrical Input voltage range 103 5 to 132 V Rated frequency range 50 to 60 Hz Input frequency range 49 5 to 60 5 Hz Rated current 0 6 A Power consumption Approx 20 W during self test LQ at 10 cpi Environmental Tempera...

Страница 4: ...ulse width must be more than 50 µs at the receiving terminal 32 ERROR OUT This signal level goes LOW when the printer 1 Is out of paper 2 Is in an error state 3 Has no ink cartridges installed Signal pin Return pin Signal Direction Description 33 GND Same as for pins 19 30 34 NC Not used 35 5 V OUT Pulled up to 5 V through 1 KΩ resistance 36 NC Not used Notes The column heading Direction refers to...

Страница 5: ...tch Last font selected on control panel Vertical tab position Cleared Horizontal tab positions Every eight characters Font selection Last font selected on control panel Item Default setting Special printing effects Cancelled except condensed and economy printing User defined character set Hardware control panel initialization cleared Software initialization deselected only Graphic mode assignment ...

Страница 6: ...r troubleshooting analysis Default setting mode Operate Economy Condensed Enters the Default setting mode Note To exit the hex dump or Default setting mode press the Pause button and then the Operate button to turn off the printer Reset printer Alt Pause Clears the printer s buffer and resets the printer settings to their factory defaults Hold down both buttons for about 5 seconds Black print head...

Страница 7: ...age containing accents symbols or other characters not available in the U S A character table change to a different character table To turn on Default setting mode and print instructions turn off the printer Then hold down the Economy Condensed button while you turn the printer back on Follow the instructions that describe how to change the default settings by pressing the buttons on the control p...

Страница 8: ...d when the printer has been on for a while without being used or when you turn it on after it has been off for a while You may sometimes need to manually activate a cleaning cycle to clean the print heads if you notice a decline in print quality Note When you need to replace ink cartridges be sure to use only genuine EPSON ink cartridges and do not refill them Other products may cause damage to yo...

Страница 9: ...pattern you selected 9 If the lines are not aligned press Tab to move to Re Align then press Enter to repeat the calibration 10 When you are satisfied with the alignment press Enter to select Done Using a Macintosh Follow these steps to calibrate the printer using a Macintosh 1 Open the Stylus COLOR folder and double click Bi D Calibration Utility 2 You see a prompt asking you to choose the interf...

Страница 10: ... steps 1 Remove the output tray and remove any paper in the paper tray 2 The paper tray extension acts as the rear edge guide so make sure the built in rear edge guide is folded down as shown in the illustration below 3 Gently pull the extension out using both hands one to hold the paper tray in position and the other to pull out the extension 4 Load the stack of paper in the tray and then slide i...

Страница 11: ...nside the paper tray to the left as far as it will go and slide the rear edge guide toward the front of the printer as far as it will go 3 Fan a stack of paper then tap it on a flat surface to even the edges 4 Before you load paper make sure the printable surface is face down For coated papers the printable side is whiter than the other side For glossy paper and transparencies the printable side i...

Страница 12: ...n it around and reinstall it as shown 3 Insert the paper or envelopes into the paper tray It is best to load sheets of heavy paper one at a time If you re loading envelopes insert them as shown You can load up to 10 envelopes 4 Adjust the rear and left edge guides as shown above so the media feeds straight into the paper path 5 Change the printer driver settings so they are appropriate for the med...

Страница 13: ...se light stops flashing To clean the black print head hold down the Alt button and press Load Eject or Black The cleaning cycle begins and the Pause light flashes The cleaning cycle is over when the Pause light stops flashing 4 Press the Pause button and close the printer cover It can sometimes take up to five cleaning cycles to improve print quality If it does not improve after you clean the prin...

Страница 14: ...utton This cleans the black print head If you replaced the color cartridge hold down the Alt button while you press the Economy Condensed or Color button This cleans the color print head After you clean the print head s skip to step 11 10 If you did not clean the print heads press the Alt button to charge the printer s ink delivery system The Pause light flashes during the process 11 Close the pri...

Отзывы: